Challenge
This Best Practice describes the rationale for matching in real-time along with the concepts and strategies used in planning for and developing a real-time matching solution. It also provides step-by-step instructions on how to build this process using Informatica’s PowerCenter and Data Quality.
The cheapest and most effective way to eliminate duplicate records from a system is to prevent them from ever being entered in the first place. Whether the data is coming from a website, an application entry, EDI feeds messages on a queue, changes captured from a database, or other common data feeds, taking these records and matching them against existing master data that already exists allows for only the new, unique records to be added.
- Benefits of preventing duplicate records include:
- Better ability to service customer, with the most accurate and complete information readily available
- Reduced risk of fraud or over-exposure
- Trusted information at the source
- Less effort in BI, data warehouse, and/or migration projects
Description
Performing effective real-time matching involves multiple puzzle pieces.
- There is a master data set (or possibly multiple master data sets) that contain clean and unique customers, prospects, suppliers, products, and/or many other types of data.
- To interact with the master data set, there is an incoming transaction; typically thought to be a new item. This transaction can be anything from a new customer signing up on the web to a list of new products; this is anything that is assumed to be new and intended to be added to master.
- There must be a process to determine if a “new” item really is new or if it already exists within the master data set. In a perfect world of consistent id’s, spellings, and representations of data across all companies and systems, checking for duplicates would simply be some sort of exact lookup into the master to see if the item already exists. Unfortunately, this is not the case and even being creative and using %LIKE% syntax does not provide thorough results. For example, comparing Bob to Robert or GRN to Green requires a more sophisticated approach.
Standardizing Data in Advance of Matching
The first prerequisite for successful matching is to cleanse and standardize the master data set. This process requires well-defined rules for important attributes. Applying these rules to the data should result in complete, consistent, conformant, valid data, which really means trusted data. These rules should also be reusable so they can be used with the incoming transaction data prior to matching. The more compromises made in the quality of master data by failing to cleanse and standardize, the more effort will need to be put into the matching logic, and the less value the organization will derive from it. There will be many more chances of missed matches allowing duplicates to enter the system.
Once the master data is cleansed, the next step is to develop criteria for candidate selection. For efficient matching, there is no need to compare records that are so dissimilar that they cannot meet the business rules for matching. On the other hand, the set of candidates must be sufficiently broad to minimize the chance that similar records will not be compared. For example, when matching consumer data on name and address, it may be sensible to limit candidate pull records to those having the same zip code and the same first letter of the last name, because we can reason that if those elements are different between two records, those two records will not match.
There also may be cases where multiple candidate sets are needed. This would be the case if there are multiple sets of match rules that the two records will be compared against. Adding to the previous example, think of matching on name and address for one set of match rules and name and phone for a second. This would require selecting records from the master that have the same phone number and first letter of the last name.
Once the candidate selection process is resolved, the matching logic can be developed. This can consist of matching one to many elements of the input record to each candidate pulled from the master. Once the data is compared each pair of records, one input and one candidate, will have a match score or a series of match scores. Scores below a certain threshold can then be discarded and potential matches can be output or displayed.
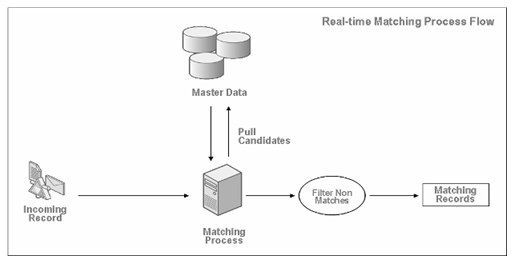
The full real-time match process flow includes:
- The input record coming into the server
- The server then standardizes the incoming record and retrieves candidate records from the master data source that could match the incoming record
- Match pairs are then generated, one for each candidate, consisting of the incoming record and the candidate
- The match pairs then go through the matching logic resulting in a match score
- Records with a match score below a given threshold are discarded
- The returned result set consists of the candidates that are potential matches to the incoming record
Developing an Effective Candidate Selection Strategy
Determining which records from the master should be compared with the incoming record is a critical decision in an effective real-time matching system. For most organizations it is not realistic to match an incoming record to all master records. Consider even a modest customer master data set with one million records; the amount of processing, and thus the wait in real-time would be unacceptable.
Candidate selection for real-time matching is synonymous to grouping or blocking for batch matching. The goal of candidate selection is to select only that subset of the records from the master that are definitively related by a field, part of a field, or combination of multiple parts/fields. The selection is done using a candidate key or group key. Ideally this key would be constructed and stored in an indexed field within the master table(s) allowing for the quickest retrieval. There are many instances where multiple keys are used to allow for one key to be missing or different, while another pulls in the record as a candidate.
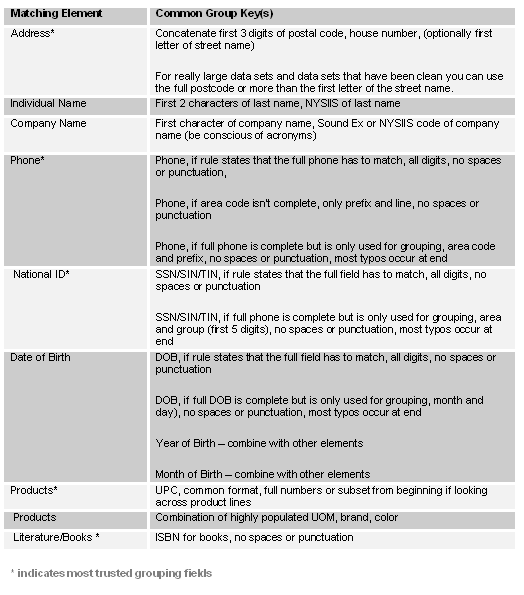
What specific data elements the candidate key should consist of very much depends on the scenario and the match rules. The one common theme with candidate keys is the data elements used should have the highest levels of completeness and validity possible. It is also best to use elements that can be verified as valid, such as a postal code or a National ID. The table below lists multiple common matching elements and how group keys could be used around the data.
The ideal size of the candidate record sets, for sub-second response times, should be under 300 records. For acceptable two to three second response times, candidate record counts should be kept under 5000 records.
Step by Step Development
The following instructions further explain the steps for building a solution to real-time matching using the Informatica suite. They involve the following applications:
- Informatica PowerCenter 8.5.1 - utilizing Web Services Hub
- Informatica Data Explorer 5.0 SP4
- Informatica Data Quality 8.5 SP1 – utilizing North American Country Pack
- SQL Server 2000
Scenario:
- A customer master file is provided with the following structure
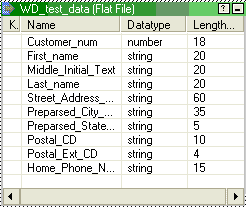
- In this scenario, we are performing a name and address match
- Because address is part of the match, we will use the recommended address grouping strategy for our candidate key (see table1)
- The desire is that different applications from the business will be able to make a web service call to determine if the data entry represents a new customer or an existing customer
Solution:
- The first step is to analyze the customer master file. Assume that this analysis shows the postcode field is complete for all records and the majority of it is of high accuracy. Assume also that neither the first name or last name field is completely populated; thus the match rules we must account for blank names.
- The next step is to load the customer master file into the database. Below is a list of tasks that should be implemented in the mapping that loads the customer master data into the database:
- Standardize and validate the address, outputting the discreet address components such as house number, street name, street type, directional, and suite number. (Pre-built mapplet to do this; country pack)
- Generate the candidate key field, populate that with the selected strategy (assume it is the first 3 characters of the zip, house number, and the first character of street name), and generate an index on that field. (Expression, output of previous mapplet, hint: substr(in_ZIPCODE, 0, 3)||in_HOUSE_NUMBER||substr(in_STREET_NAME, 0, 1))
- Standardize the phone number. (Pre-built mapplet to do this; country pack)
- Parse the name field into individual fields. Although the data structure indicates names are already parsed into first, middle, and last, assume there are examples where the names are not properly fielded. Also remember to output a value to handle of nicknames. (Pre-built mapplet to do this; country pack)
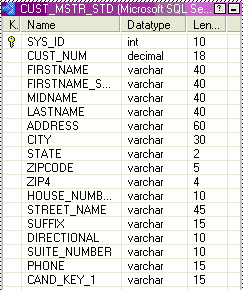
- Once complete, your customer master table should look something like this:
3. Now that the customer master has been loaded, a Web Service mapping must be created to handle real-time matching. For this project, assume that the incoming record will include a full name field, address, city, state, zip, and a phone number. All fields will be free-form text. Since we are providing the Service, we will be using a Web Service Provider source and target. Follow these steps to build the source and target definitions.
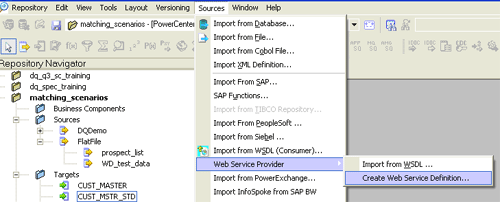
- Within PowerCenter Designer, go to the source analyzer and select the source menu. From there select Web Service Provider and the Create Web Service Definition.
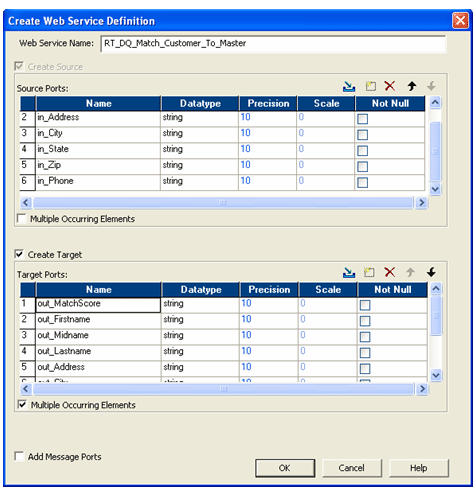
- You will see a screen like the one below where the Service can be named and input and output ports can be created. Since this is a matching scenario, the potential that multiple records will be returned must be taken into account. Select the Multiple Occurring Elements checkbox for the output ports section. Also add a match score output field to return the percentage at which the input record matches the different potential matching records from the master.
- Both the source and target should now be present in the project folder.
- An IDQ match plan must be build to use within the mapping. In developing a plan for real-time, using a CSV source and CSV sink, both enabled for real-time is the most significant difference from a similar match plan designed for use in IDQ standalone. The source will have the _1 and the _2 fields that a Group Source would supply built into it, e.g. Firstname_1 & Firstname_2. Another difference from batch matching in PowerCenter is that the DQ transformation can be set to passive. The following steps illustrate converting the North America Country Pack’s Individual Name and Address Match Plan from a plan built for use in a batch mapping to a plan built for use in a real-time mapping.
- Open the DCM_NorthAmerica project and from within the Match folder make a copy of the “Individual Name and Address Match” plan. Rename it to “RT Individual Name and Address Match”.
- Create a new stub CSV file with only the header row. This will be used to generate a new CSV Source within the plan. This header must use all of the input fields used by the plan before modification. For convenience, a sample stub header is listed below. The header for the stub file will duplicate all of the fields, with one set having a suffix of _1 and the other _2.
IN_GROUP_KEY_1,IN_FIRSTNAME_1,IN_FIRSTNAME_ALT_1,
IN_MIDNAME_1,IN_LASTNAME_1,IN_POSTNAME_1,
IN_HOUSE_NUM_1,IN_STREET_NAME_1,IN_DIRECTIONAL_1,
IN_ADDRESS2_1,IN_SUITE_NUM_1,IN_CITY_1,IN_STATE_1,
IN_POSTAL_CODE_1,IN_GROUP_KEY_2,IN_FIRSTNAME_2,
IN_FIRSTNAME_ALT_2,IN_MIDNAME_2,IN_LASTNAME_2,
IN_POSTNAME_2,IN_HOUSE_NUM_2,IN_STREET_NAME_2,
IN_DIRECTIONAL_2,IN_ADDRESS2_2,IN_CITY_2,IN_STATE_2,
IN_POSTAL_CODE_2
- Now delete the CSV Match Source from the plan and add a new CSV Source, and point it at the new stub file.
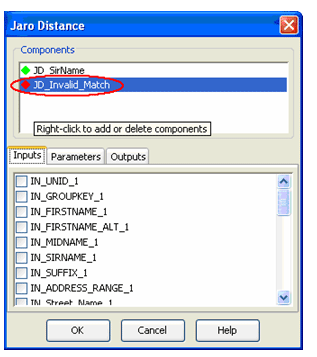
- Because the components were originally mapped to the CSV Match Source and that was deleted, the fields within your plan need to be reselected. As you open the different match components and RBAs, you can see the different instances that need to be reselected as they appear with a red diamond, as seen below.
- Also delete the CSV Match Sink and replace it with a CSV Sink. Only the match score field(s) must be selected for output. This plan will be imported into a passive transformation. Consequently, data can be passed around it and does not need to be carried through the transformation. With this implementation you can output multiple match scores so it is possible to see why two records matched or didn’t match on a field by field basis.
- Select the check box for Enable Real-time Processing in both the source and the sink and the plan will be ready to be imported into PowerCenter.
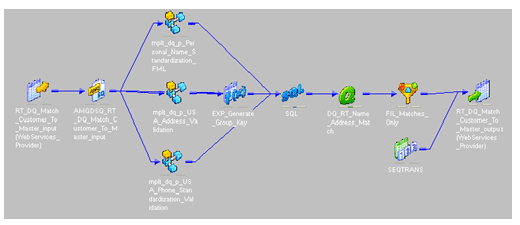
5. The mapping will consist of :
- The source and target previously generated
- An IDQ transformation importing the plan just built
- The same IDQ cleansing and standardization transformations used to load then master data (Refer to step 2 for specifics)
- An Expression transformation to generate the group key and build a single directional field
- A SQL transformation to get the candidate records for the master table
- A Filter transformation to filter those records that match score below a certain threshold
- A Sequence transformation to build a unique key for each matching record returned in the SOAP response
- Within PowerCenter Designer, create a new mapping and drag the web service source and target previously created into the mapping.
- Add the following country pack mapplets to standardize and validate the incoming record from the web service:
- mplt_dq_p_Personal_Name_Standardization_FML
- mplt_dq_p_USA_Address_Validation
- mplt_dq_p_USA_Phone_Standardization_Validation
- Add an Expression Transformation and build the candidate key from the Address Validation mapplet output fields. Remember to use the same logic as in the mapping that loaded the customer master. Also within the expression, concatenate the pre and post directional field into a single directional field for matching purposes.
- Add a SQL transformation to the mapping. The SQL transform will present a dialog box with a few questions related to the SQL transformation. For this example select Query mode, MS SQL Server (change as desired), and a Static connection. For details on the other options refer to the PowerCenter help.
- Connect all necessary fields from the source qualifier, DQ mapplets, and Expression transformation to the SQL transformation. These fields should include:
- XPK_n4_Envelope (This is the Web Service message key)
- Parsed name elements
- Standardized and parsed address elements, which will be used for matching.
- Standardized phone number
- The next step is to build the query from within the SQL transformation to select the candidate records. Make sure that the output fields agree with the query in number, name, and type.
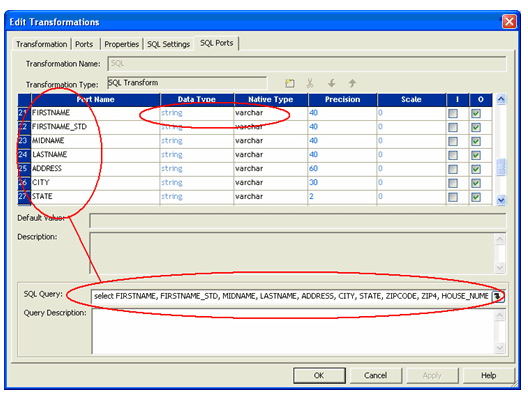
The output of the SQL transform will be the incoming customer record along with the candidate record. These will be stacked records where the Input/Output fields will represent the input record and the Output only fields will represent the Candidate record. A simple example of this is shown in the table below where a single incoming record will be paired with two candidate records:
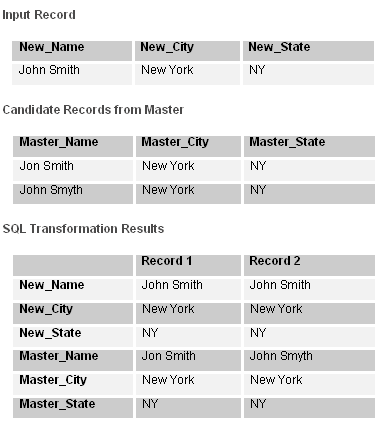
- Comparing the new record to the candidates is done by embedding the IDQ plan converted in step 4 into the mapping through the use of the Data Quality transformation. When this transformation is created, select passive as the transformation type. The output of the Data Quality transformation will be a match score. This match score will be in a float type format between 0.0 and 1.0.
- Using a filter transformation, all records that have a match score below a certain threshold will get filtered off. For this scenario, the cut-off will be 80%. (Hint: TO_FLOAT(out_match_score) >= .80)
- Any record coming out of the filter transformation is a potential match that exceeds the specified threshold, and the record will be included in the response. Each of these records needs a new Unique ID so the Sequence Generator transformation will be used.
- To complete the mapping, the output of the Filter and Sequence Generator transformations need to be mapped to the target. Make sure to map the input primary key field (XPK_n4_Envelope_output) to the primary key field of the envelope group in the target (XPK_n4_Envelope) and to the foreign key of the response element group in the target (FK_n4_Envelope). Map the output of the Sequence Generator to the primary key field of the response element group.
- The mapping should look like this:
- Before testing the mapping, create a workflow.
- Using the Workflow Manager, generate a new workflow and session for this mapping using all the defaults.
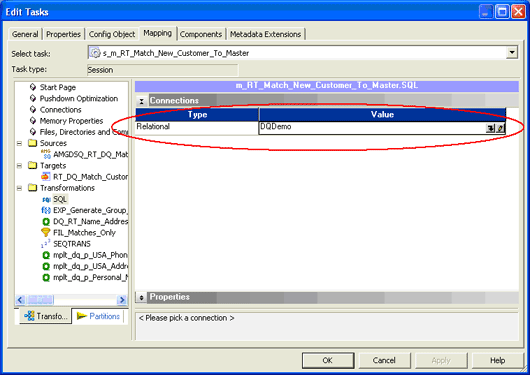
- Once created, edit the session task. On the Mapping tab select the SQL transformation and make sure the connection type is relational. Also make sure to select the proper connection. For more advanced tweaking and web service settings see the PowerCenter documentation.
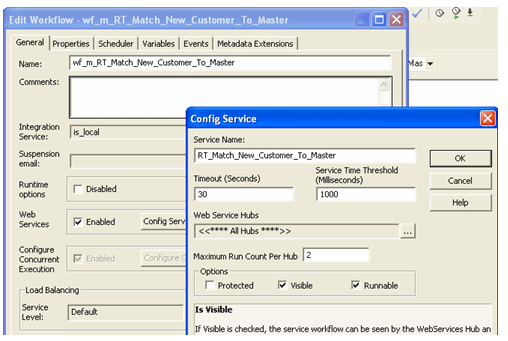
- The final step is to expose this workflow as a Web Service. This is done by editing the Workflow. The workflow needs to be Web Services enabled and this is done by selecting the enabled checkbox for Web Services. Once the Web Service is enabled, it should be configured. For all the specific details of this please refer to the PowerCenter documentation, but for the purpose of this scenario:
- Give the service the name you would like to see exposed to the outside world
- Set the timeout to 30 seconds
- Allow 2 concurrent runs
- Set the workflow to be visible and runnable
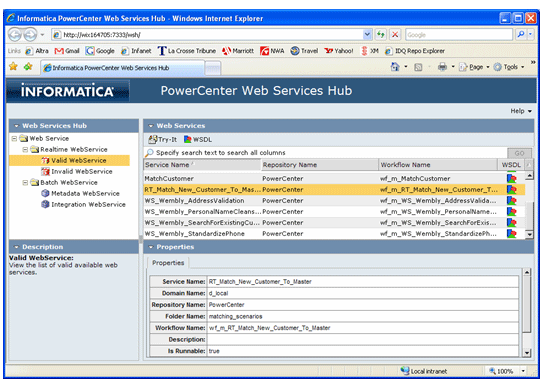
7. The web service is ready for testing
