
-
Manage your Success Plans and Engagements, gain key insights into your implementation journey, and collaborate with your CSMsSuccessAccelerate your Purchase to Value by engaging with Informatica for Customer SuccessAll your Engagements at one place
-
A collaborative platform to connect and grow with like-minded Informaticans across the globeCommunitiesConnect and collaborate with Informatica experts and championsHave a question? Start a Discussion and get immediate answers you are looking forCustomer-organized groups that meet online and in-person. Join today to network, share ideas, and get tips on how to get the most out of Informatica
-
Troubleshooting documents, product guides, how to videos, best practices, and moreKnowledge CenterOne-stop self-service portal for solutions, FAQs, Whitepapers, How Tos, Videos, and moreVideo channel for step-by-step instructions to use our products, best practices, troubleshooting tips, and much moreInformation library of the latest product documents
-
Rich resources to help you leverage full capabilities of our productsLearnRole-based training programs for the best ROIGet certified on Informatica products. Free, Foundation, or ProfessionalFree and unlimited modules based on your expertise level and journeySelf-guided, intuitive experience platform for outcome-focused product capabilities and use cases
-
Library of content to help you leverage the best of Informatica productsResourcesMost popular webinars on product architecture, best practices, and moreProduct Availability Matrix statements of Informatica productsMonthly support newsletterInformatica Support Guide and Statements, Quick Start Guides, and Cloud Product Description ScheduleEnd of Life statements of Informatica productsMonitor the status of your Informatica services across regions
- Velocity
- Strategy
-
Solutions
- Stages
-
More
-
Manage your Success Plans and Engagements, gain key insights into your implementation journey, and collaborate with your CSMsManage your Success Plans and Engagements, gain key insights into your implementation journey, and collaborate with your CSMsAccelerate your Purchase to Value by engaging with Informatica for Customer SuccessAll your Engagements at one place
-
A collaborative platform to connect and grow with like-minded Informaticans across the globeA collaborative platform to connect and grow with like-minded Informaticans across the globeConnect and collaborate with Informatica experts and championsHave a question? Start a Discussion and get immediate answers you are looking forCustomer-organized groups that meet online and in-person. Join today to network, share ideas, and get tips on how to get the most out of Informatica
-
Troubleshooting documents, product guides, how to videos, best practices, and moreTroubleshooting documents, product guides, how to videos, best practices, and moreOne-stop self-service portal for solutions, FAQs, Whitepapers, How Tos, Videos, and moreVideo channel for step-by-step instructions to use our products, best practices, troubleshooting tips, and much moreInformation library of the latest product documents
-
Rich resources to help you leverage full capabilities of our productsRich resources to help you leverage full capabilities of our productsRole-based training programs for the best ROIGet certified on Informatica products. Free, Foundation, or ProfessionalFree and unlimited modules based on your expertise level and journeySelf-guided, intuitive experience platform for outcome-focused product capabilities and use cases
-
Library of content to help you leverage the best of Informatica productsLibrary of content to help you leverage the best of Informatica productsMost popular webinars on product architecture, best practices, and moreProduct Availability Matrix statements of Informatica productsMonthly support newsletterInformatica Support Guide and Statements, Quick Start Guides, and Cloud Product Description ScheduleEnd of Life statements of Informatica productsMonitor the status of your Informatica services across regions
-
Using PowerCenter Labels
Cloud Data Warehouse & Data Lake
Challenge
Using labels effectively in a data warehouse or data integration project to assist with administration and migration.
Description
A label is a versioning object that can be associated with any versioned object or group of versioned objects in a repository. Labels provide a way to tag a number of object versions with a name for later identification. Therefore, a label is a named object in the repository, whose purpose is to be a “pointer” or reference to a group of versioned objects. For example, a label called “Project X version X” can be applied to all object versions that are part of that project and release.
Labels can be used for many purposes:
- Track versioned objects during development
- Improve object query results.
- Create logical groups of objects for future deployment.
- Associate groups of objects for import and export.
Note that labels apply to individual object versions, and not objects as a whole. So if a mapping has ten versions checked in, and a label is applied to version 9, then only version 9 has that label. The other versions of that mapping do not automatically inherit that label. However, multiple labels can point to the same object for greater flexibility.
The “Use Repository Manager” privilege is required in order to create or edit labels, To create a label, choose Versioning-Labels from the Repository Manager.
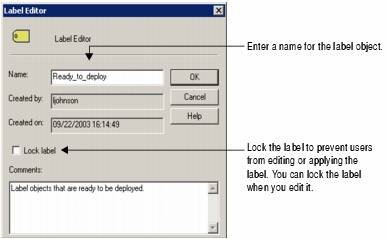
When creating a new label, choose a name that is as descriptive as possible. For example, a suggested naming convention for labels is: Project_Version_Action. Include comments for further meaningful description.
Locking the label is also advisable. This prevents anyone from accidentally associating additional objects with the label or removing object references for the label.
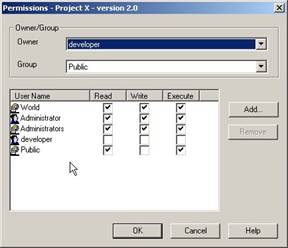
Labels, like other global objects such as Queries and Deployment Groups, can have user and group privileges attached to them. This allows an administrator to create a label that can only be used by specific individuals or groups. Only those people working on a specific project should be given read/write/execute permissions for labels that are assigned to that project.
Once a label is created, it should be applied to related objects. To apply the label to objects, invoke the “Apply Label” wizard from the Versioning >> Apply Label menu option from the menu bar in the Repository Manager (as shown in the following figure).
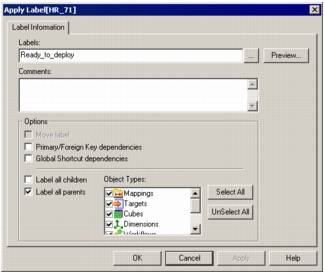
Applying Labels
Labels can be applied to any object and cascaded upwards and downwards to parent and/or child objects. For example, to group dependencies for a workflow, apply a label to all children objects. The Repository Server applies labels to sources, targets, mappings, and tasks associated with the workflow. Use the “Move label” property to point the label to the latest version of the object(s).
Note: Labels can be applied to any object version in the repository except checked-out versions. Execute permission is required for applying labels.
After the label has been applied to related objects, it can be used in queries and deployment groups (see the Best Practice on Deployment Groups). Labels can also be used to manage the size of the repository (i.e., to purge object versions).
Using Labels in Deployment
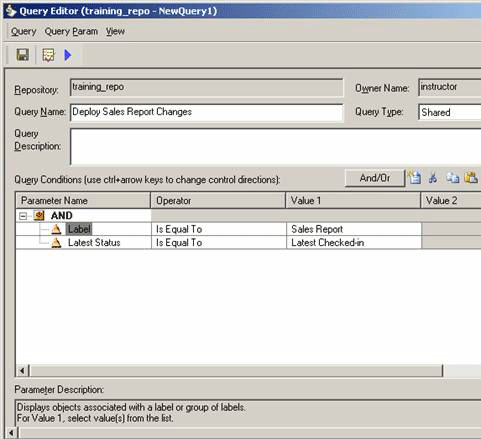
An object query can be created using the existing labels (as shown below). Labels can be associated only with a dynamic deployment group. Based on the object query, objects associated with that label can be used in the deployment.
Strategies for Labels
Repository Administrators and other individuals in charge of migrations should develop their own label strategies and naming conventions in the early stages of a data integration project. Be sure that developers are aware of the uses of these labels and when they should apply labels.
For each planned migration between repositories, choose three labels for the development and subsequent repositories:
- The first is to identify the objects that developers can mark as ready for migration.
- The second should apply to migrated objects, thus developing a migration audit trail.
- The third is to apply to objects as they are migrated into the receiving repository, completing the migration audit trail.
When preparing for the migration, use the first label to construct a query to build a dynamic deployment group. The second and third labels in the process are optionally applied by the migration wizard when copying folders between versioned repositories. Developers and administrators do not need to apply the second and third labels manually.
Additional labels can be created with developers to allow the progress of mappings to be tracked if desired. For example, when an object is successfully unit-tested by the developer, it can be marked as such. Developers can also label the object with a migration label at a later time if necessary. Using labels in this fashion along with the query feature allows complete or incomplete objects to be identified quickly and easily, thereby providing an object-based view of progress.