
-
Manage your Success Plans and Engagements, gain key insights into your implementation journey, and collaborate with your CSMsSuccessAccelerate your Purchase to Value by engaging with Informatica for Customer SuccessAll your Engagements at one place
-
A collaborative platform to connect and grow with like-minded Informaticans across the globeCommunitiesConnect and collaborate with Informatica experts and championsHave a question? Start a Discussion and get immediate answers you are looking forCustomer-organized groups that meet online and in-person. Join today to network, share ideas, and get tips on how to get the most out of Informatica
-
Troubleshooting documents, product guides, how to videos, best practices, and moreKnowledge CenterOne-stop self-service portal for solutions, FAQs, Whitepapers, How Tos, Videos, and moreVideo channel for step-by-step instructions to use our products, best practices, troubleshooting tips, and much moreInformation library of the latest product documents
-
Rich resources to help you leverage full capabilities of our productsLearnRole-based training programs for the best ROIGet certified on Informatica products. Free, Foundation, or ProfessionalFree and unlimited modules based on your expertise level and journeySelf-guided, intuitive experience platform for outcome-focused product capabilities and use cases
-
Library of content to help you leverage the best of Informatica productsResourcesMost popular webinars on product architecture, best practices, and moreProduct Availability Matrix statements of Informatica productsMonthly support newsletterInformatica Support Guide and Statements, Quick Start Guides, and Cloud Product Description ScheduleEnd of Life statements of Informatica productsMonitor the status of your Informatica services across regions
- Velocity
- Strategy
-
Solutions
- Stages
-
More
-
Manage your Success Plans and Engagements, gain key insights into your implementation journey, and collaborate with your CSMsManage your Success Plans and Engagements, gain key insights into your implementation journey, and collaborate with your CSMsAccelerate your Purchase to Value by engaging with Informatica for Customer SuccessAll your Engagements at one place
-
A collaborative platform to connect and grow with like-minded Informaticans across the globeA collaborative platform to connect and grow with like-minded Informaticans across the globeConnect and collaborate with Informatica experts and championsHave a question? Start a Discussion and get immediate answers you are looking forCustomer-organized groups that meet online and in-person. Join today to network, share ideas, and get tips on how to get the most out of Informatica
-
Troubleshooting documents, product guides, how to videos, best practices, and moreTroubleshooting documents, product guides, how to videos, best practices, and moreOne-stop self-service portal for solutions, FAQs, Whitepapers, How Tos, Videos, and moreVideo channel for step-by-step instructions to use our products, best practices, troubleshooting tips, and much moreInformation library of the latest product documents
-
Rich resources to help you leverage full capabilities of our productsRich resources to help you leverage full capabilities of our productsRole-based training programs for the best ROIGet certified on Informatica products. Free, Foundation, or ProfessionalFree and unlimited modules based on your expertise level and journeySelf-guided, intuitive experience platform for outcome-focused product capabilities and use cases
-
Library of content to help you leverage the best of Informatica productsLibrary of content to help you leverage the best of Informatica productsMost popular webinars on product architecture, best practices, and moreProduct Availability Matrix statements of Informatica productsMonthly support newsletterInformatica Support Guide and Statements, Quick Start Guides, and Cloud Product Description ScheduleEnd of Life statements of Informatica productsMonitor the status of your Informatica services across regions
-
Event Based Scheduling
Cloud Data Warehouse & Data Lake
Challenge
In an operational environment, the beginning of a task often needs to be triggered by some event, either internal or external, to the Informatica environment. In the current versions of Informatica PowerCenter, it is achieved through the use of the EventRaise and EventWait within Workflow and Worklet tasks, as well as indicator files.
Description
In the current versions of Informatica PowerCenter, Event-Based scheduling can be achieved through the use of Event-Wait and Event-Raise tasks. These tasks can be used to define task execution order within a workflow or worklet. They can even be used to control sessions across workflows.
An Event-Raise task represents a user-defined event.
An Event-Wait task waits for an event to occur within a workflow. After the event triggers, the PowerCenter Server continues executing the workflow from the Event-Wait task forward.
The following sections describe events that can be triggered by an Event-Wait task.
Pre-Defined Event
A pre-defined event is a file-watch event. For pre-defined events, an Event-Wait task can be used to notify the Integration service to wait for the specified indicator file to appear before continuing with the rest of the workflow. When the indicator file is found, the Integration Service starts the task downstream of the Event-Wait.
Waiting for a Pre-Defined Event
To use a pre-defined event a session, shell command, script, or batch file is needed to create an indicator file. The file must be created or sent to a directory local to the PowerCenter Server. The file can be any format recognized by the PowerCenter Server operating system. It is optional to have PowerCenter Server delete the indicator file after it detects the file, or it can be manually deleted later. The PowerCenter Server marks the status of the Event-Wait task as "failed" if it is required to, but cannot delete the indicator file. Both the indicator file name and the directory path in which the file will arrive must be specified in the Event-Wait task. It is best practice to use, Informatica Process variables ($PMRootDir, $PMSourceFileDir, $PMTargetFileDir, $PMLookupFileDir, etc.) when they can be used instead of absolute paths. Typically it is recommended to neither use a source or target file name as the indicator file name, as target files are created at the beginning of the session execution and a source file could theoretically be deleted before the read is complete.
If you only specify the file name, and not the directory, Workflow Manager looks for the indicator file in the system directory.
For example, on Windows 2008 Server, the system directory is C:/Windows/System32. On UNIX, the Integration Service looks for the indicator file in the current working directory for the Integration Service process. On UNIX this directory would be $INFA_HOME/server/bin.
You can enter the actual name of the file or use Process variables to specify the location of the files. The PowerCenter Server writes the time the file appears in the workflow log.
Follow these steps to set up a pre-defined event in the workflow:
- Create an Event-Wait task and double-click the Event-Wait task to open the Edit Tasks dialog box.
- In the Events tab of the Edit Task dialog box, select Pre-defined.
- Enter the path of the indicator file.
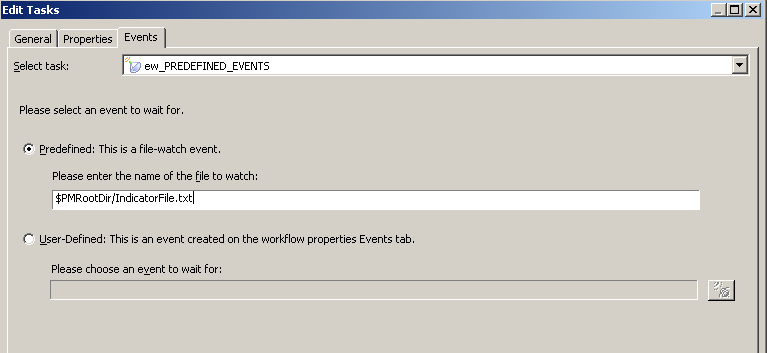
- If you want the PowerCenter Server to delete the indicator file after it detects the file, select the Delete Indicator File option in the Properties tab.
- Click OK.
User-defined Event
A user-defined event is defined at the workflow or worklet level and the Event-Raise task triggers the event at one point of the workflow/worklet. Use an Event-Raise task to specify the location of the user-defined event in the workflow. A user-defined event is a sequence of tasks in the branch from the Start task, leading to the Event-Raise task. If an Event-Wait task is configured in the same workflow/worklet to listen for that event, then the execution will continue from the Event-Wait task forward.
Declaring a User-Defined Event
Declare a user-defined event to use in conjunction with an Event-Raise task.
- In the Workflow Designer, click Workflow > Edit.
- Select the Events tab in the Edit Workflow dialog box.
- Click the Add button to add an event name (event name is not case sensitive).

4. Click OK.
Using the Event-Raise Task for a User-Defined Event
After you declare a user-defined event, use the Event-Raise task to represent the location of the event and to trigger the event.
- A user-defined event is the sequence of tasks in the branch from the Start task to the Event-Raise task.
- On the Event-Raise Properties tab, click the Open button in the Value field to open the Events Browser for user-defined events.

3. Choose an event in the Events Browser.
4. Click OK twice.
The following is an example of using user-defined events:

Assume that you have four sessions that you want to execute in a workflow. You want s_P1 and s_P2 to execute concurrently to save time. You also want to execute s_Q3 after s_P1 completes. You want to execute s_Q4 only when s_P1, s_P2, and s_Q3 complete. Follow these steps:
- Link s_P1 and s_P2 concurrently.
- Add s_Q3 after s_P1.
- Declare an event called P1Q3_Complete in the Events tab of the workflow properties
- In the workspace, add an Event-Raise task er_P1Q3_Complete after s_Q3.
- Specify the P1Q3_Complete event in the Event-Raise task properties. This allows the Event-Raise task er_P1Q3_Complete to trigger the event when s_P1 and s_Q3 complete.
- Add an Event-Wait task ew_P1Q3_Complete after s_P2.
- Specify the P1Q3_Complete event for the Event-Wait task.
- Add s_Q4 after the Event-Wait task ew_P1Q3_Complete. When the PowerCenter Server processes the Event-Wait task ew_P1Q3_Complete, it waits until the Event-Raise task er_P1Q3_Complete triggers P1Q3_Complete before it executes s_Q4.
The PowerCenter Server executes the workflow in the following order:
- The PowerCenter Server executes s_P1 and s_P2 concurrently.
- When s_P1 completes, the PowerCenter Server executes s_Q3.
- The PowerCenter Server finishes executing s_P2.
- The Event-Wait task waits for the Event-Raise task to trigger the event P1Q3_Complete.
- The PowerCenter Server completes Q3_session.
- The Event-Raise task triggers the event, P1Q3_Complete.
- The Informatica Server executes s_Q4 because the event, P1Q3_Complete, has been triggered.
Be sure to take care in setting the links though. If they are left as default and if Q3 fails, the Event-Raise will never happen. Then the Event-Wait will wait forever and the workflow will run until it is stopped. To avoid this, check the workflow option, ‘suspend on error’. With this option, if a session fails, the whole workflow goes into suspended mode and can send an email to notify the developers.
Enabling Past Events

The Enable Past Events property in the Event Wait task can be selected to verify if the event has already occurred.
By default, the Event-Wait task waits for the Event-Raise task to trigger the event, it does not check if the event has already occurred. When 'Enable Past Events' option is chosen, the Integration Service continues executing the next tasks if the event has already occurred.