-
Manage your Success Plans and Engagements, gain key insights into your implementation journey, and collaborate with your CSMsSuccessAccelerate your Purchase to Value by engaging with Informatica for Customer SuccessAll your Engagements at one place
-
A collaborative platform to connect and grow with like-minded Informaticans across the globeCommunitiesConnect and collaborate with Informatica experts and championsHave a question? Start a Discussion and get immediate answers you are looking forCustomer-organized groups that meet online and in-person. Join today to network, share ideas, and get tips on how to get the most out of Informatica
-
Troubleshooting documents, product guides, how to videos, best practices, and moreKnowledge CenterOne-stop self-service portal for solutions, FAQs, Whitepapers, How Tos, Videos, and moreVideo channel for step-by-step instructions to use our products, best practices, troubleshooting tips, and much moreInformation library of the latest product documentsBest practices and use cases from the Implementation team
-
Rich resources to help you leverage full capabilities of our productsLearnRole-based training programs for the best ROIGet certified on Informatica products. Free, Foundation, or ProfessionalFree and unlimited modules based on your expertise level and journeySelf-guided, intuitive experience platform for outcome-focused product capabilities and use cases
-
Library of content to help you leverage the best of Informatica productsResourcesMost popular webinars on product architecture, best practices, and moreProduct Availability Matrix statements of Informatica productsMonthly support newsletterInformatica Support Guide and Statements, Quick Start Guides, and Cloud Product Description ScheduleEnd of Life statements of Informatica productsMonitor the status of your Informatica services across regions
- Solution Accelerators
- Azure SQL Datawarehouse Migration
While enterprises work with massive amounts of data and manage them through Azure SQL Data Warehouse for better data analytics performance, they need to ensure these systems will handle the most sensitive and useful data for their business with enhanced security.
It becomes more challenging when it becomes equally important to attain optimal performance from the analytical systems while moving your journey to the cloud.
This Solution Accelerator will help you drive your migration of on-premises enterprise data warehouse (EDW) workloads using Informatica Enterprise Data Catalog and Intelligent Cloud Services. This document covers the details of Informatica EDC's deployment on Azure, leveraging EDC for Profiling & Data Discovery, and using IICS for Azure SQL DW Data Migration.
This Solution Accelerator will help you drive your migration of on-premises enterprise data warehouse (EDW) workloads using Informatica Enterprise Data Catalog and Intelligent Cloud Services. This document covered the details of Informatica EDC's deployment on Azure, leveraging EDC for Profiling & Data Discovery, and using IICS for Azure SQL DW Data Migration.
Contents


For customers that have been tuning analytics appliances for years, such as Teradata and Netezza, it can seem overwhelming to start the journey towards the cloud. Customers have invested valuable time, skills, and personnel to achieve optimal performance from their analytics systems, containing the most sensitive and useful data for their business. Using Informatica Enterprise Data Catalog and Intelligent Cloud Services (iPaaS), you can accelerate the migration of on-premises enterprise data warehouse (EDW) workloads to Azure.
The following image shows the components and architecture for a small-sized Azure HDInsight cluster deployment:
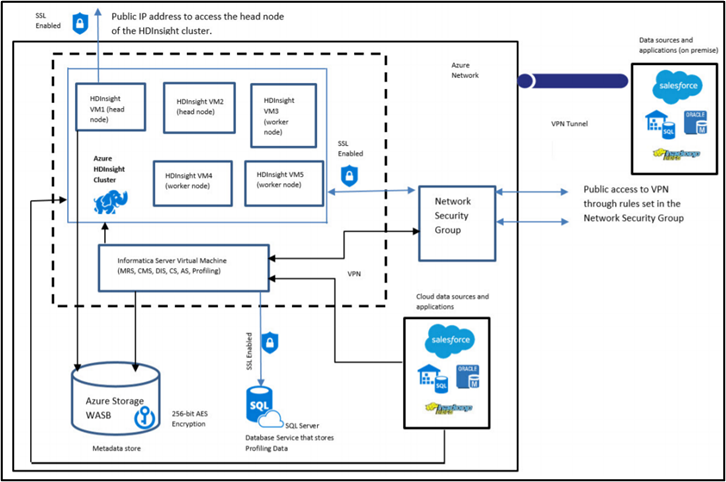

Figure 1. Azure HDInsight Cluster Deployment
More details about the EDC on Azure can be found at:
Deploying Enterprise Data Catalog on Microsoft Azure Marketplace
The following image shows the components and architecture for Azure SQL DW Migration using Informatica EDC & IICS.
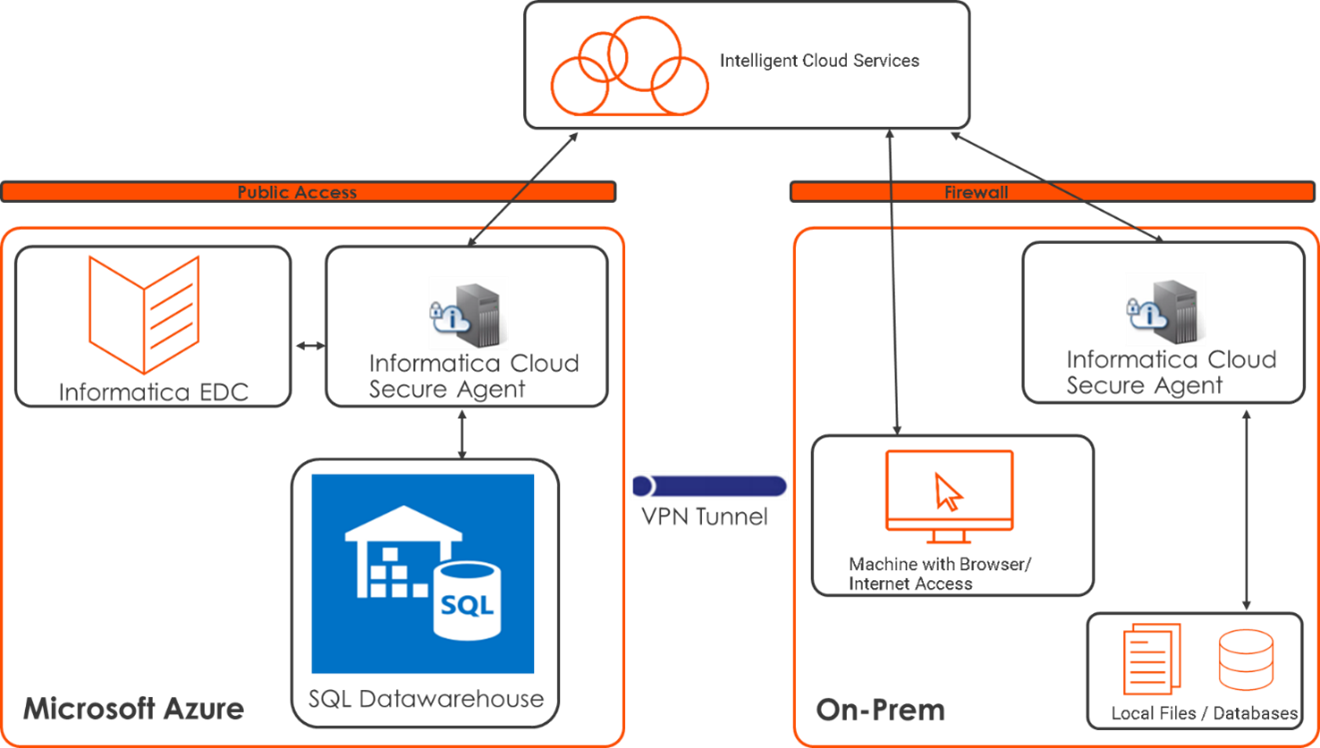

Figure 2. Azure SQL DW Migration
Components
Informatica Enterprise Data Catalog: Informatica Enterprise Data Catalog is an AI-powered data catalog that provides a machine-learning-based discovery engine to scan and catalog data assets across the enterprise—across cloud, on-premises, and big data anywhere. The intelligence in Enterprise Data Catalog is provided by the CLAIRE™ engine, which includes intelligence in leveraging metadata to deliver intelligent recommendations, suggestions, and automation of data management tasks. It enables IT users to be more productive and allow business users to be full partners in managing and using data.
Informatica Cloud Secure Agent: A lightweight program that runs tasks and collects metadata for Informatica Intelligent Cloud Services. A Secure Agent enables secure communication across the firewall between Informatica Intelligent Cloud Services and your organization or a cloud computing services environment. A Secure Agent runs within a Secure Agent group.
Informatica Provides EDC deployment template on Microsoft Azure. You can access the deployment template for Informatica Enterprise Data Catalog on Microsoft Azure from Microsoft Azure Marketplace using the following link:
Informatica Enterprise Data Catalog 10.4.1 BYOL
Make sure you have an appropriate license from Informatica for the deployment.
Once the EDC deployment is complete, you can access Informatica Administrator Console & Catalog Service URLs.
Pre-Requisite:
- Make sure you have an IICS Account
- Connectors like Relational (Oracle) & SQL Datawarehouse available.
- License options “EDC for IICS” and “EDCSearch” are available (Under Administrator > Licenses).
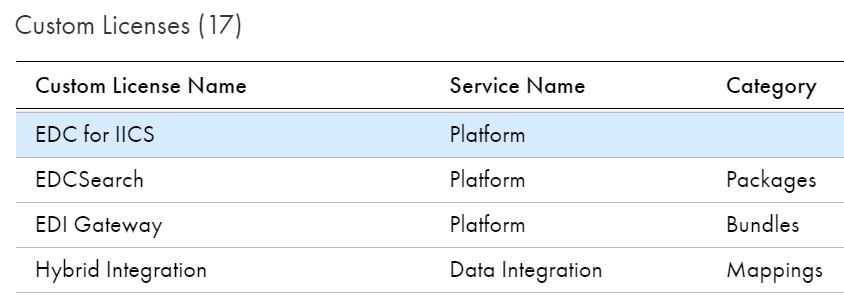

Figure 3. Custom Licenses
Using IICS UI, download the Secure Agent & make a note of Installation Security Token.
Once the Secure Agent installation is complete, make sure you register the Secure Agent with the IICS Org using Username & Security Token. It will record your SA to IICS Org and downloads all the necessary connector/feature packages to Secure Agent Machine.
Using IICS Administrator, Configure SQL Datawarehouse Connection and make sure Test Connection works using the Secure Agent Deployed on Azure VM.
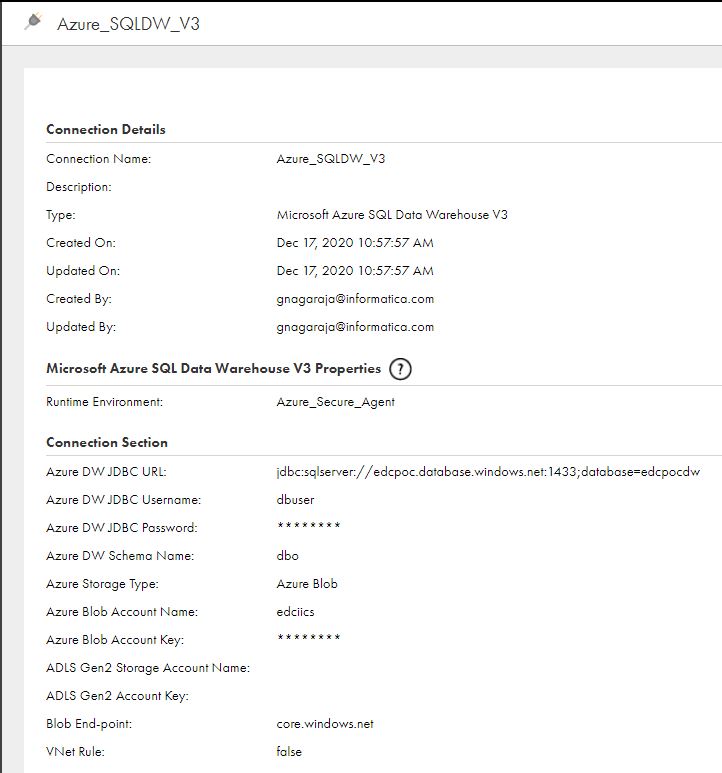

Figure 4. Secure Agent Deployed on Azure VM
Using EDC, users can perform Profiling & Data Domain Discovery of SQL DW once the data is migrated to SQL DW. It requires a Connection on Informatica Administrator. Create an SQL Datawarehouse Connection and make sure Test Connection Works.
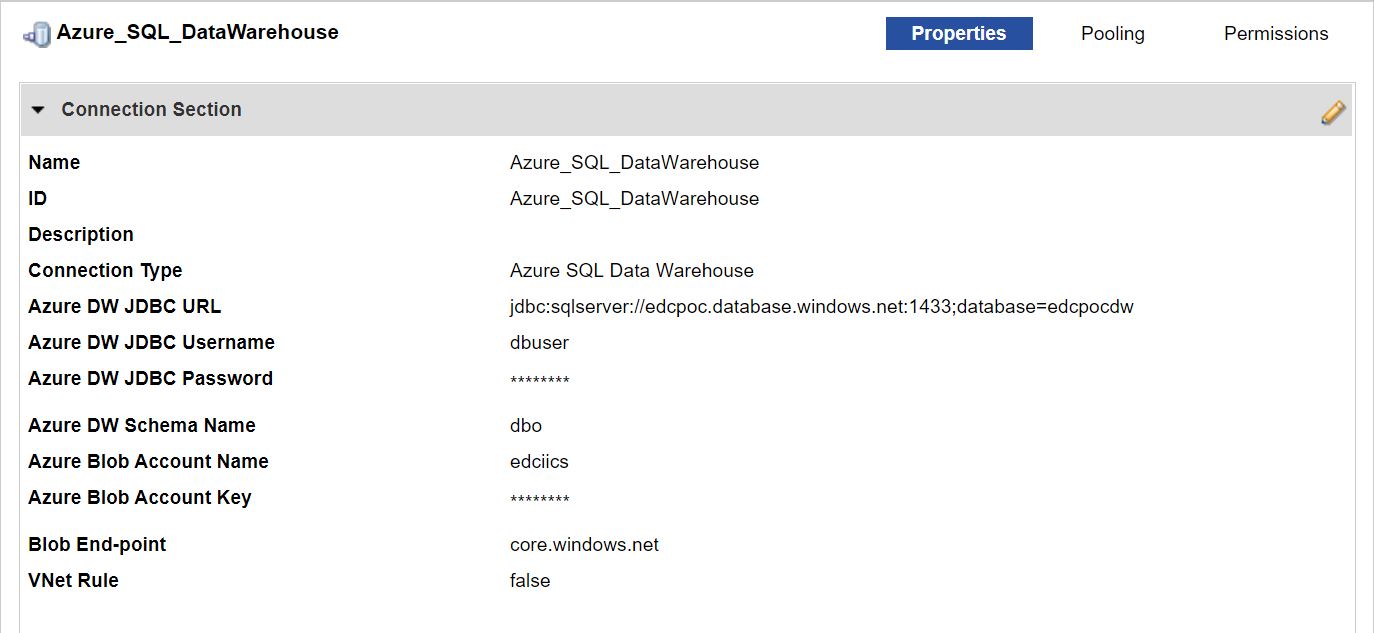

Figure 5. SQL Datawarehouse Connection
Using EDC, users can perform Profiling & Data Domain Discovery. It requires a Connection on Informatica Administrator. In this case, we will scan Oracle metadata. Hence, Create an Oracle Connection and make sure Test Connection Works.
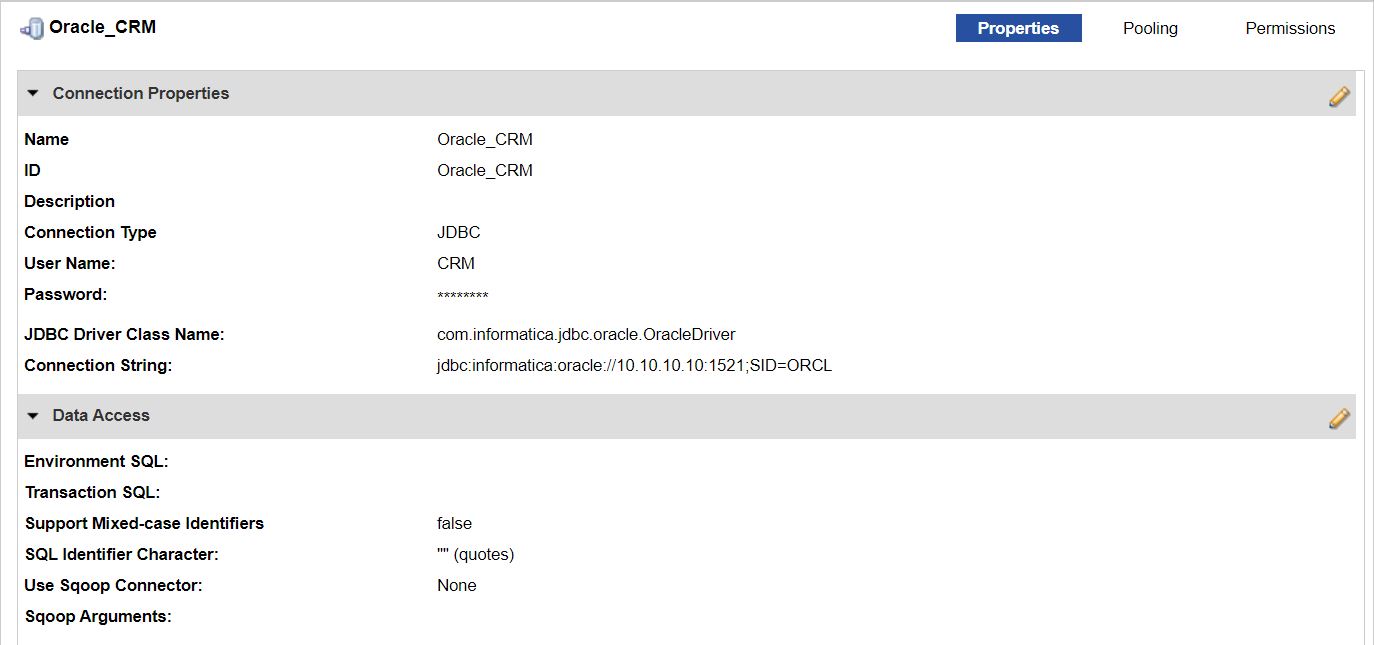

Figure 6. Oracle Connection
Note:
- If you are using JDBC Connection, make sure required JDBC jars are present under the $INFA_HOME/externaljdbcjars directory.
- If you are using a Native Database Connection, make sure required DB Client Libraries are present on DIS Machine. Make sure all the required Environment variables are in place.
To extract metadata from Oracle & to perform Profiling/Data Domain Discovery, perform the following activities:
1. Log in to LDMAdmin URL and click on New > Resource
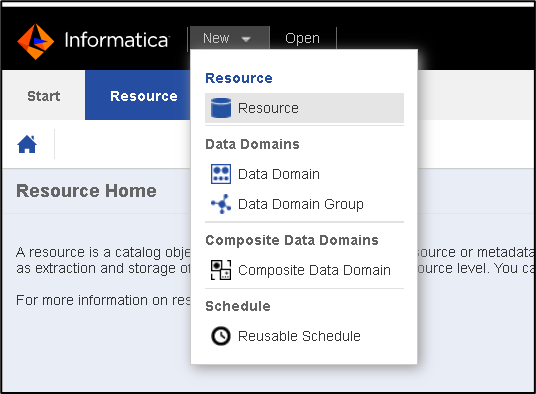

Figure 7. LDMAdmin URL
2. Select Resource Type as Oracle & provide necessary details:
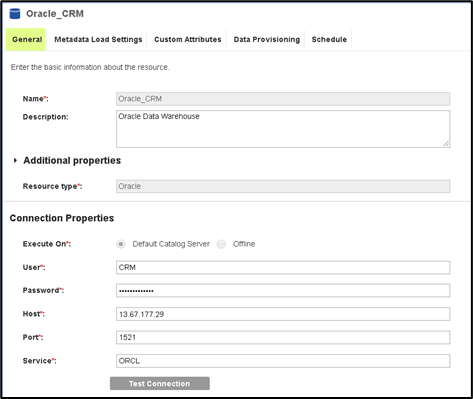

Figure 8. Resource Type – Oracle
3. Configure Metadata Load Settings:
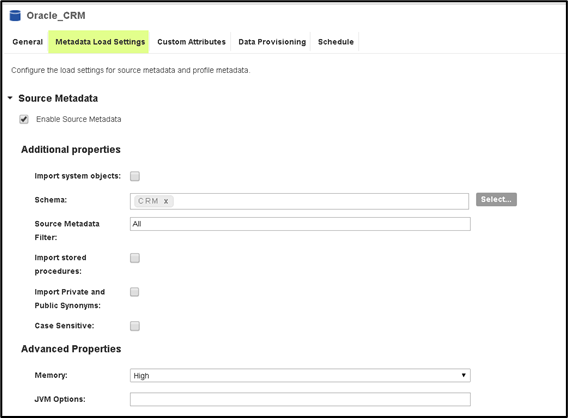

Figure 9. Metadata Load Settings
4. You can uncheck the “Composite Domain Discovery.”


Figure 10. Composite Data Domain Settings
5. Check Enable Data Discovery and provide required details:
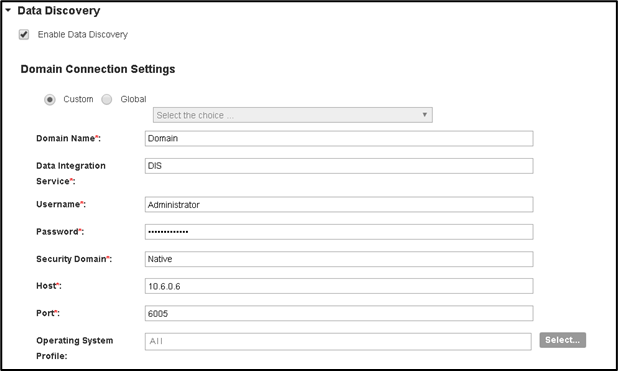

Figure 11. Domain Connection Settings
6. Configure Basic Profile Settings & make sure you select the Oracle Connection created in the previous Step (Oracle_CRM)
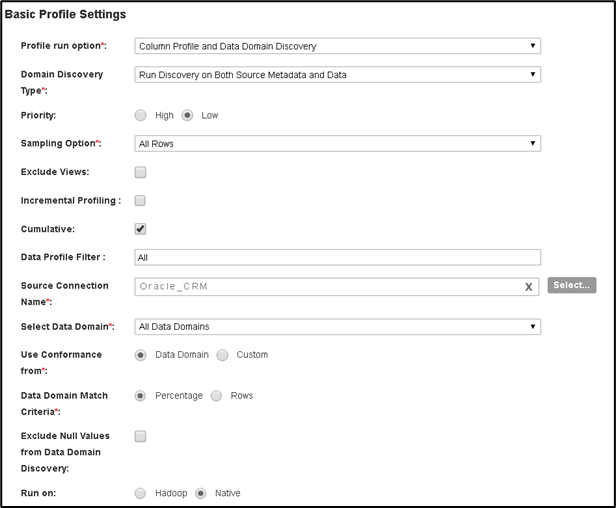

Figure 12. Basic Profile Settings
7. Optionally, you can enable Similarity Data Preparation & Business Term Association. In our case, we have enabled Similarity Discovery:
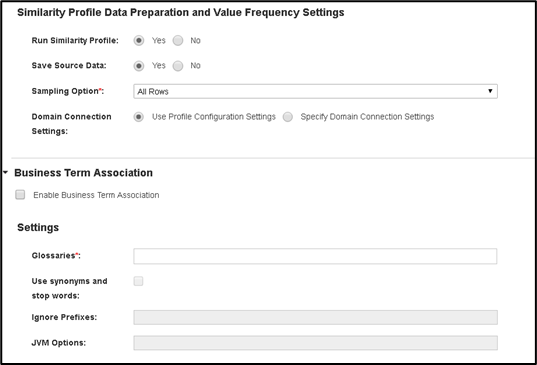

Figure 13. Similarity Data Preparation & Business Term Association Settings
8. Save the Resource configuration & click on Run (or Save & Run)


Figure 14. Resource Configuration
9. You can Log in to EDC Catalog URL & make sure all the assets are loaded in Oracle_CRM resource.
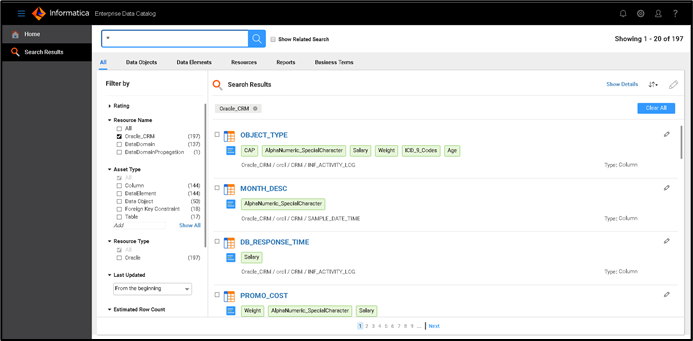

Figure 15. EDC Catalog URL
As a Business user/ Data Steward, you can review the technical metadata, Column Profile results & Data Domain Discovery results and curate them.
To configure EDC with IICS, perform the following activities:
1. Log in to IICS using Administrator Account and go to “Administrator” Services.
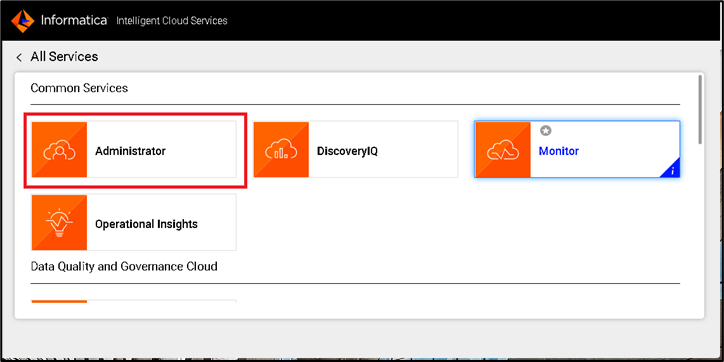

Figure 16. IICS – Administrator Services
2. Under “Organization,” go to the “Enterprise Data Catalog” Section. Provide the EDC instance details & select Secure Agent installed on Azure VM as Run-Time Environment. Make sure you have the required connectivity between the Secure Agent machine & EDC Server.
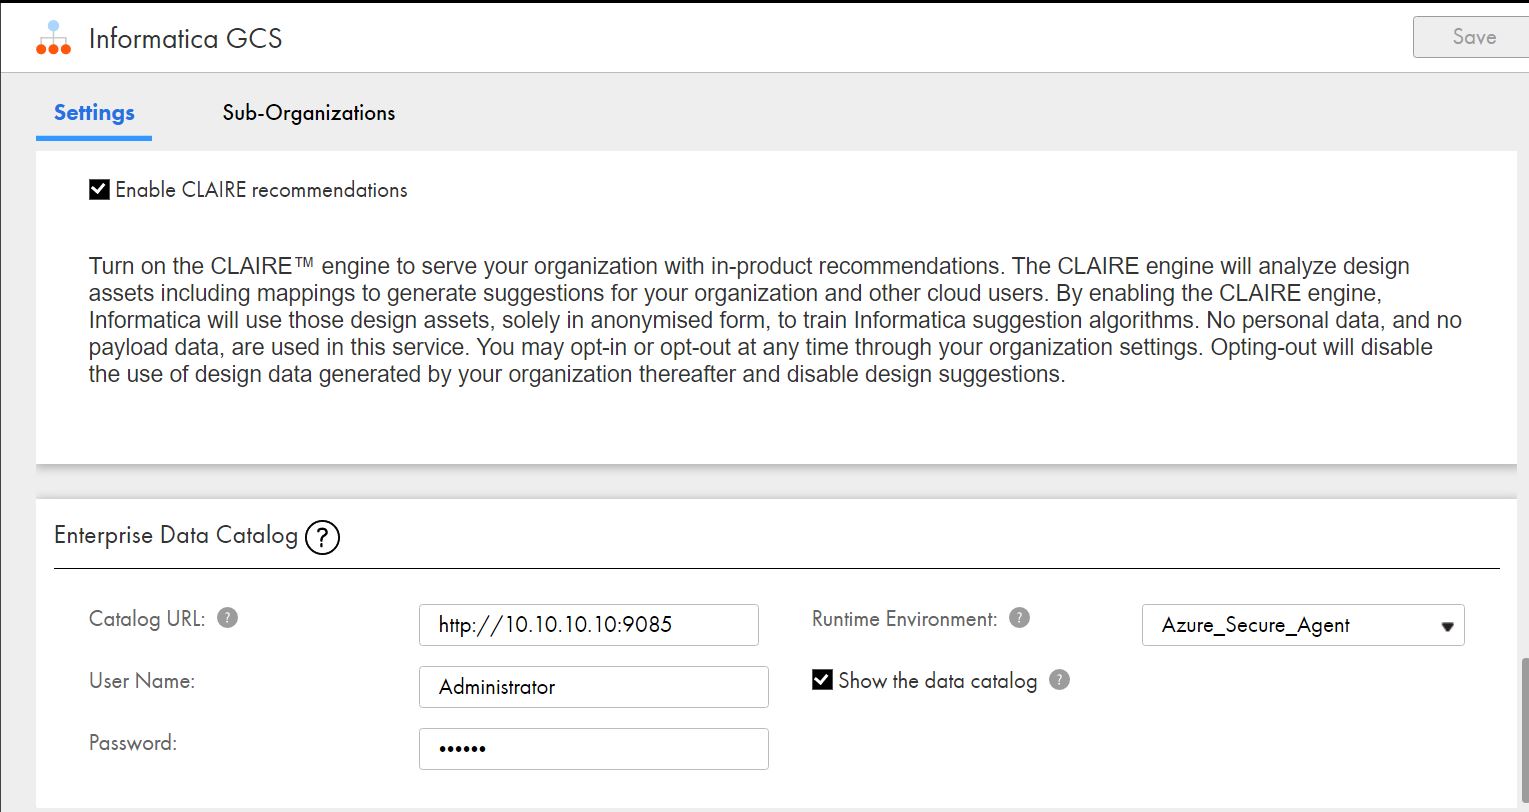

Figure 17. EDC – Organization
The following image shows EDC Integration Properties.
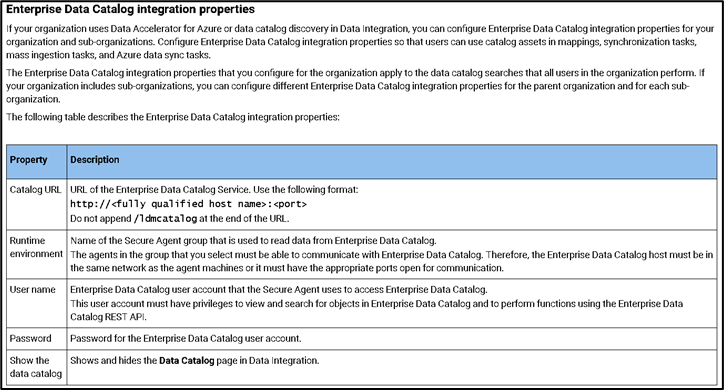

Figure 18. EDC Integration Properties
3. Once this is configured & Saved, go to “Data Integration” Service & you should be able to see “Data Catalog.”
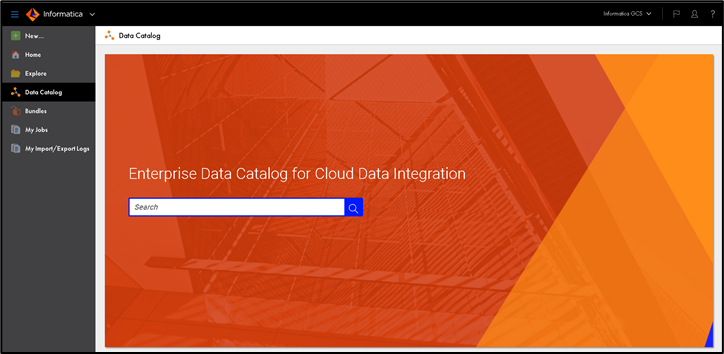

Figure 19. EDC for CDI
Using Data Catalog in IICS, users can search for the appropriate assets and add them to the Data synchronization task or Mapping.
Follow the below steps to configure IICS Mapping using EDC Data Asset:
1. Search for required Data Asset, which is Catalogued in EDC using the IICS Data Catalog:
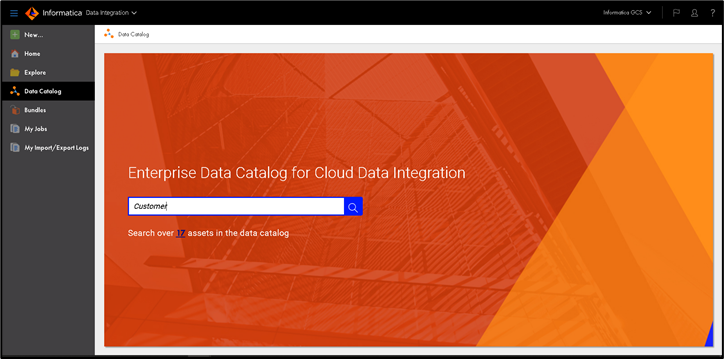

Figure 20. IICS Data Catalog
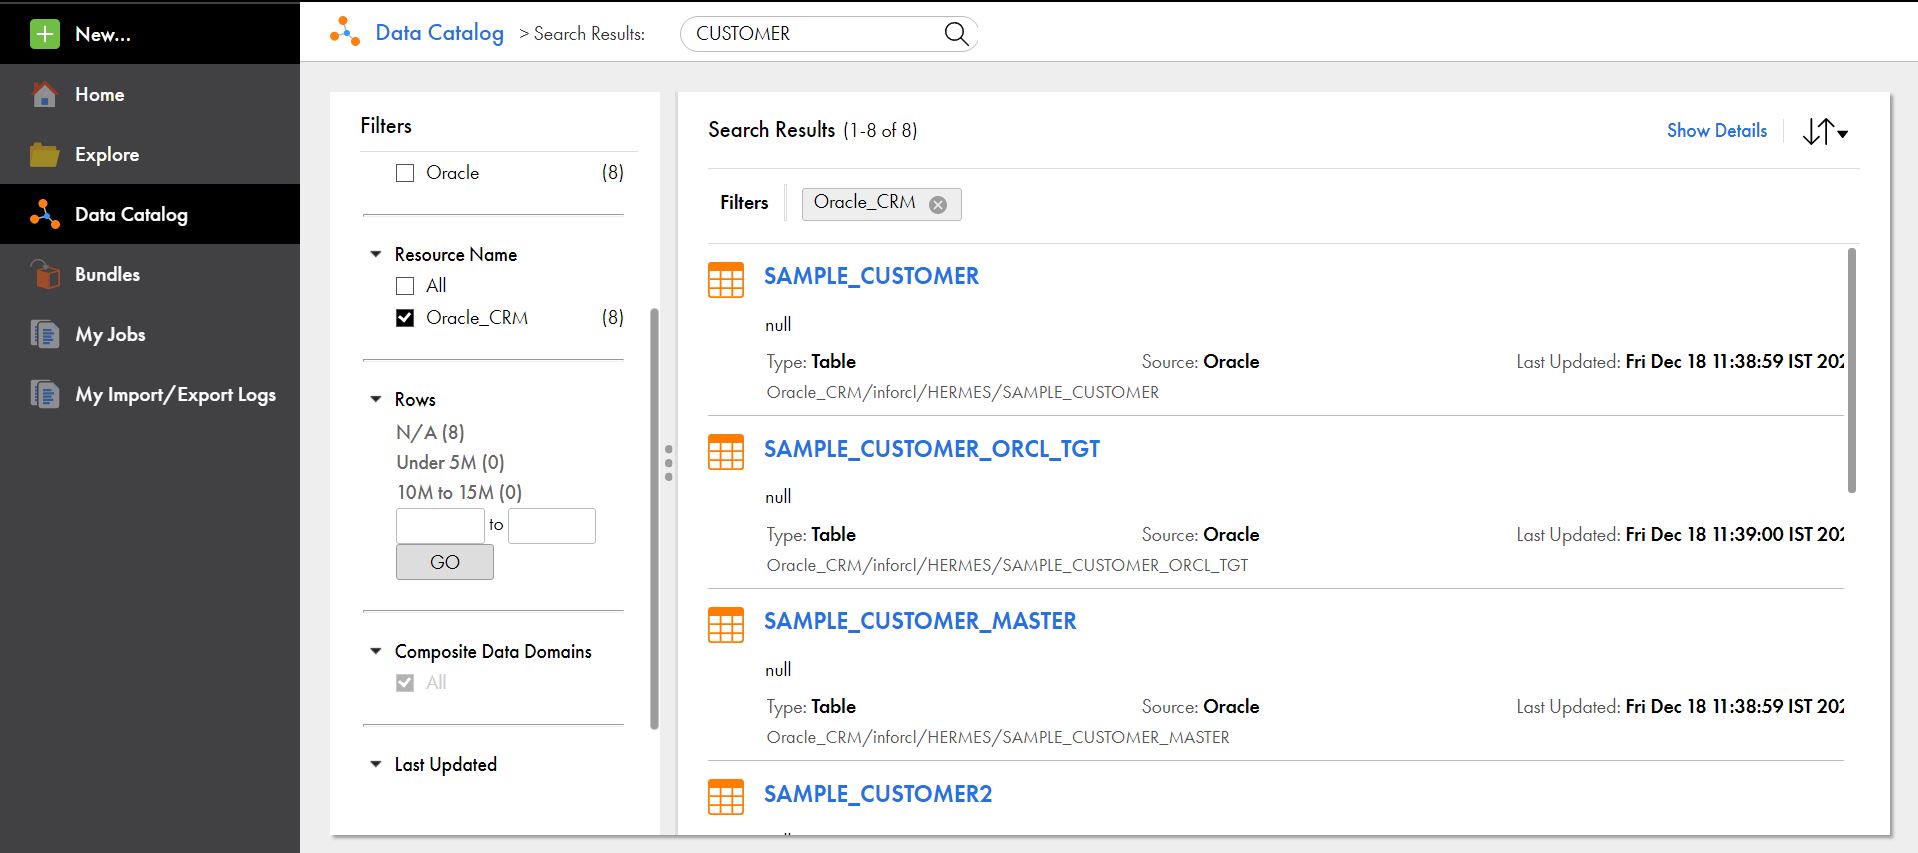

Figure 21. Search results
You can click on the Asset name if you would like to see more details (like Columns, Profile/Data Domain Discovery results). It will redirect/open a tab with EDC LDMCatalog.
For example, if you click on “SAMPLE_CUSTOMER” from Search results, you will see the asset in EDC Catalog:
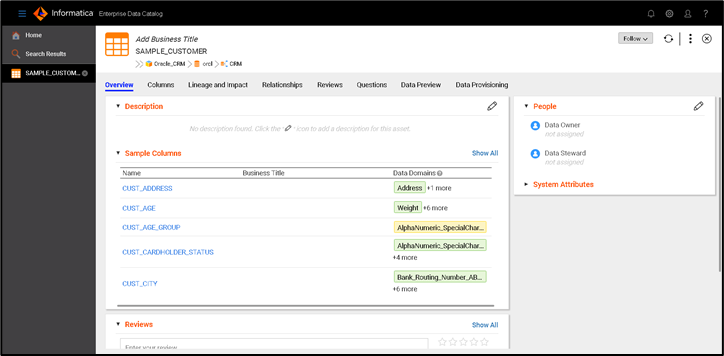

Figure 22. An asset in EDC Catalog
2. Click on “Use Object.”
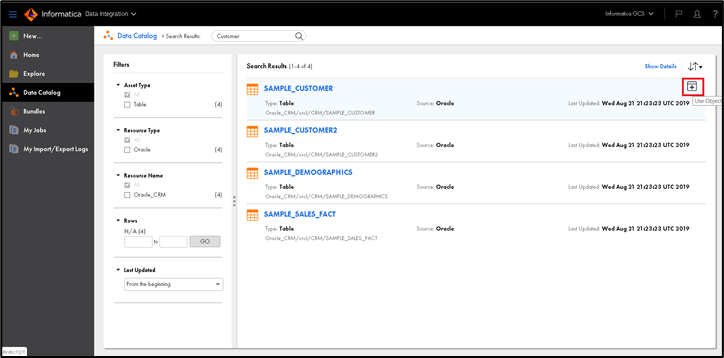

Figure 23. Use Object
3. Select “Mapping” under “Create New Asset” and Click Ok.
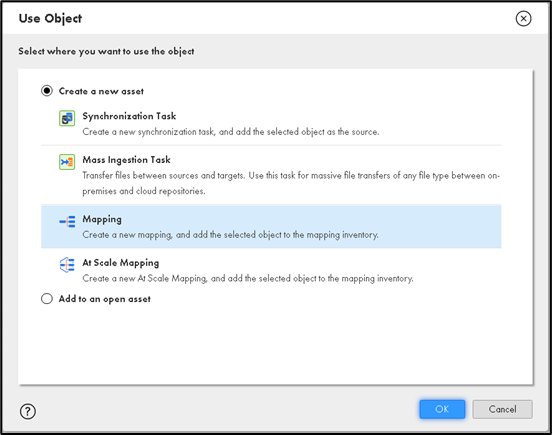

Figure 24. Create New Asset
4. In “Import Connection From EDC,” provide a Connection Name & DB Password for Oracle. All other Connection details are fetched from the EDC Resource Configuration. Make sure you select the appropriate Cloud Secure Agent. After providing all details, make sure Test Connection works. Click on Continue to Create the connection and to open Mapping canvas.
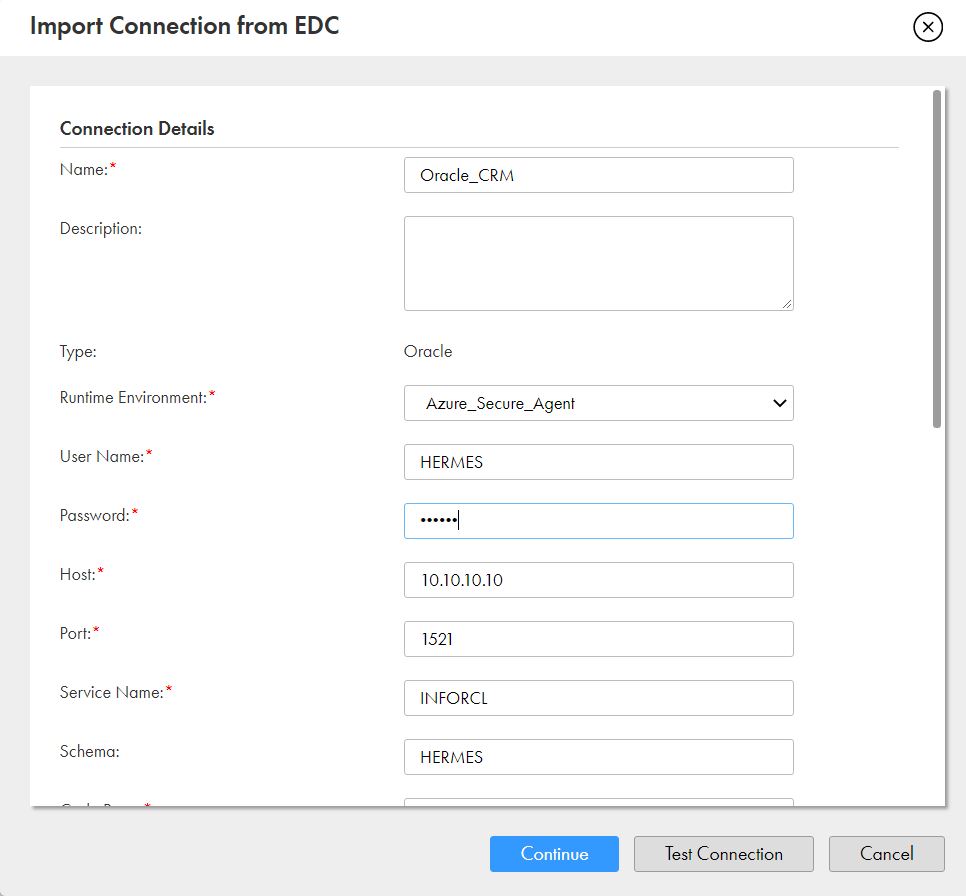

Figure 25. Import Connection from EDC
5. In the Mapping canvas, you can see “SAMPLE_CUSTOMER” under Inventory. You can provide the appropriate mapping name & select the Project under which Mapping needs to be stored.
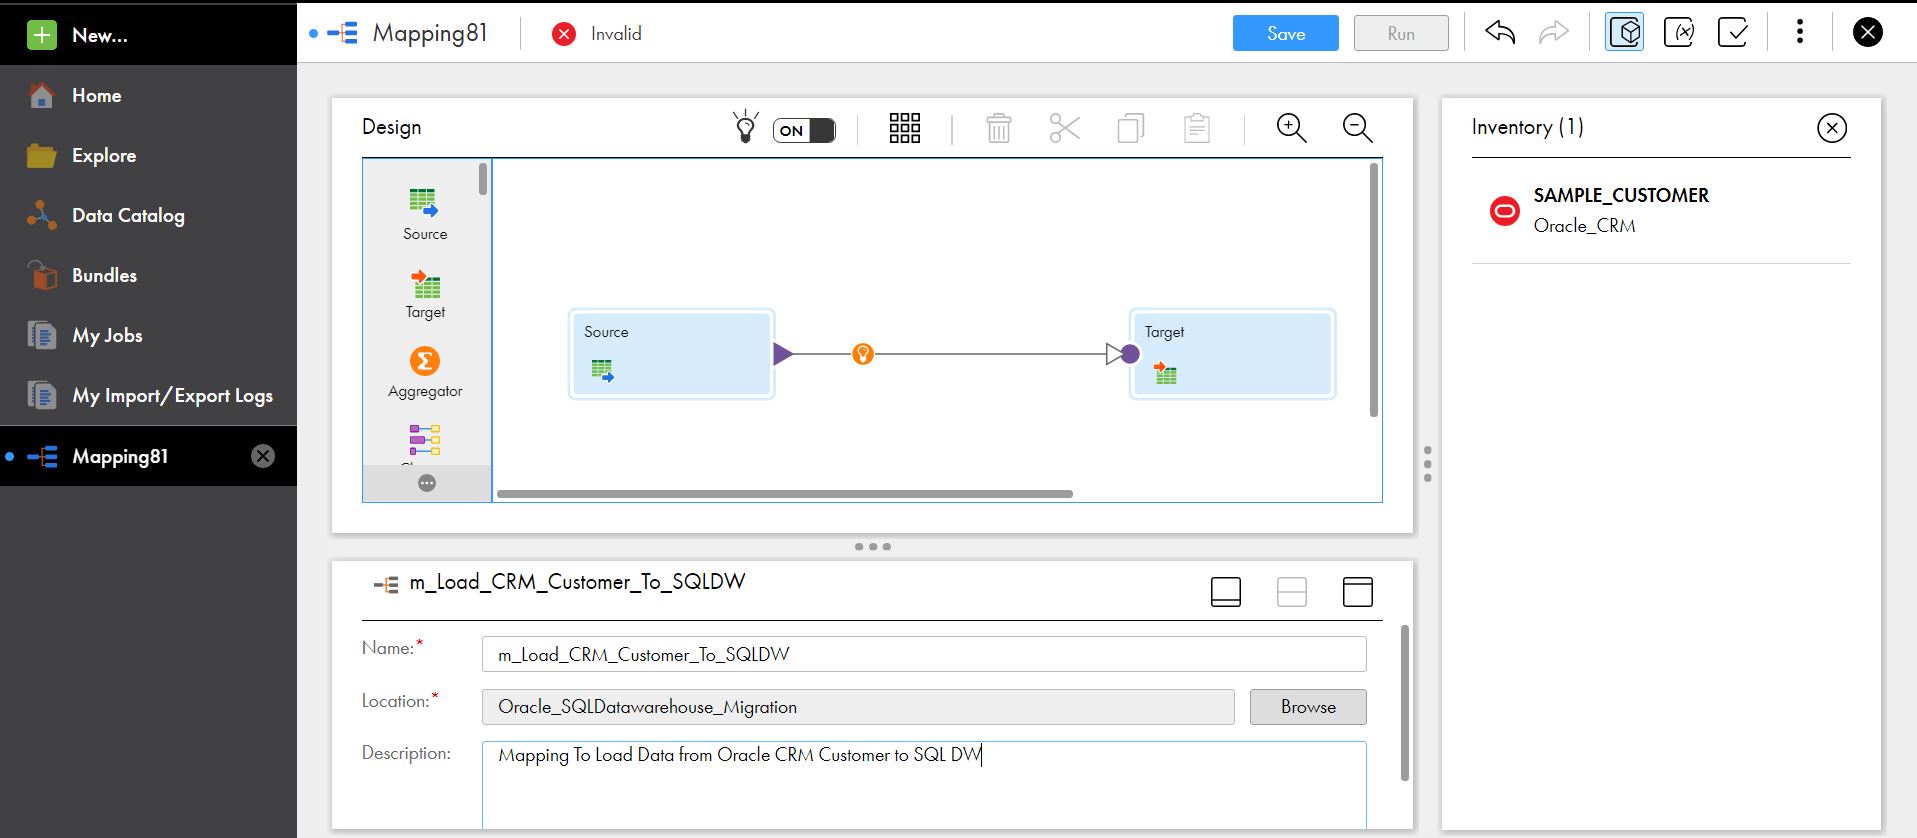

Figure 26. Mapping Canvas
6. To select Oracle Table as Source, click on Source Object & under “Source” properties, click on “Select an object from Inventory.”
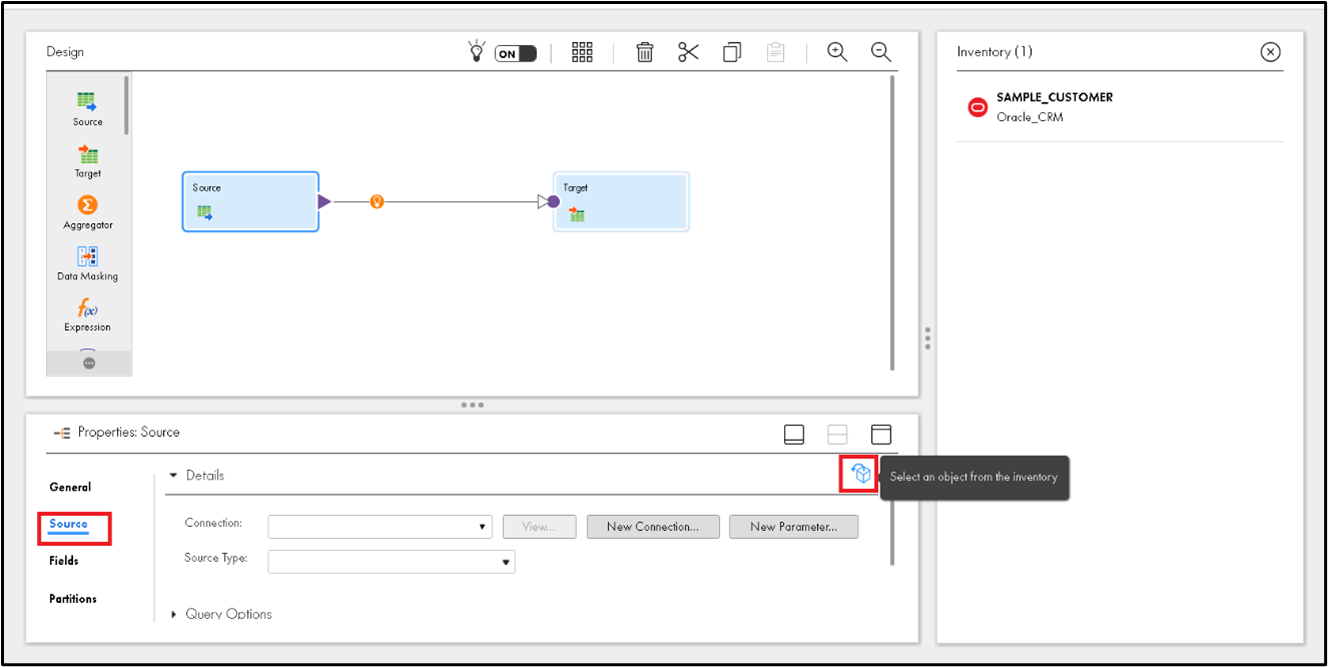

Figure 27. Source Properties
7. From the Inventory, select SAMPLE_CUSTOMER and click on Ok.
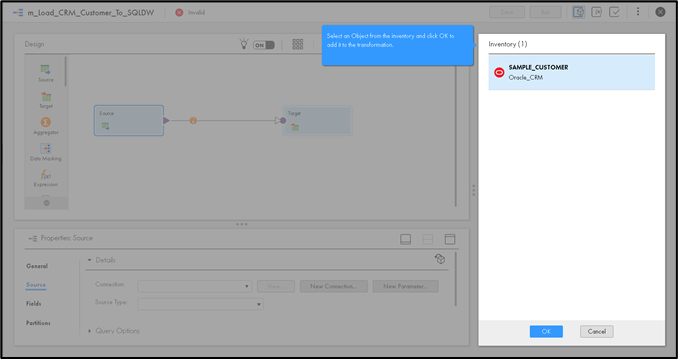

Figure 28. Inventory
It will populate the Connection, Source Type, Object Automatically. Optionally, you can provide a name to the Source.
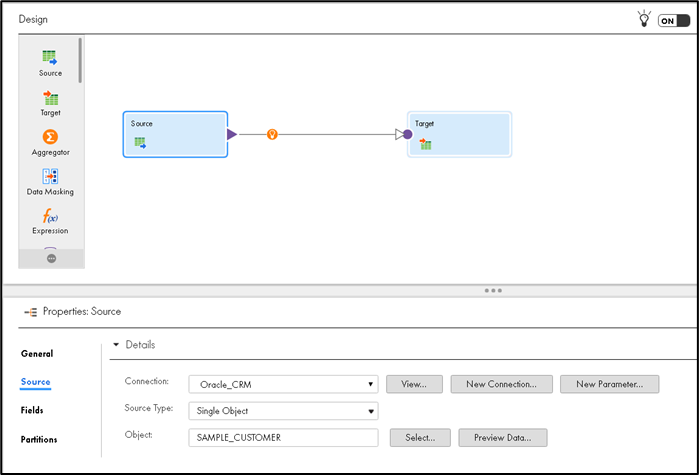

Figure 29. Populate Connection
8. To Configure the target, click on the Target object. Pick SQL DW Connection from the dropdown and click “Select” for Object.
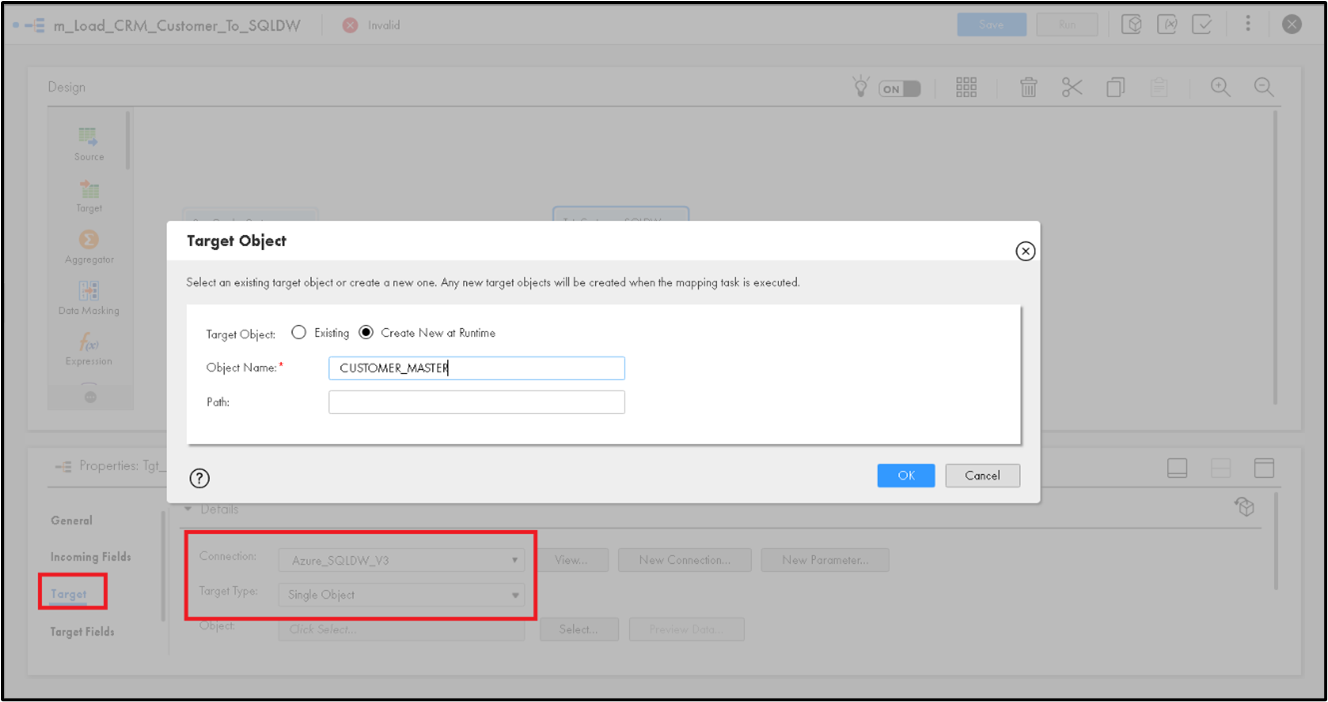

Figure 30. Target Object
You can either select an Existing table available on SQL DW or Create a new one at Runtime. Click Ok to continue. Optionally, provide a name to Target Object.
9. Under the Advanced Section of the Target, provide Azure Blob Container Name and click on Save.
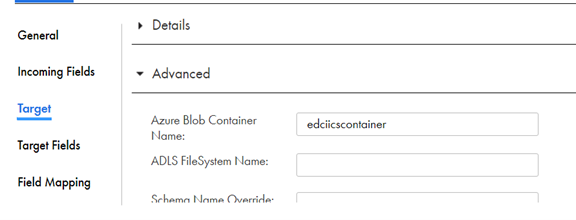

Figure 31. Target – Advanced Section
The Mapping should be Valid.
Once the Mapping is configured completely, you can create a Mapping configuration Task & execute it. Alternately, you can directly run the Mapping.
Follow the below steps to configure MCT.
1. From Actions, click on “New Mapping Task.”
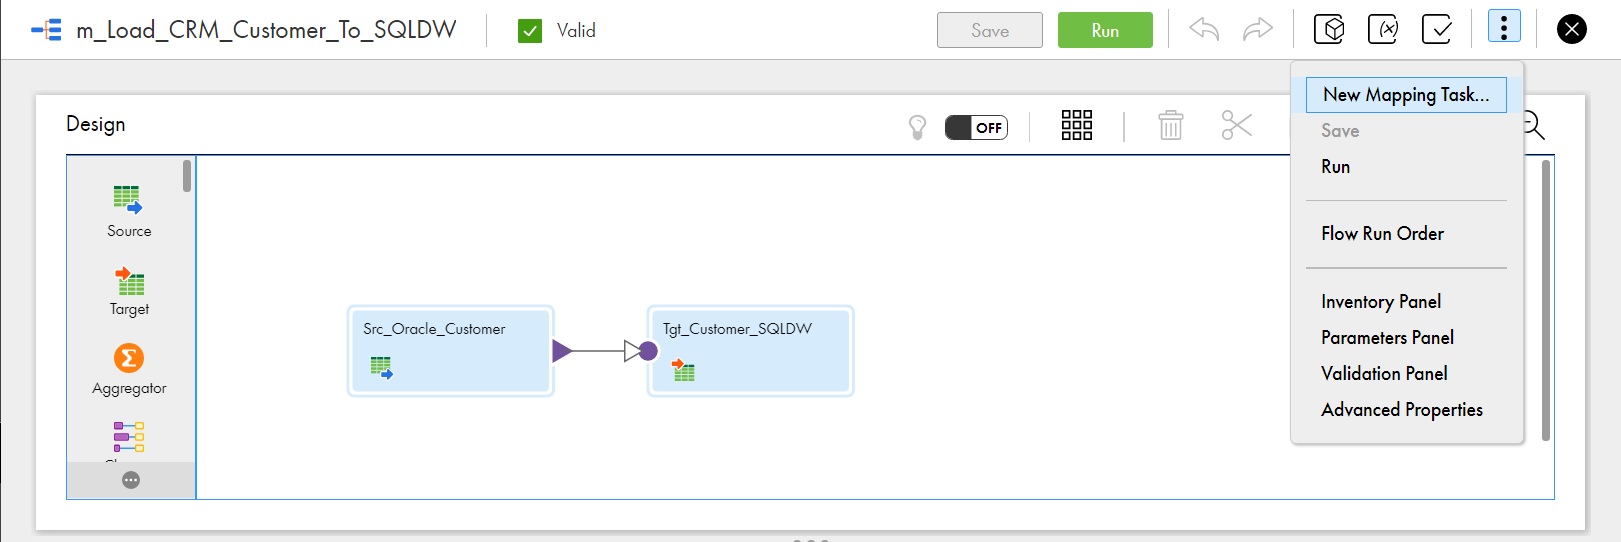

Figure 32. New Mapping Task
2. Provide a Name to the Mapping Task & select the appropriate Secure Agent. Click on Next.
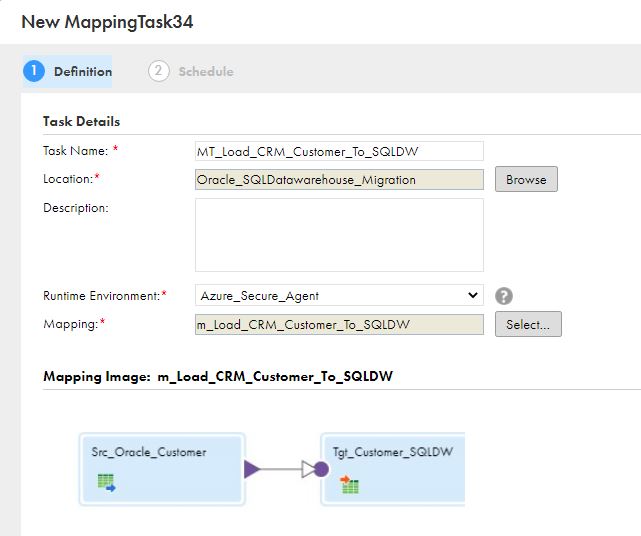

Figure 33. New Mapping Task – Secure Agent
3. Review other configuration details and Click on “Finish.”
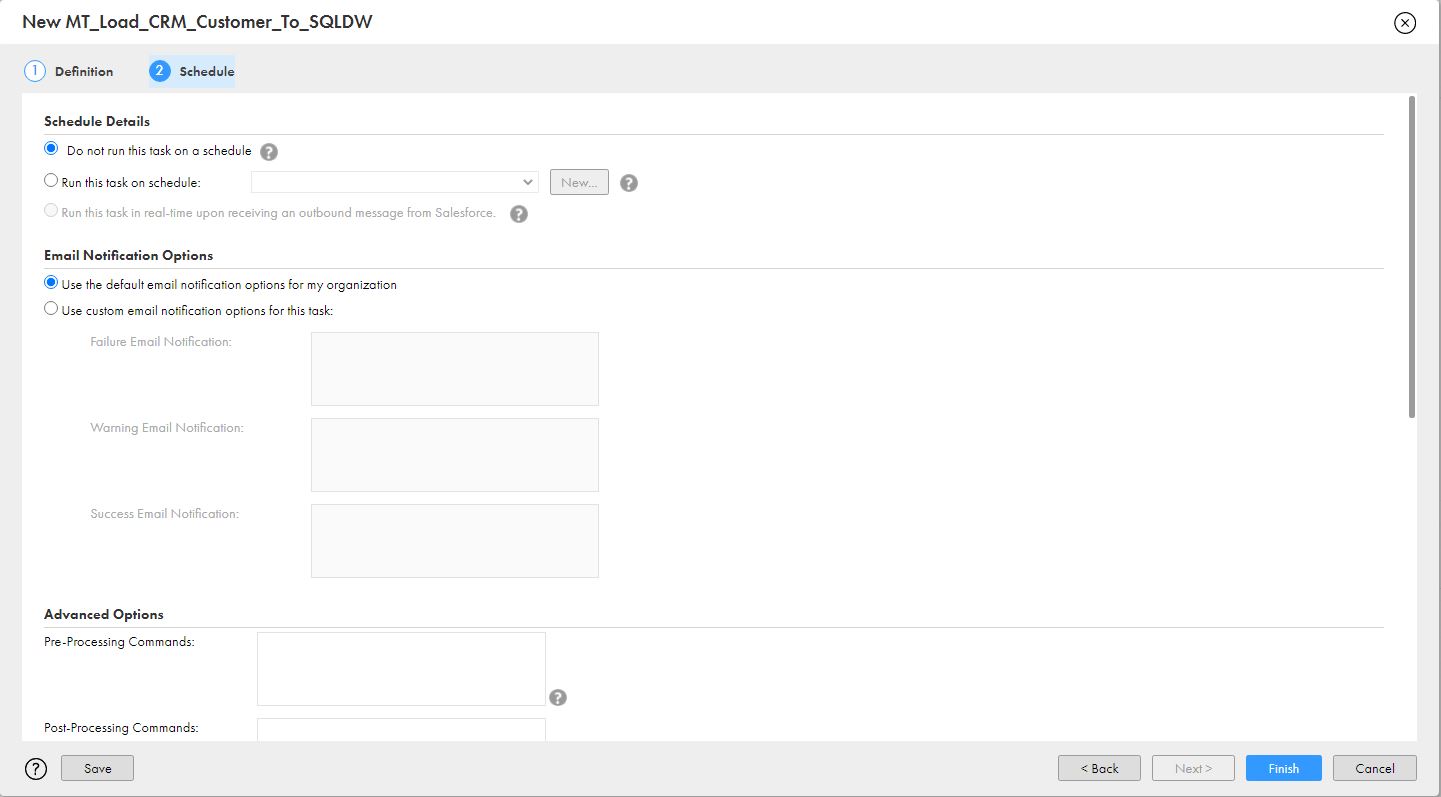

Figure 34. Configuration Details
4. Once the mapping task is created, click on “Run” to start the Mapping Task Execution.


Figure 35. Mapping Task Execution
5. You can go to the “My Jobs” section to view the Job Statistics.


Figure 36. My Jobs
6. Click on Instance Name to view Execution details & to download the execution log.
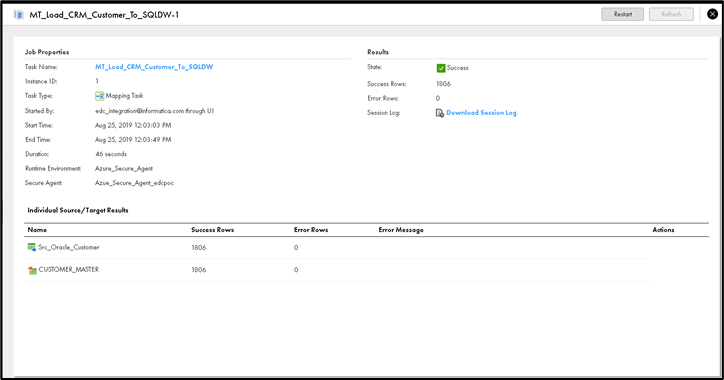

Figure 37. Execution Details
7. Using DB Client, verify the target table has correct data.
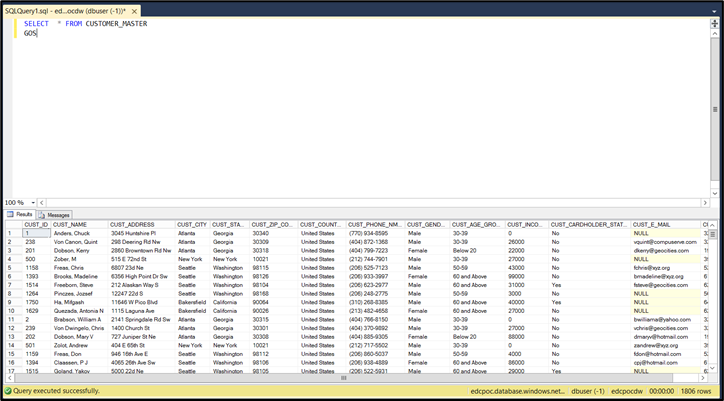

Figure 38. Target Table
You can extract SQL DW Metadata once the tables/data are available. To extract metadata from SQL Datawarehouse & to perform Profiling/Data Domain Discovery, perform the following activities:
1. Log in to LDMAdmin URL and click on New > Resource
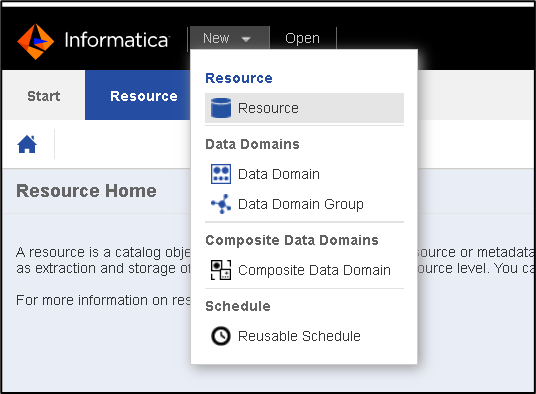

Figure 39. LDMAdmin URL
2. Select Resource Type as “Azure Microsoft SQL Data Warehouse” & provide necessary details:
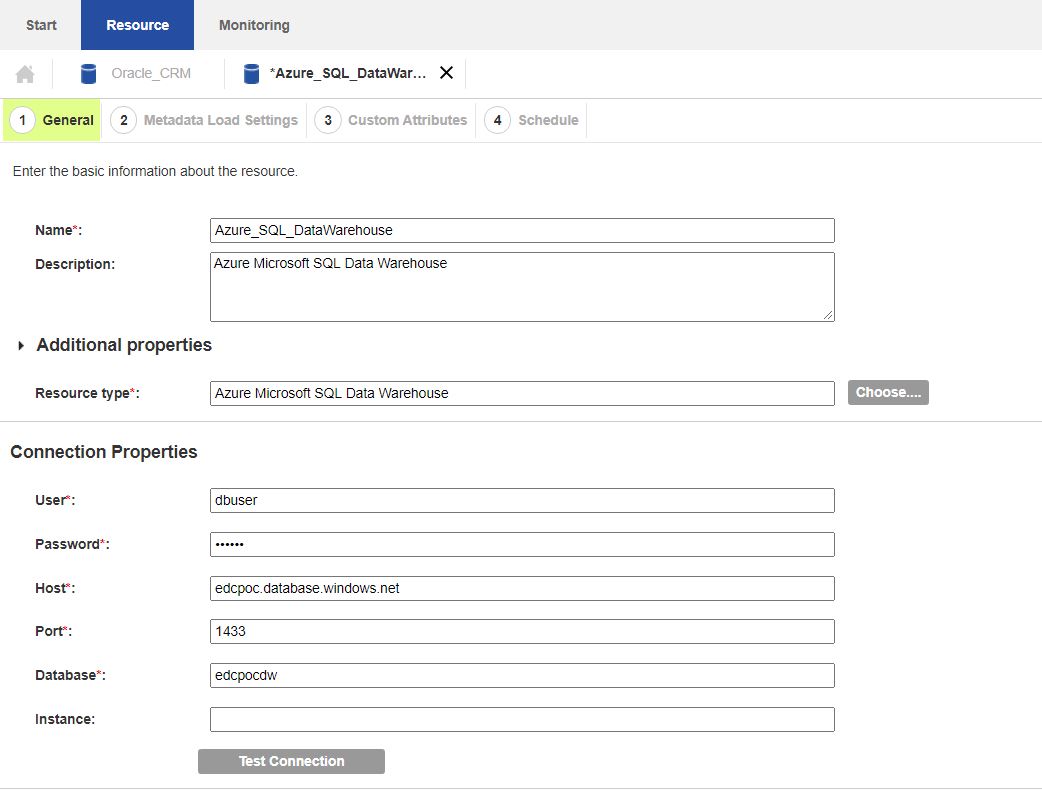

Figure 40. Resource Type – Azure Microsoft SQL Data Warehouse
3. Configure Metadata Load Settings – Provide Schema, Container Name.
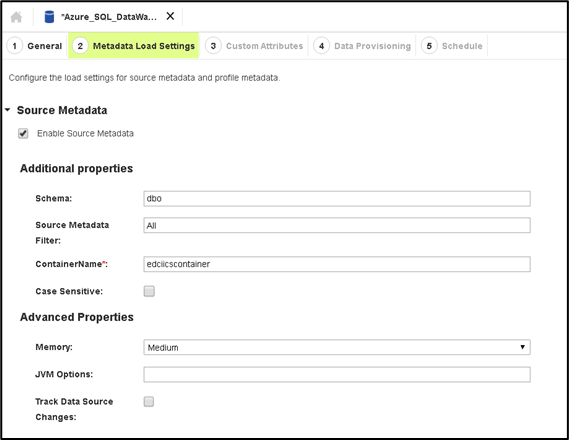

Figure 41. Metadata Load Settings
4. You can uncheck the “Composite Domain Discovery.”


Figure 42. Composite Domain Discovery
5. Check Enable Data Discovery and provide required details:
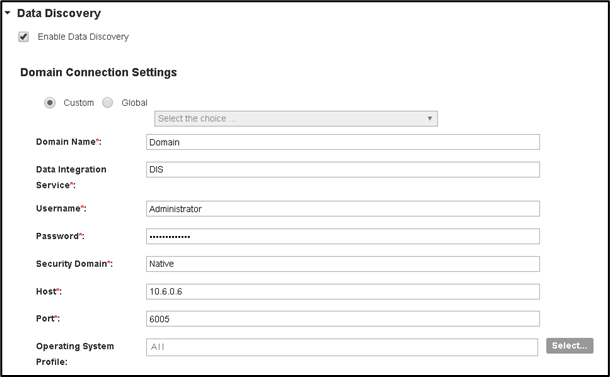

Figure 43. Data Discovery
6. Configure Basic Profile Settings & make sure you select the SQL DW Connection created in the previous Step (Azure_SQL_DataWarehouse)
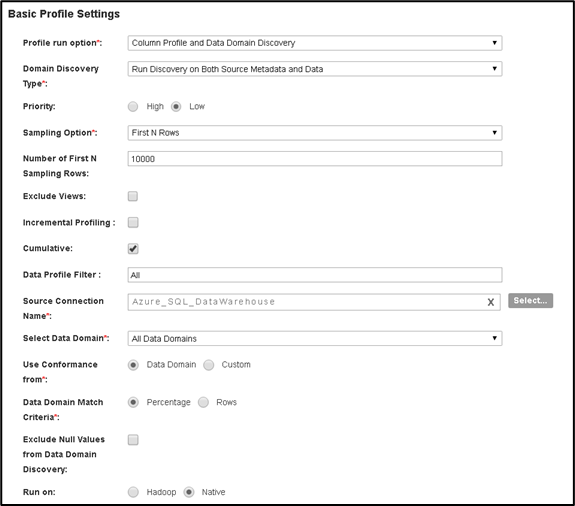

Figure 44. Basic Profile Settings – Configuration
7. Optionally, you can enable Similarity Data Preparation & Business Term Association. In our case, we have enabled Similarity Discovery:
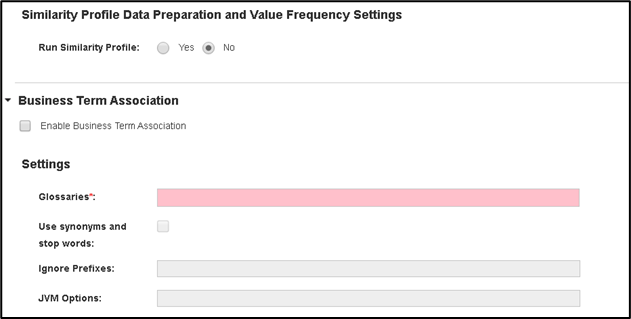

Figure 45. Similarity Discovery
8. Save the Resource configuration & click on Run (or Save & Run)
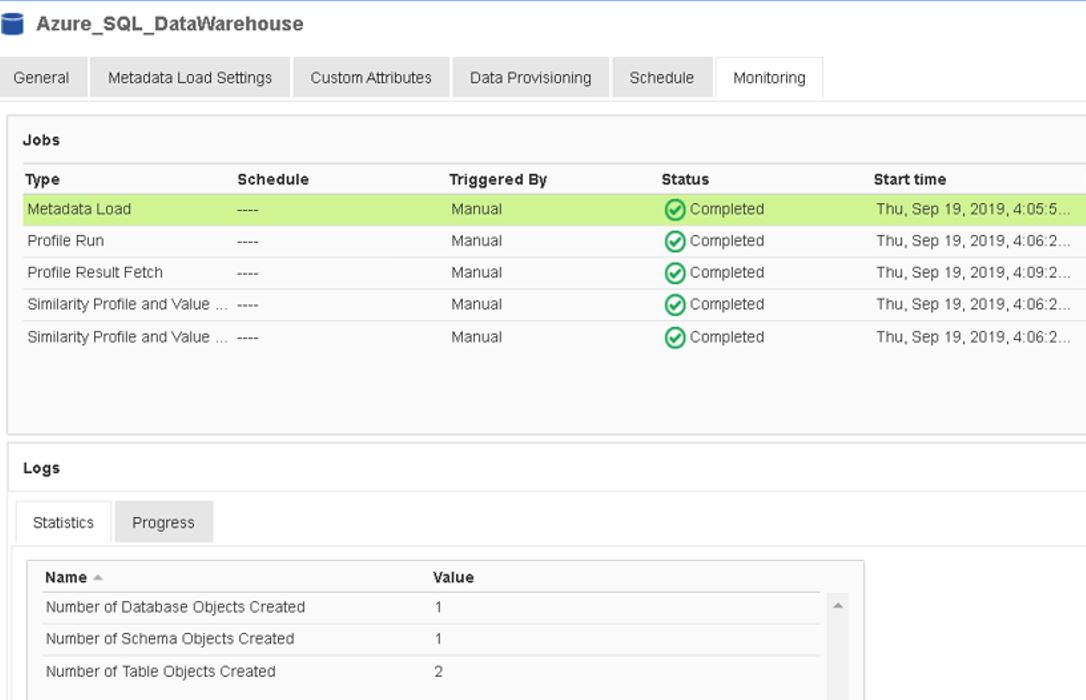

Figure 46. Resource Configuration
9. You can log in to EDC Catalog URL & make sure all the assets are loaded in the Azure_SQL_DataWarehouse resource.
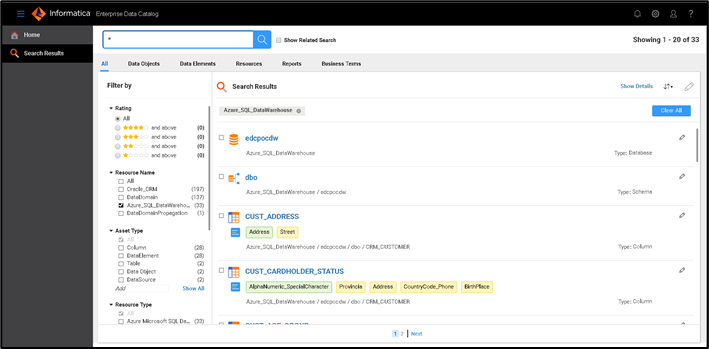

Figure 47. EDC Catalog URL
As a Business user/ Data Steward, you can review the technical metadata, Column Profile results & Data Domain Discovery results and curate them.
Now, we have the Metadata for Oracle (Source) & SQL Datawarehouse (Target). Let us extract metadata from Integration Tool (Cloud Data Integration) to view End-To-End Lineage.
As Informatica Cloud Services Endpoints are TLS Enabled, to connect & import metadata from Informatica Cloud, we need to import IICS Root Certificate into Infa Truststore. You can download the certificate from the Browser or using the openssl command.
Follow the below steps to import IICS Certificate into infa_truststore.
1. On EDC Server machine, go to $INFA_HOME/services/shared/security/
cd /home/Informatica/services/shared/security
2. Run the openssl command to download the certificate: (We are using US POD; you may need to use the POD you are interested in) openssl s_client -showcerts -verify 5 -connect dm-us.informaticacloud.com:443 < /dev/null | awk '/BEGIN/,/END/{ if(/BEGIN/){a++}; out="cert"a".pem"; print >out}'
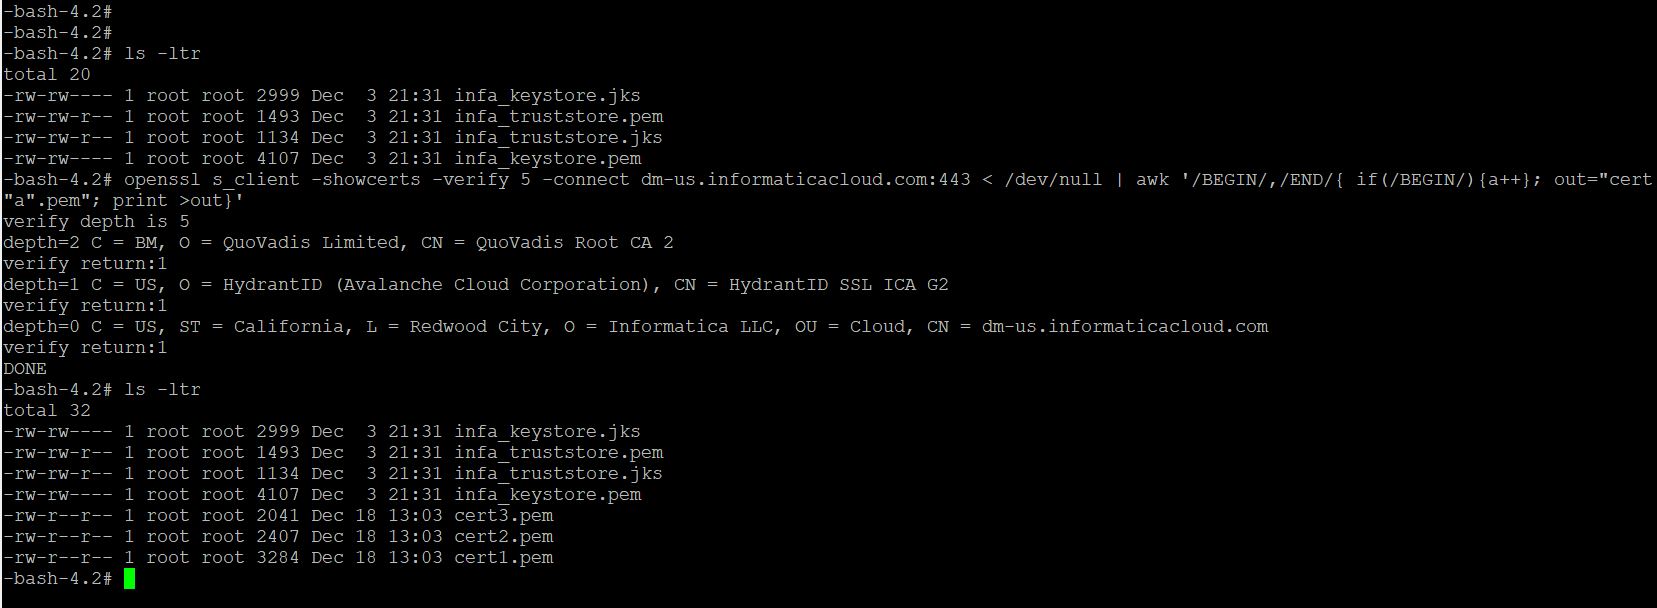

Figure 48. openssl command
3. This will create three certificates as we have three levels:
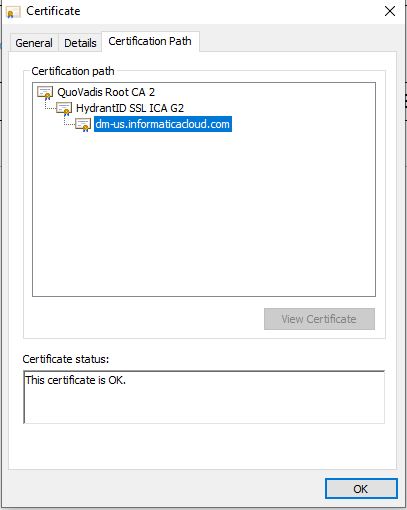

Figure 49. Certificates
4. You can import Root Certificate (cert3.pem) alone into infa_truststore.jks available at $INFA_HOME/services/shared/security. Or import all three (there is no harm in doing it). Type Yes to Trust this certificate.
[root@edciics security]# /home/Informatica/java/bin/keytool -import -file cert3.pem -alias QuoVadis_Root -keystore infa_truststore.jks -storepass pass2038@infaSSL
Owner: CN=QuoVadis Root CA 2, O=QuoVadis Limited, C=BM
Issuer: CN=QuoVadis Root CA 2, O=QuoVadis Limited, C=BM
…..
Trust this certificate? [no]: yes
The certificate was added to keystore
[root@edciics security]# /home/Informatica/java/bin/keytool -import -file cert2.pem -alias IICS_Interim -keystore infa_truststore.jks -storepass pass2038@infaSSL
The certificate was added to keystore
[root@edciics security]# /home/Informatica/java/bin/keytool -import -file cert1.pem -alias IICS_host -keystore infa_truststore.jks -storepass pass2038@infaSSL
The certificate was added to keystore
5. Once the certificate's import is done, we can run the IICS Scanner in EDC.
Note: You can run the below command to display all the certificates. The certificate will be listed between "BEGIN CERTIFICATE" and "END CERTIFICATE" markers. You can only copy the Root certificate (including Marker) and import it into infa_truststore.jks.
openssl s_client -showcerts -verify 5 -connect dm-us.informaticacloud.com:443
To extract metadata from Oracle & to perform Profiling/Data Domain Discovery, perform the following activities:
1. Log in to LDMAdmin URL and click on New > Resource
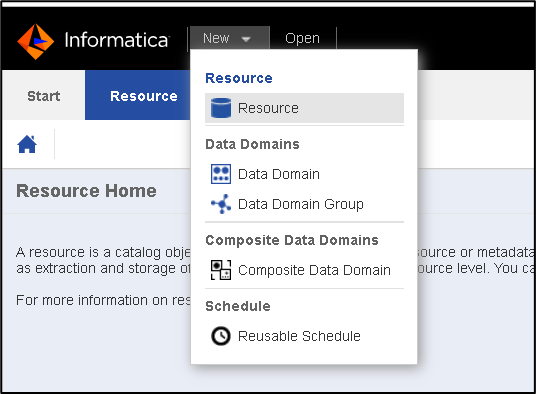

Figure 50. LDMAdmin URL – Resource
2. Select Resource Type as “Informatica Cloud Service” & provide necessary details. Check “Auto Assign Connections.”
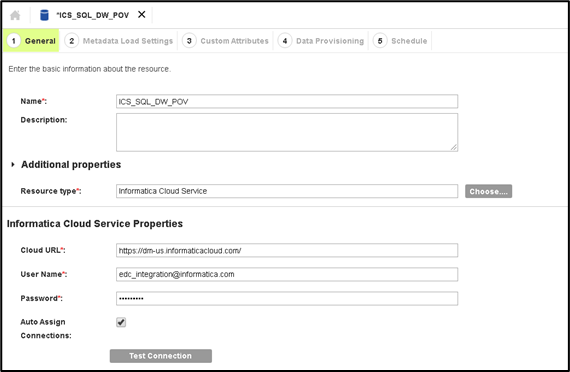

Figure 51. Auto Assign Connections
3. Configure Metadata Load Settings. Make sure you check the “Detailed Lineage” option.
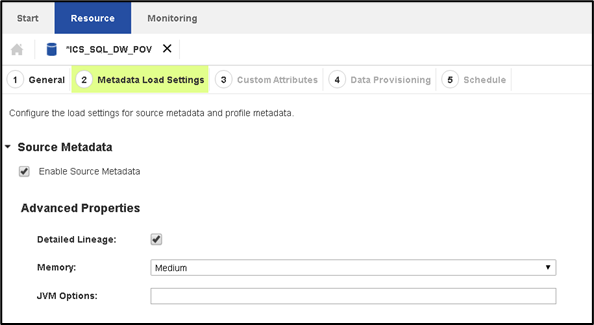

Figure 52. Metadata Load Settings – Detailed Lineage
4. Save the Resource configuration & click on Run (or Save & Run)
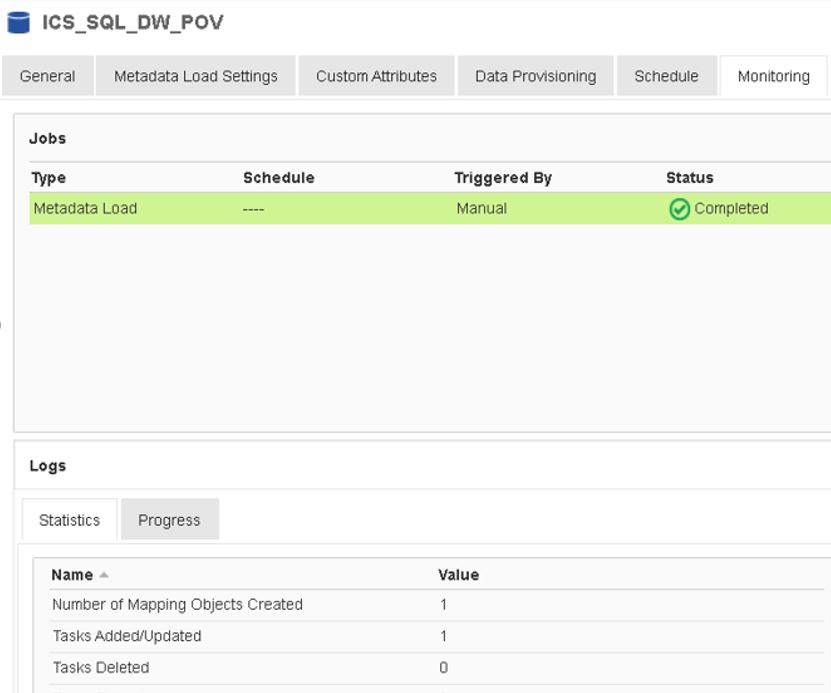

Figure 53. Resource Configuration
5. Go to Manage > Connection Assignment and make sure Connections are assigned Properly.
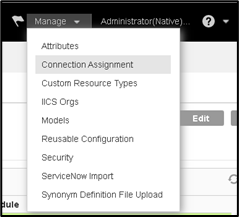

Figure 54. Manage - Connection Assignment


Figure 55. Connection Assignment
Once the metadata is extracted from Oracle, SQL Data Warehouse & Informatica Cloud Service, and Connection Assignments are done, the end-user can review all the metadata, Impact & End-to-End Lineage in the EDC Catalog. To view the Lineage, perform the following:
1. Log in to EDC Catalog URL
2. Search for the IICS Mapping Name or use the filter option to view all the objects loaded under Informatica Cloud Service resource.
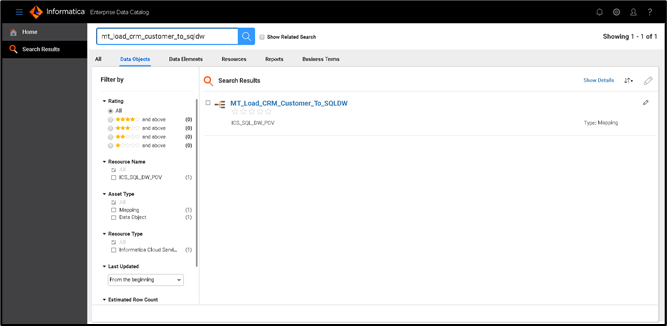

Figure 56. Informatica Cloud Service Resource
3. Click on the Mapping to view its details & also the Source and Target Table information.
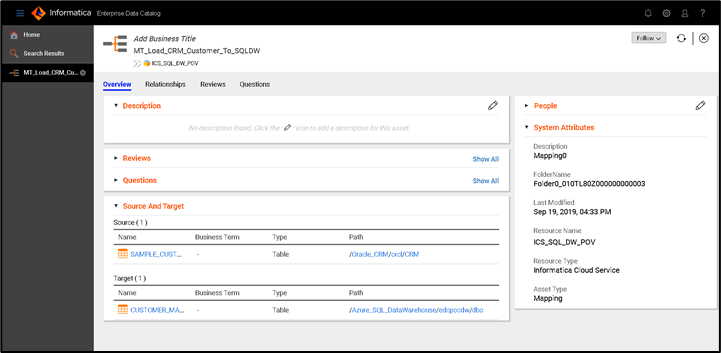

Figure 57. Mapping
4. Click on Source/Target Table to view the details of the table.
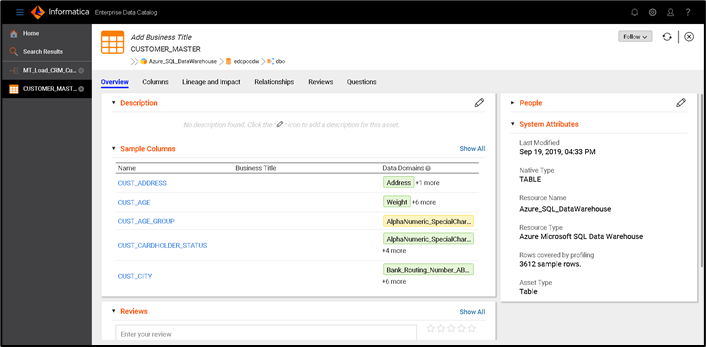

Figure 58. Table Details
5. Click on the “Lineage and Impact” tab to view the Lineage. Click on the “Show Transformation Logic” button.
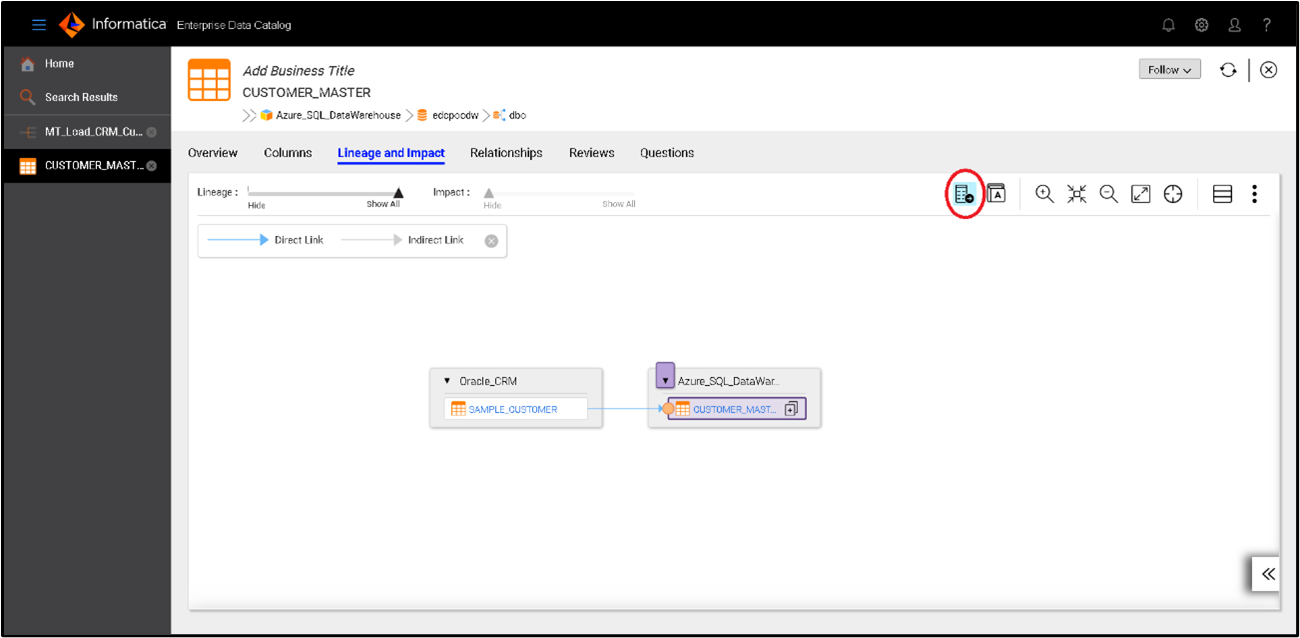

Figure 59. Lineage Impact
6. Once the “Show Transformation Logic” is selected, click on the “Orange Bubble” at the target table to view the detailed Lineage.
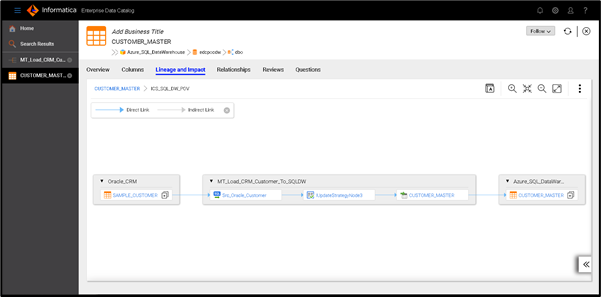

Figure 60. Transformation Logic
7. You can view Column Level Lineage as well, if interested.
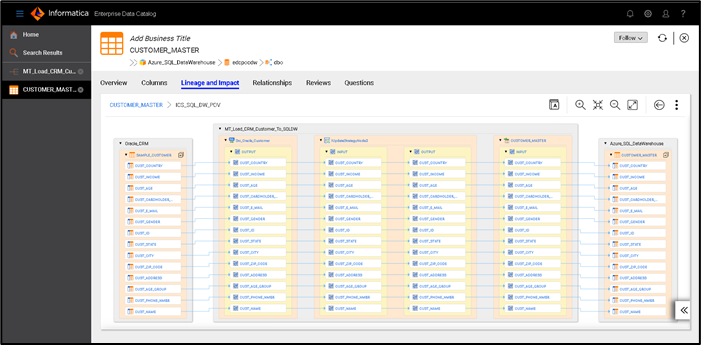
 Figure 61. Detailed Lineage: Part 1
Figure 61. Detailed Lineage: Part 1
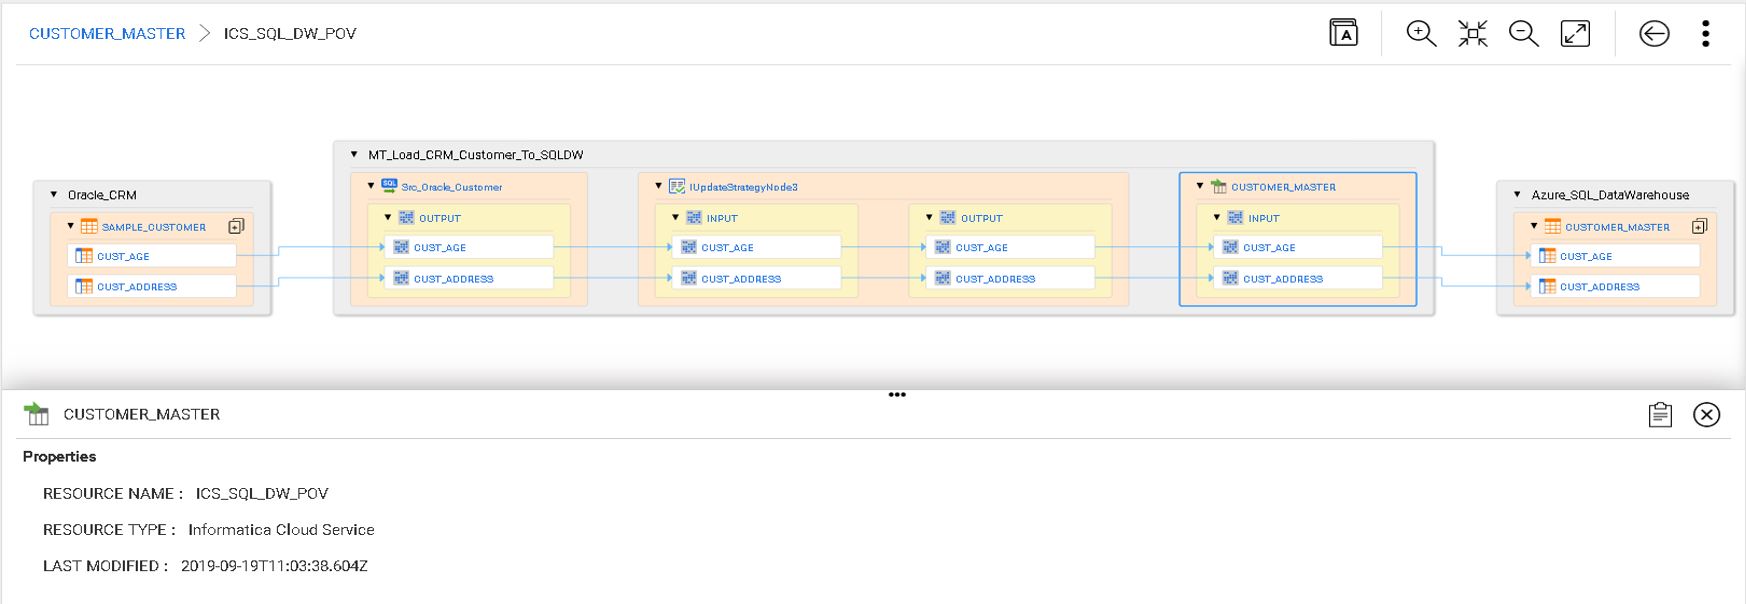

Figure 62. Detailed Lineage: Part 2
Here are few important links that will take you through Intelligent Data Catalog, Enterprise Data Catalog and Azure team up with Informatica:
Click on the below link for an ebook that will help you learn how to accelerate your cloud journey with an intelligent Data Catalog:
Accelerate Your Cloud Journey with an Intelligent Data Catalog
Click on the below links to go through Informatica Enterprise Data Catalog Learning Path. Beginner, Intermediate, Advanced Learning Paths will help you to get a deeper understanding of Informatica EDC. Also, you can learn about some of the critical features of Enterprise Data Catalog by performing tasks in a configured environment:
From the below link learn how Azure and Informatica teamed up to remove barriers for cloud analytics migration and how it will provide you an accelerated path for your digital transformation:
Azure and Informatica team up to remove barriers for cloud analytics migration
