-
Manage your Success Plans and Engagements, gain key insights into your implementation journey, and collaborate with your CSMsSuccessAccelerate your Purchase to Value by engaging with Informatica for Customer SuccessAll your Engagements at one place
-
A collaborative platform to connect and grow with like-minded Informaticans across the globeCommunitiesConnect and collaborate with Informatica experts and championsHave a question? Start a Discussion and get immediate answers you are looking forCustomer-organized groups that meet online and in-person. Join today to network, share ideas, and get tips on how to get the most out of Informatica
-
Troubleshooting documents, product guides, how to videos, best practices, and moreKnowledge CenterOne-stop self-service portal for solutions, FAQs, Whitepapers, How Tos, Videos, and moreVideo channel for step-by-step instructions to use our products, best practices, troubleshooting tips, and much moreInformation library of the latest product documentsBest practices and use cases from the Implementation team
-
Rich resources to help you leverage full capabilities of our productsLearnRole-based training programs for the best ROIGet certified on Informatica products. Free, Foundation, or ProfessionalFree and unlimited modules based on your expertise level and journeySelf-guided, intuitive experience platform for outcome-focused product capabilities and use cases
-
Library of content to help you leverage the best of Informatica productsResourcesMost popular webinars on product architecture, best practices, and moreProduct Availability Matrix statements of Informatica productsMonthly support newsletterInformatica Support Guide and Statements, Quick Start Guides, and Cloud Product Description ScheduleEnd of Life statements of Informatica productsMonitor the status of your Informatica services across regions
- Solution Accelerators
- Axon EDC Integration and Axon Data Marketplace
Data is more critical than ever in delivering the right insights across industries. However, managing data is only getting more challenging as we have vast volumes and continually evolving data types. We are also catering to more user groups than ever before, looking to deliver data to the masses, not just a select few data scientists.
The Data Marketplace, supported by Axon and EDC integration, plays a crucial role in this process by enabling data owners to shop for approved, high-quality data without navigating the complex world of the Data Management organization and vast on-premises and cloud data stores. To sum it up, the Data Marketplace is a platform to browse data collections easily, in a data landscape that your company already owns, using governed provisioning capabilities. This accelerator will help you get the best value out of your data by using the Marketplace in a structured, consistent manner.
The Data Marketplace, supported by Axon and EDC integration, plays a crucial role in enabling data owners to shop for approved, high-quality data without navigating the complex world of the Data Management organization and vast on-premises and cloud data stores. The Data Marketplace is a platform to browse data collections easily, in a data landscape that your company already owns, using governed provisioning capabilities. This accelerator helped you to get the best value out of your data by using the Marketplace in a structured, consistent manner.
Contents


Data is more critical than ever in delivering the right insights across industries and use cases. However, managing data is only getting more challenging as we have exponential growth and continually evolving types of data to keep up with. We are also catering to more user groups than ever before, looking to deliver data to the masses, not just a select few data scientists.
So how can we achieve this? The Data Marketplace plays a crucial role in this process by providing data owners with the means to curate and publish representations of their best data collections for all to see. This enables business consumers like report writers and dashboard developers and technical consumers, like integrators, to shop for approved, high-quality data without navigating the complex world of the Data Management organization and vast on-premises and cloud data stores.
The foundation for this Data Marketplace lies in good governance; you must be able to:
- Catalog your available data at scale (using AI-powered automation wherever possible) so that data is easier to find and retrieve and its provenance is recognized
- Understand the quality of your data across the enterprise (using AI-powered automation wherever possible) so that you can ensure you are sharing the best possible data with consumers
- Comprehend the sensitivity and protection status of the data in question so that you can ensure the correct policies are being enforced concerning the usage of that data
Only then will your data citizens easily browse data collections, shopping for the best possible data for their purposes. Think of Data Marketplace as shopping for the data you need, in the data landscape that your company already owns, using governed provisioning capabilities. This knowledge base will help you get the best value out of your data using the Marketplace in a structured, consistent manner.
Let’s explore how to get started with Axon Data Marketplace, beginning with identifying your core organization and data owners, then moving to Definition, Curation, and finally Publishing and Provisioning information for your Data Consumers.
Note: This is intended to provide an introduction; there are extensive Job Aids and demos available to provide more detail into each step shown here.
The high-level flow for managing and using the Marketplace looks like this:
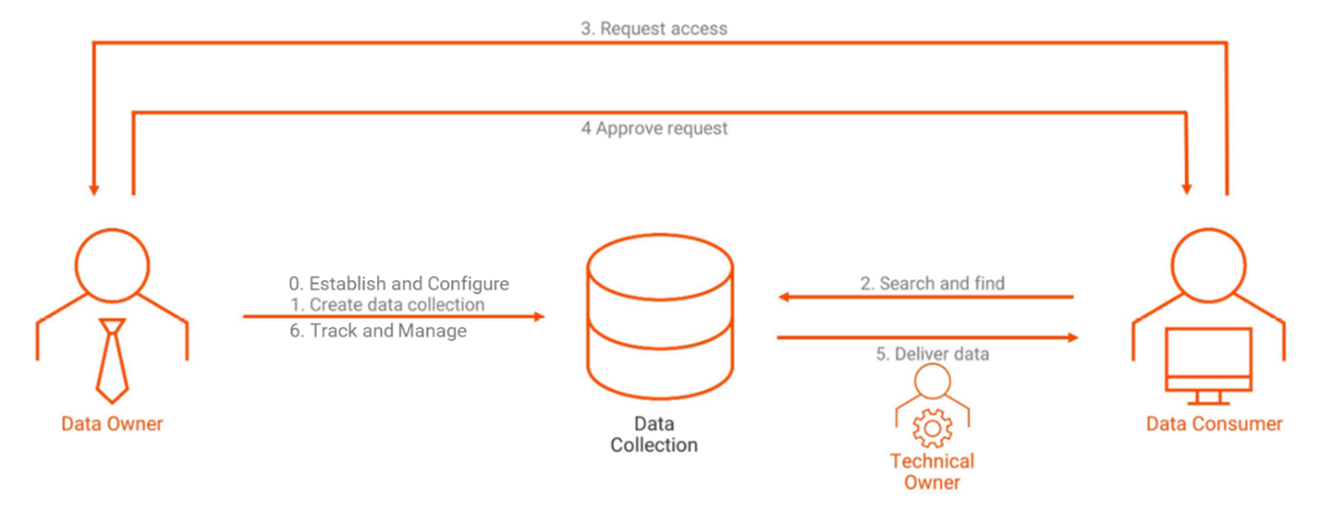
Figure 1. Marketplace Flow
To enable the Marketplace and make it a productive and seamless experience for Owners and Consumers, there are some initial setup activities to stage for success:
- It would be best to establish a Hierarchy of Data Categories, broad groupings of data that will make sense to your users when shopping. Some examples of this include a top-level Finance category that contains subcategories of Accounting, General Ledger, Accounts Payable, etc. In this way, users new to the Marketplace can navigate through intuitive hierarchies to locate data that meets their needs, in addition to keyword searching.
- It would be best to establish Policies for data usage; these may include Acceptable Use, Retention, Privacy (PII, PHI, PCI), and others. These are defined using the Policy facet in Axon to publish a Data Collection in the steps that follow.
- It would be best to establish potential Delivery Methods for the data. These are the specific means by which access could be provisioned. For example, it may be pointing a user to an extracted flat file or providing a link to the AWS S3 Bucket in which the raw data is stored.
- It would be best to establish Marketplace Administrators and Technical Owners who will serve as default Data and Technical Owners for all Data Collections where specific people are not defined.
In short form:
- The Marketplace Administrator is generally a data owner and will Publish data sets to the Data Marketplace as data collections, assign ownership where they are not the correct person to handle requests, and Approve or Reject access requests to data collections where they are.
- The Technical Owner is a System Administrator for specific data sources and will organize data access to consumers. They are the correct person to do so or assign ownership where they are not.
- The Data Consumer is the end-user of the curated data and will use Marketplace to Find and request access to data collections or even request that new ones are created where they cannot find what they need.
- Establishing these roles provides ongoing governance for access and distribution of your most valuable data.
With these in place, you can start to populate the Marketplace.
The initial creation of the data collections begins with defining the Data Set in Axon. We recommend reviewing Axon methodologies for onboarding technical data to understand all the nuances. Still, in short, you typically use integrated Axon, IDQ, and Enterprise Data Catalog to Discover and Curate valuable data in your enterprise. This helps tie the System, Data Set, and Attribute technical components to Business Glossaries and other facets in Axon to give context.
Once satisfied with this data's quality and documentation, the Data Owner will link the data set to the appropriate Policies and notify the Marketplace administrator that it is ready for publication. The Data Quality review is an essential component and will be tied to the data collection's shopping entry; this is covered in detail in the following sections.
The Marketplace Administrator then publishes the data, which involves finding an appropriate place in the Data Category hierarchy for the Data Collection and confirming reasonable provisioning possibilities with the Technical Owner. The Data Collection is now available for shopping.
Shop for Data
Now that the Data Collection is in the Marketplace, Data Consumers can search for relevant data to fulfill their use cases. As an example, Joe Smith, a Tableau report writer, is looking to develop a new dashboard summarizing sales operating margin in the Retail arm of his company.
He accesses the Data Marketplace and initially navigates to the Sales area of the hierarchy, looking for data sets that meet his needs. He may also use a full-text search to search on “Margin” or “Sales” or other keywords to uncover potential sources. Alternatively, he could use the glossary filter to ensure the data collection that he is seeking contains the right concepts for his analysis.
Request Access
Having now discovered the Data Collection that can meet his sales dashboarding needs, the Data Consumer will add the item to his shopping basket in Marketplace. In our example, Joe Smith must describe his business justification for gaining access to the data so that the Data and Technical Owners can make an educated decision about granting access. The Data Consumer will always have a list of active and fulfilled orders for reference, while the Data and Technical Owners will see those requests pertinent to them, based on their role against a Data Collection.
It should be noted that advanced configurations of Data Marketplace may involve configuring ServiceNow as the workflow tool instead of native Axon if that is your fulfillment tool of choice.
Approve Access
The approval process has two elements: The Data Marketplace element and the technical system element. Approving the Data Marketplace request is a straightforward gesture for the Data and Technical Owners, using the native workflow to approve or deny access based on the Data Consumer's business justification.
The second part of this is granting access to the data itself. Suppose the Delivery Method is, for instance, access to an AWS S3 Bucket. In that case, the Technical Owner is responsible for providing these rights, potentially creating user IDs, updating ACLs, etc., for the requested data source. This will vary greatly depending upon the Delivery Method. Data Marketplace is how the access is documented for the user but does not play a role in granting access to the technical source.
Once access is granted, the Data and Technical Owners execute final approval. At this time, the Data Consumer will receive notification of the provisioning in their Axon notification center and via email.
Deliver Data
This aspect of the process is primarily outside of Data Marketplace. Once granted access, the Data Consumer will attempt to open the data by (in our example) querying the S3 Bucket to validate that data can be viewed and searched and fed into the Operating Margin dashboard. Technical connection and integration are the responsibility of the Data Consumer and their IT team.
The Data Consumer, now connected to the Data and Technical Owners, can provide feedback about the quality and usefulness of the data, giving a rating and commentary to the Owners and other Data Consumers looking to leverage this information.
Track and Manage
Data Marketplace tracks and retains all requests, orders, and feedback in activity logs; an essential activity for Data and Technical Owners and the overall System Administrators will be establishing and monitoring success metrics for the Marketplace. Specific metrics may include Fulfillment Time, Fulfillment Accuracy, Quality and Ratings, and broad stakeholder involvement.
These may vary across your own implementation needs and should be combined with other general Data Governance metrics to provide insight into your data governance program's health from creation through to consumption.
Enterprise Data Catalog (EDC) - provides a machine-learning-based discovery engine to scan and catalog data assets across the enterprise—across cloud and on-premises and big data anywhere. EDC integrates with Axon to automate processes for acquiring data assets through scanning and discovery, assess their criticality to the data governance program, and onboard them into Axon to be brought under governance.
In our scenario, the Sales team is looking to enhance the billing and payment system at CorpAxon. John Admin (the Axon Administrator) has published all the Sales related data collections with Sales as a category in Axon Data Marketplace.
The Sales team business users would like to collaborate better with the IT team by getting a better understanding of data available to them for their core activities but have little knowledge of the advanced technologies in use. Their goal is to analyze sales data to predict better which customers will be more likely to pay their bills on time. They would like to do this for the EMEA region.
The IT team, led by Mary Smyth, has implemented AI and ML capabilities in the Data Catalog to categorize better and identify which data sets and attributes are most applicable to a business user.
The team working on this scenario consists of:
- John Steward is assigned as the Data Owner for EMEA Sales Data.
- Mary Smyth is assigned as Technical Owner for the EMEA Sales Data.
- Martin Hirst is the IT resource assigned to feeding the data into analytical models for the bill payment assessment. Martin will be the resource shopping for the data collection in the Data Marketplace.
This section will configure Axon to use a given Enterprise Data Catalog (EDC) to support onboarding EDC assets. Initially, we are acting in a capacity as the Administrator.
This sample configuration will enable all the Auto Onboarding options and then show how Axon auto onboards EDC assets later in the section titled: Intelligent Automated Onboarding. We will also review how to perform the onboarding task manually when these options are disabled in the section titled: Manual Onboarding.
Configuration
- Enable Automatic Onboarding
Optional. Automatically onboards the objects discovered in Enterprise Data Catalog to Axon. If you do not choose this option, the found objects are not onboarded automatically after the scheduled synchronization between Axon and Enterprise Data Catalog. - Accept Onboarded Objects
Optional. If you choose to accept the onboarded object and the Confidence Score is 100%, the Enterprise Data Catalog attributes appear with the Accepted review status in Axon. You do not have to curate these objects again in Axon. - Accept Lineage Recommendations and Create Links
Create attribute links automatically based on the lineage recommendations from Enterprise Data Catalog. If you do not select this option, you can manually create links later from the lineage recommendation notifications.
The following are the steps:
1. Launch the Informatica Axon URL.
2. Login with Administrator (John Admin) user credentials.
3. Access Admin Panel from the User Menu dropdown.
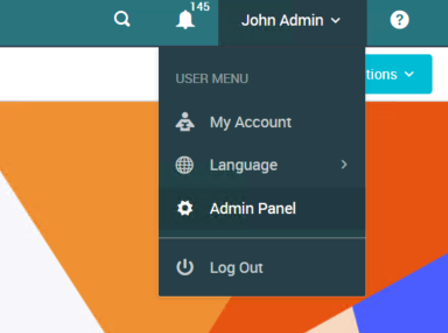
Figure 2. User Menu dropdown
4. Select Customize & Configure >> System Settings from the Admin Panel.
5. Choose Enterprise Data Catalog from the Select Group dropdown.
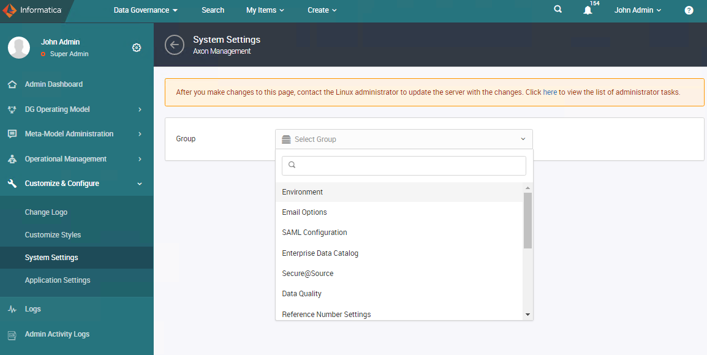
Figure 3. Select Group dropdown
6. Click Edit and enter the following details (sample):
Enterprise Data Catalog Server Host |
https://edc.hostname.com |
Enterprise Data Catalog Server Port |
9086 |
Enterprise Data Catalog Server Username |
Administrator |
Enterprise Data Catalog Server Login Password |
<password> |
Enterprise Data Catalog Server Login Namespace |
Native |
Enterprise Data Catalog Axon Resource Name |
Axon |
Enable Automatic Onboarding |
Checked |
Confidence Score Threshold |
95 |
Accept Onboarded Objects |
Checked |
Axon Super Admin email |
admin@informatica.com |
Accept Lineage Recommendations and Create Links |
Checked |
Note: We create the Enterprise Data Catalog Axon Resource (Named: axonedc). This is a mandatory step.
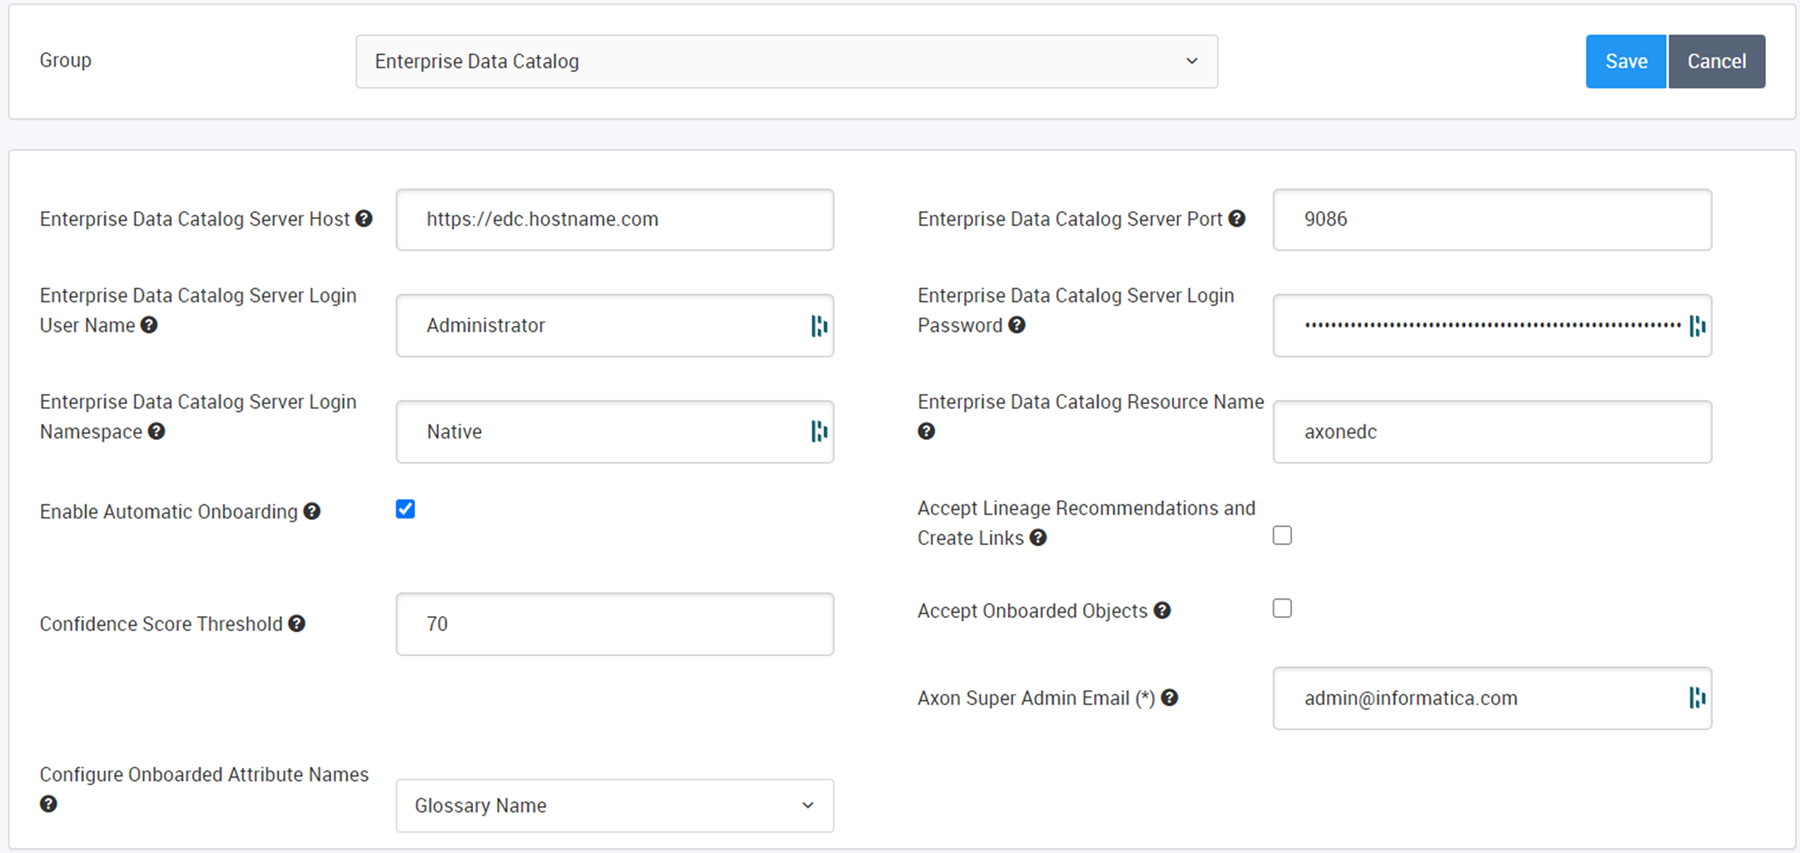
Figure 4. Select Group dropdown
Optionally you can enable the following:
Enable Automatic Onboarding
Optional. Automatically onboards the objects discovered in Enterprise Data Catalog to Axon. If you do not choose this option, the found objects are not onboarded automatically after the scheduled synchronization between Axon and Enterprise Data Catalog.
Accept Lineage Recommendations and Create Links
Create attribute links automatically based on the lineage recommendations from Enterprise Data Catalog. If you do not select this option, you can manually create links later from the lineage recommendation notifications.
Accept Onboarded Objects
Optional. If you choose to accept the onboarded object and the Confidence Score is 100%, the Enterprise Data Catalog attributes appear with the Accepted review status in Axon. You do not have to curate these objects again in Axon.
7. Click Save to complete the step.
8. Log in to the server where Axon is installed
9. Clear the Axon Cache and Restart Services.
After you make system configuration changes, you must update the Axon cache with the new configuration values.
In this example, Axon was installed at: /informatica/Axon70
sh/informatica/Axon70/axonhome/third-party-app/scripts/paramsync
When you run the paramsync script, Axon restarts the HTTPD, Memcached, and email notification services.
All users currently logged in will be logged out of the system and will have to re-login.
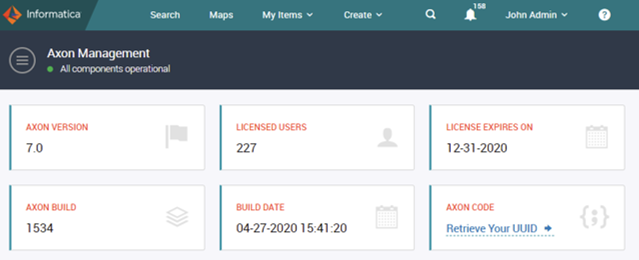
Figure 5. Admin Panel
The steps to bulk load are as follows:
1. Click on Create
2. Click Upload from File
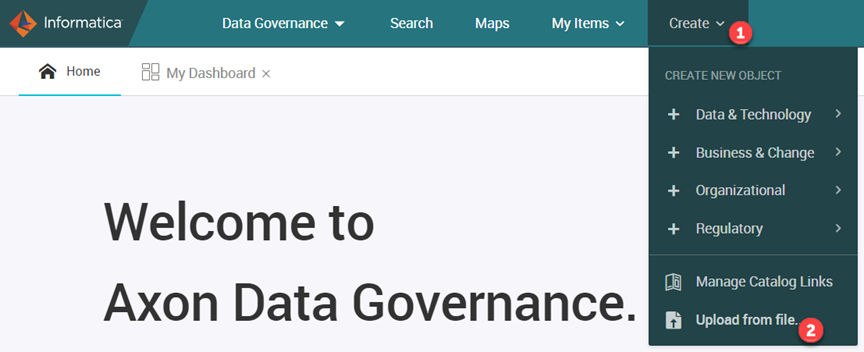
Figure 6. Create and Upload from File
3. Click on the object type dropdown
4. Enter “people” in the search, then select people
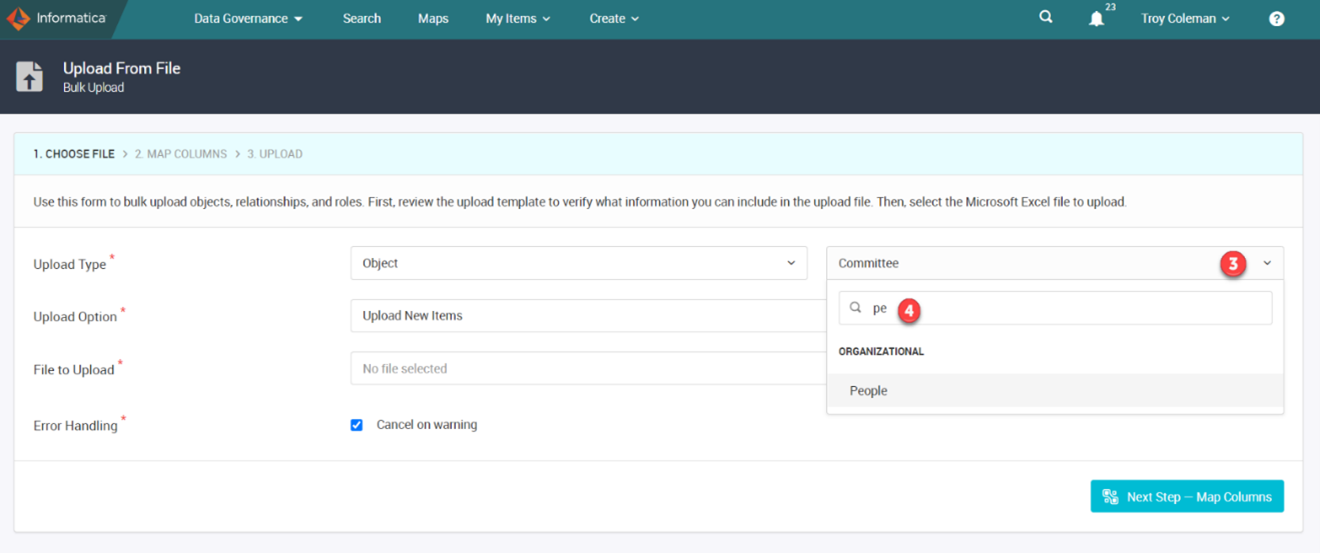
Figure 7. Select people
5. Click on choose file to browse and select the bulk load file 01_People.csv
6. Click Next
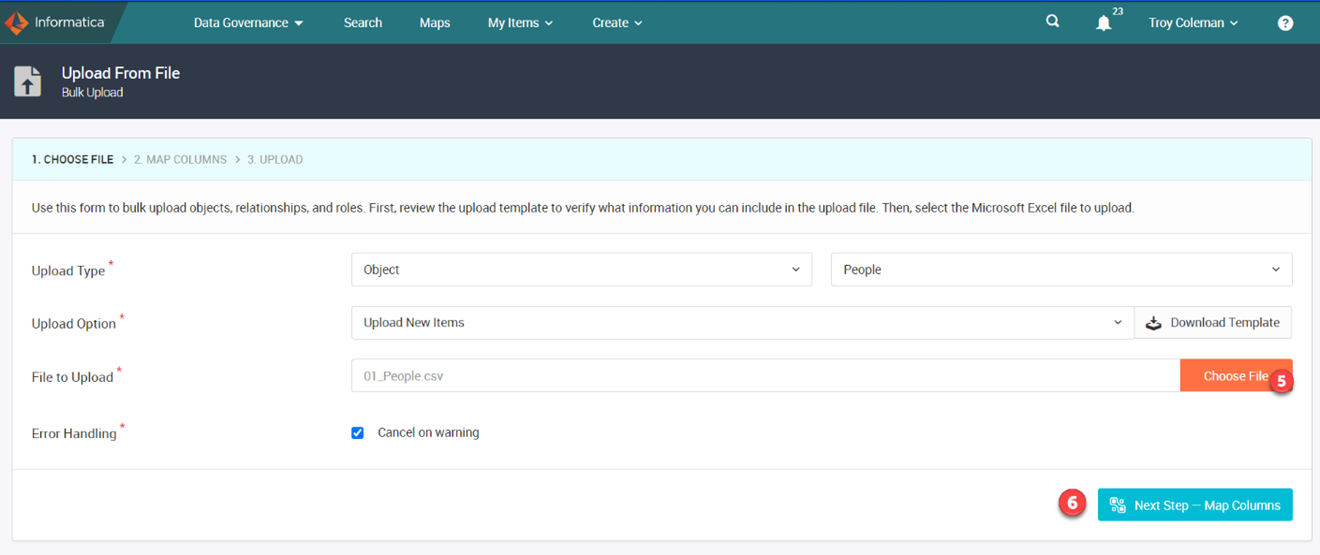
Figure 8. Select the Bulk Load File
Notice the mandatory fields are mapped
7. Click Next
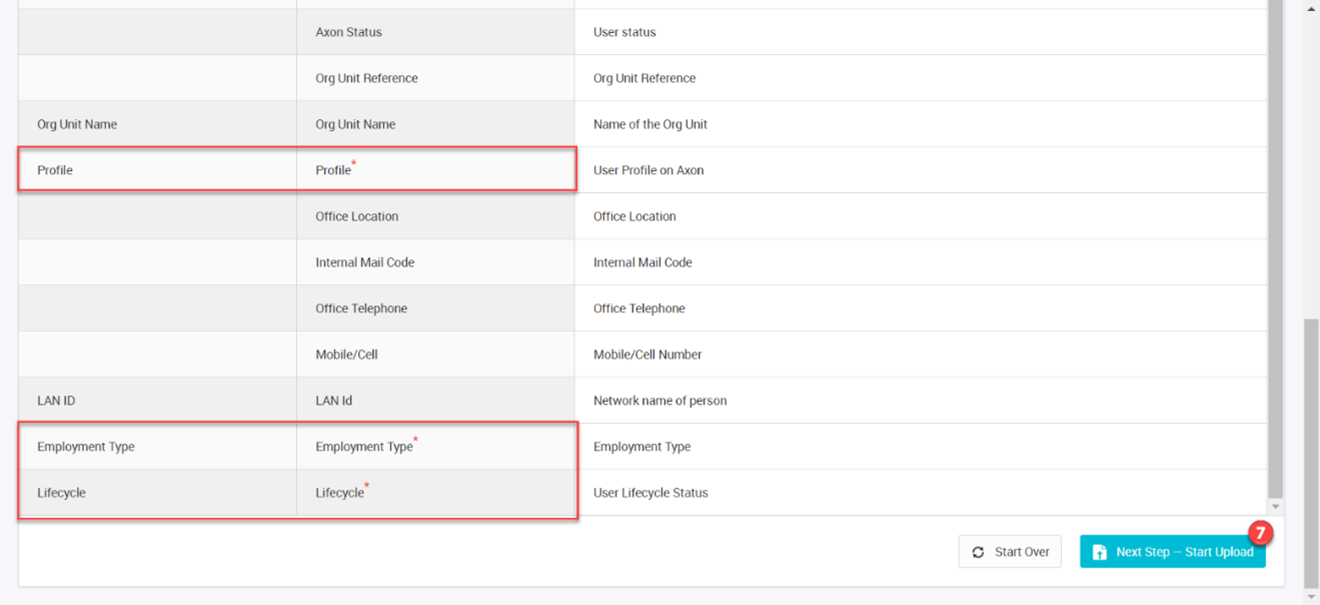
Figure 9. Map mandatory fields
You will see the load progress bar.
If you receive an error as seen below, you will need to click on the Download Report to view the errors.
Once the bulk load file errors have been corrected, click start over and reselect the file to load.
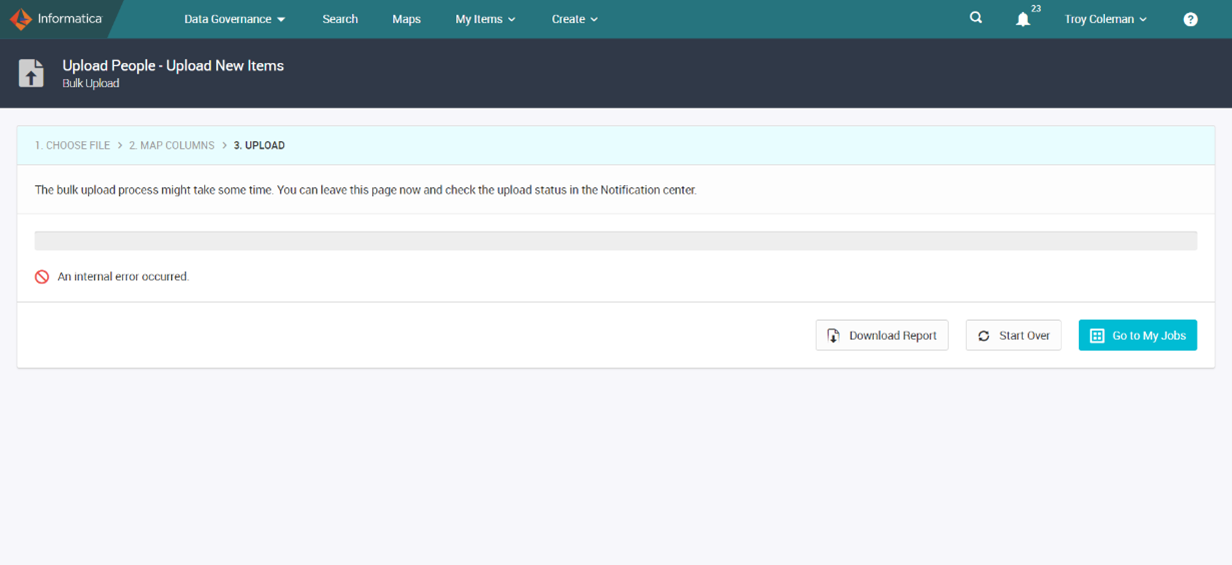
Figure 10. Load Progress Bar
In this case, people have already been loaded.
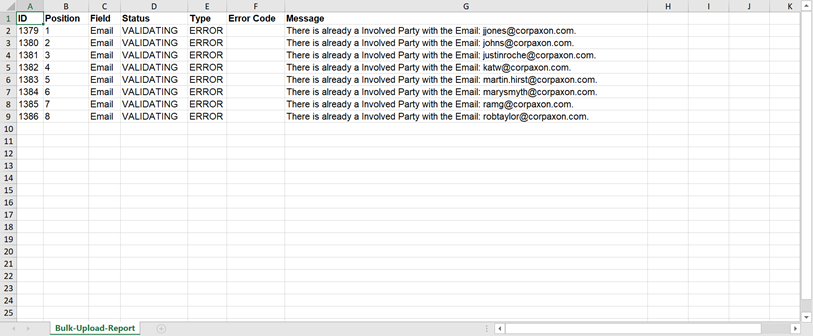
Figure 11. Bulk Upload Report
Once loaded, you can review the data. Click on Search >> People
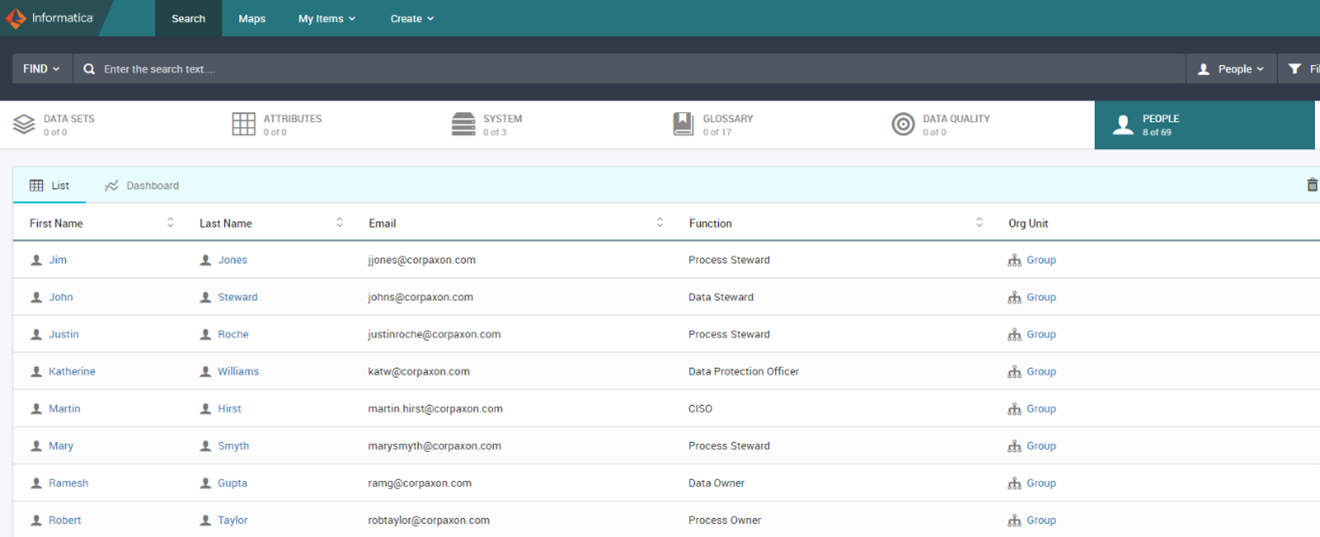
Figure 12. Review Data
Repeat the steps above. For
Step 4, choose object type Glossary
Step 5: File will be 02_Glossary.csv
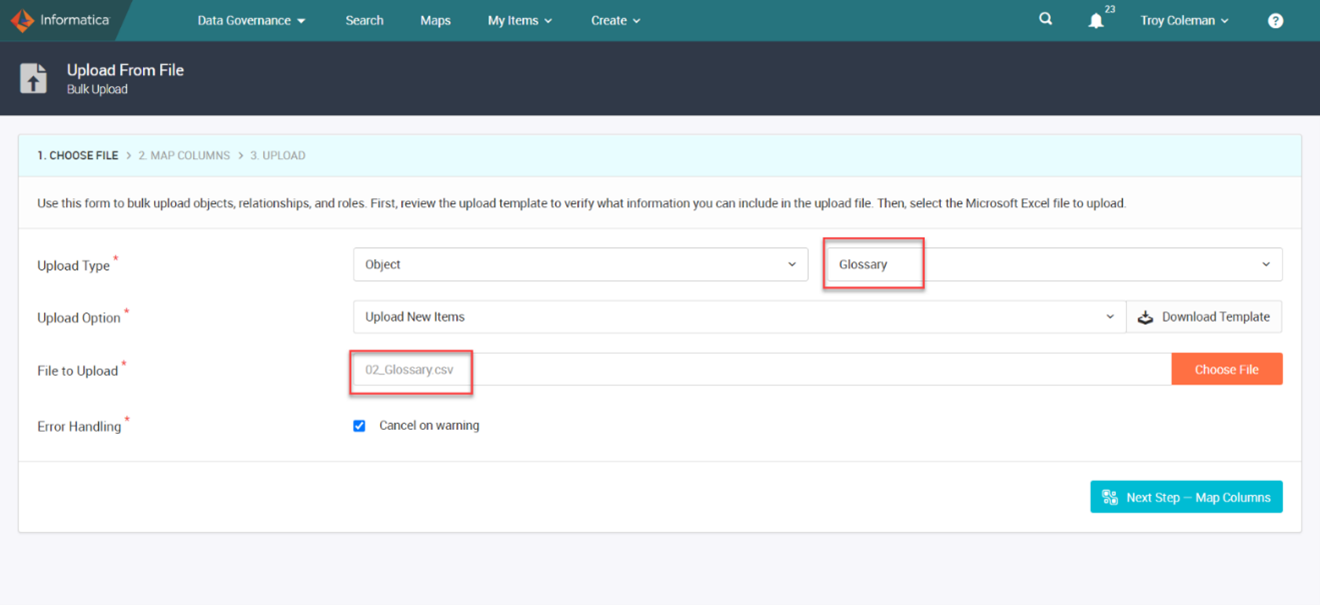
Figure 13. Object type – Glossary
Repeat the steps above. For
Step 4, choose object type System
Step 5: File will be: 03_System.csv
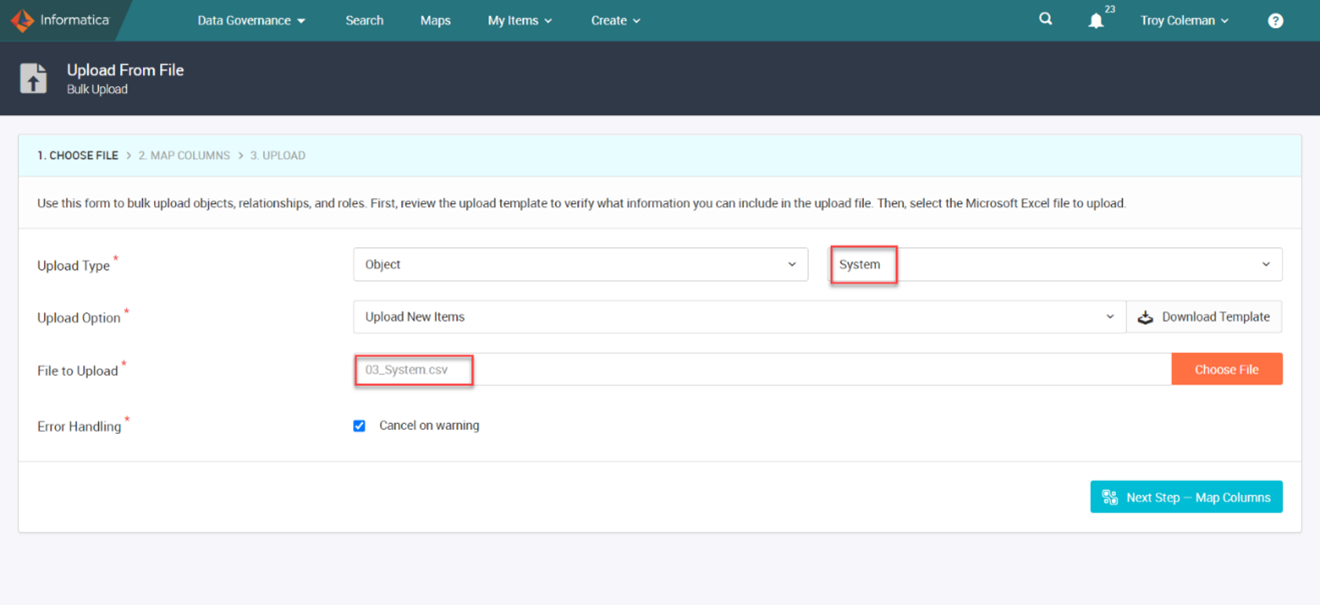
Figure 14. Object type – System
1. Login to the Informatica Administrator console of the EDC instance.
2. Launch the Catalog Administrator URL from Catalog Service.
HTTPS://<hostname>:<port>/ldmadmin/
3. Create a new Resource.
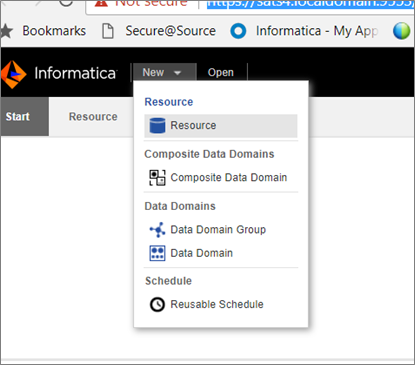
Figure 15. Create New Resource
Enter the details as per the list below.
Name: axonedc
Resource Type: Axon
Username: admin@informatica.com
Password: <password>
Host: <hostname>
Https Port: 8443
Enable Secure Communication: enabled
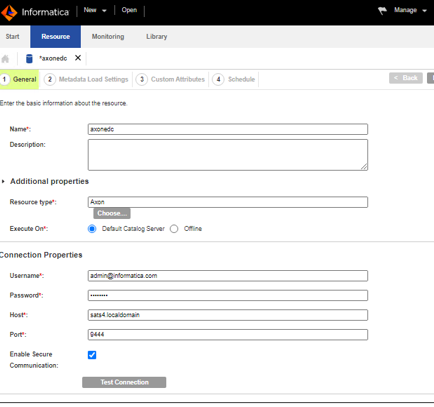
Figure 16. Enter details in the resource
4. Click Test Connection.
5. Close the Test Connection pop-up window and click Next once the connection information is valid.
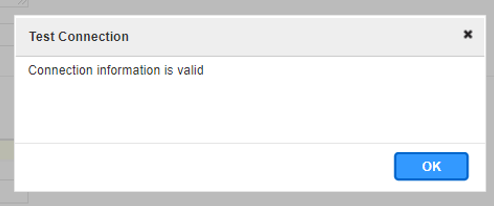
Figure 17. Test Connection
6. Retain the default settings and click Next.
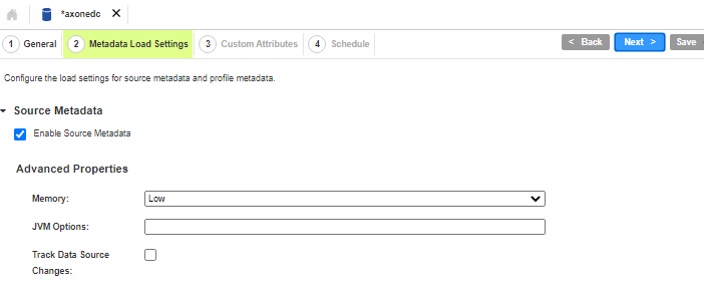
Figure 18. Retain Default Settings
7. Click Next.

Figure 19. Custom Attributes
8. Schedule the Job for an Immediate Execution, to do that select Save and Run from the drop-down for this resource.
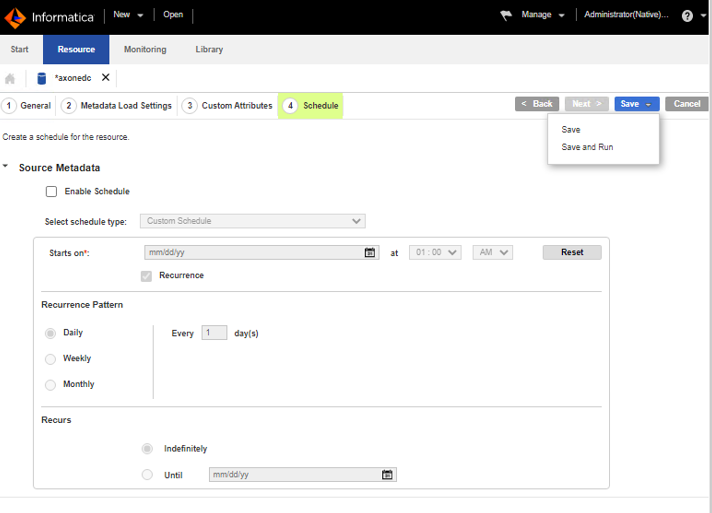
Figure 20. Schedule - Save and Run

Figure 21. Save and Run
The Job is Queued and is then executed and wait for its status to be set to Completed. This may take around 10 – 12 minutes to complete.
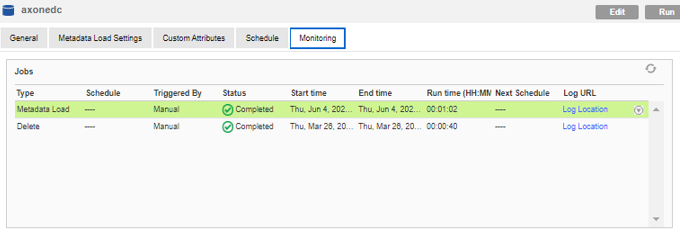
Figure 22. Scroll down monitoring
Analyze the Statistics for the Job (scroll down the Monitoring page).
Note these numbers will be different based on your Axon Glossary content.
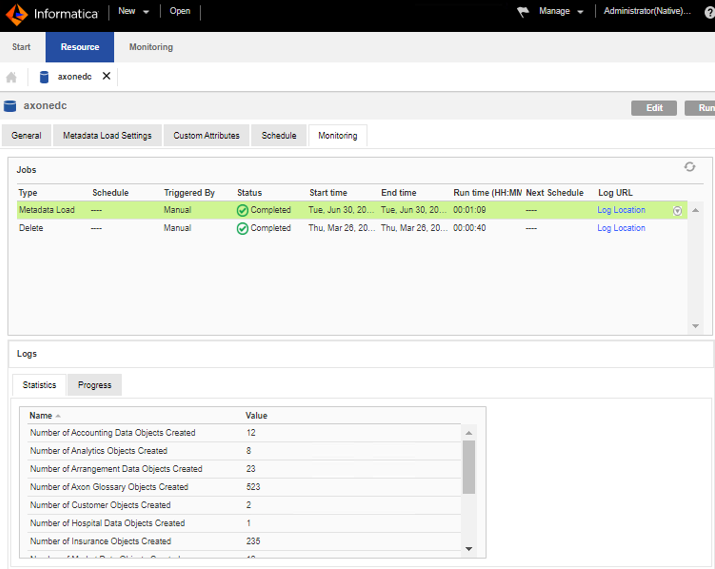
Figure 23. Analyze Statistics
9. Launch the Catalog URL in Incognito mode.
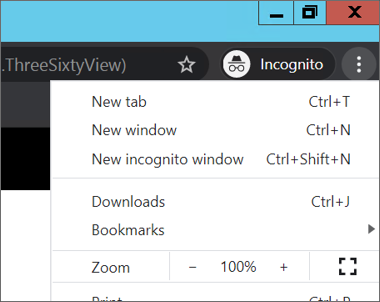
Figure 24. Catalog URL – Incognito Mode
https://<host>:<port>/ldmcatalog/login
10. Search for the axon resource name axonedc in the Catalog Search window.
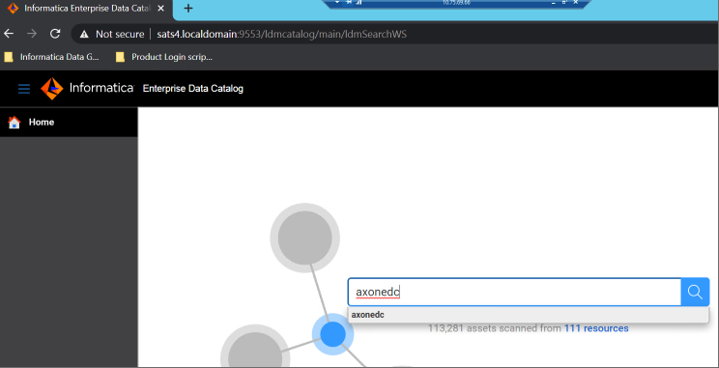
Figure 25. Search axonedc
11. Now we can see the Resource which was imported from the Axon.

Figure 26. Resource imported from Axon
12. Click on axonedc.
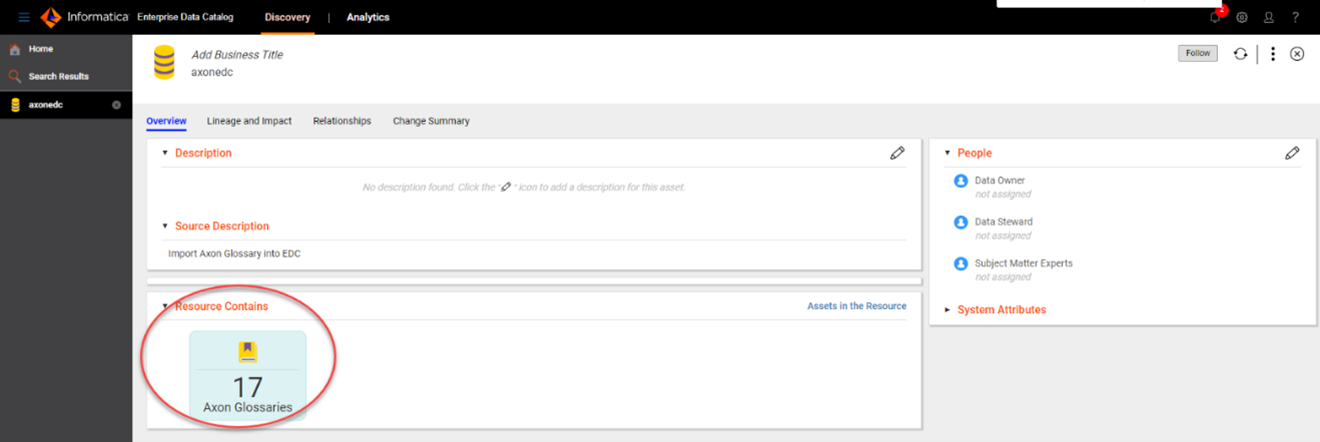
Figure 27. Click on axonedc
Now it shows the number of Glossary items imported from the axon. You can see the Glossary items by clicking on “17 Axon Glossaries”
Need to create RESOURCE with source “Global Sales Data” to be used in the next step.
1. Upload the sample data file “tcoleman_DG_SALES_GLOBAL_DATA.csv” to the server where EDC is running.
2. Create RESOURCE Global_Sales_Data using the DG_SALES_GLOBAL_DATA.csv file as source.
3. Run RESOURCE with data discovery to assign data domain FirstName, LastName
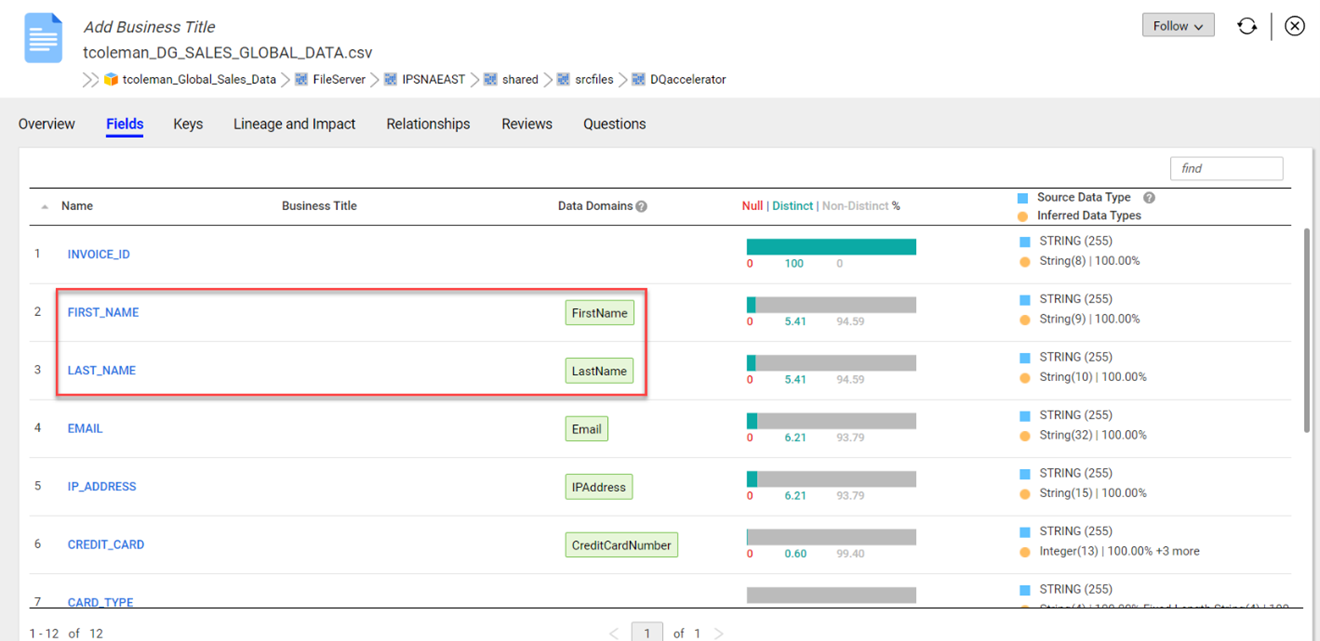
Figure 28. Run Resource with Data Discovery
1. Toggle to Create a Manage Category Links in Axon URL.
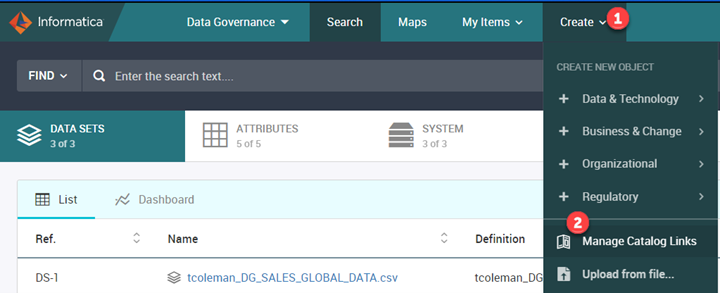
Figure 29. Create a Manage Category Links
3. Access the Resources tab.
The Resources Tab should show a list of Resources that have been created in the Enterprise Data Catalog. This instance has some prepopulated Systems that were linked to Resources. Hence you see them already linked.
4. Create links between an EDC Resource and an Axon System.
Search for Resource in Global in the Keyword field.
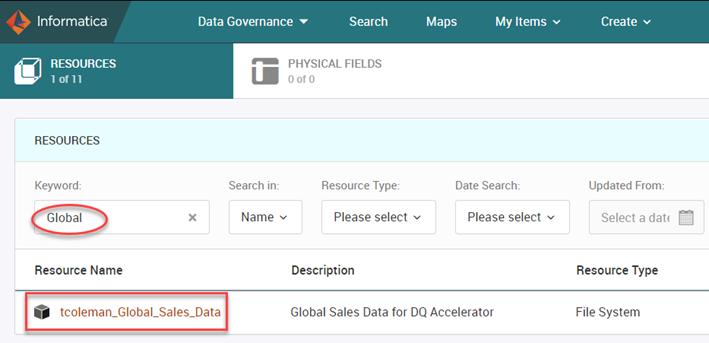
Figure 30. Search in Global
4. Select the record and then Right-click and choose Manage Linking.
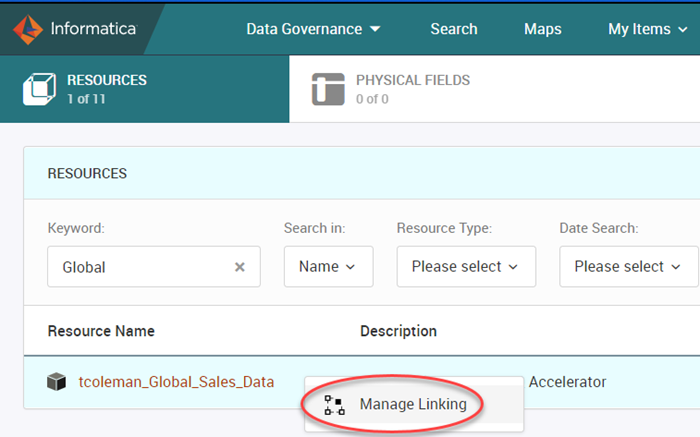
Figure 31. Manage Linking
5. Select DARWIN System.

Figure 32. Select DARWIN
6. Press Save to save the link between the EDC Resource and the Axon System. Once Saved, we can see the Linked Axon System.
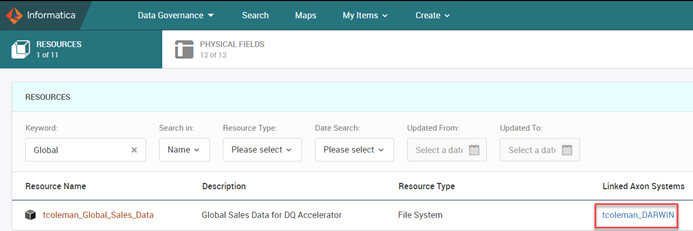
Figure 33. Linked Axon System
7. Open DARWIN System, and you can view the Enterprise Catalog tab, which lists the Resource linked in the previous step.
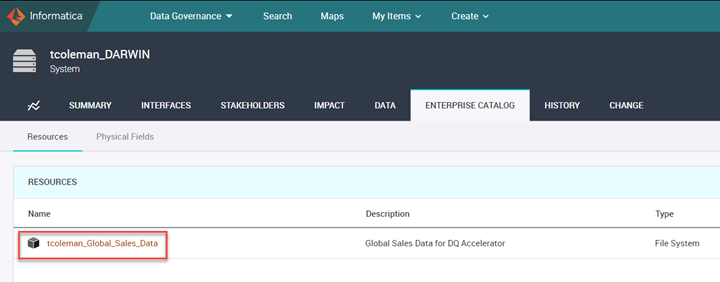
Figure 34. View Enterprise Catalog
8. Toggle back to Create >> Manage Catalog Links
Select the Physical Fields tab and search for Global under Resource.
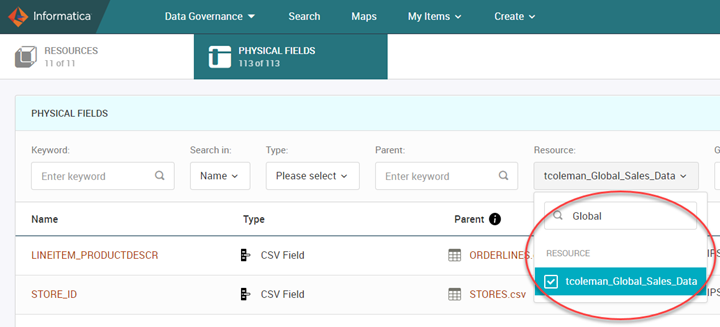
Figure 35. Select Physical Fields
Note that there are now 12 Fields showing on the Fields Tab.
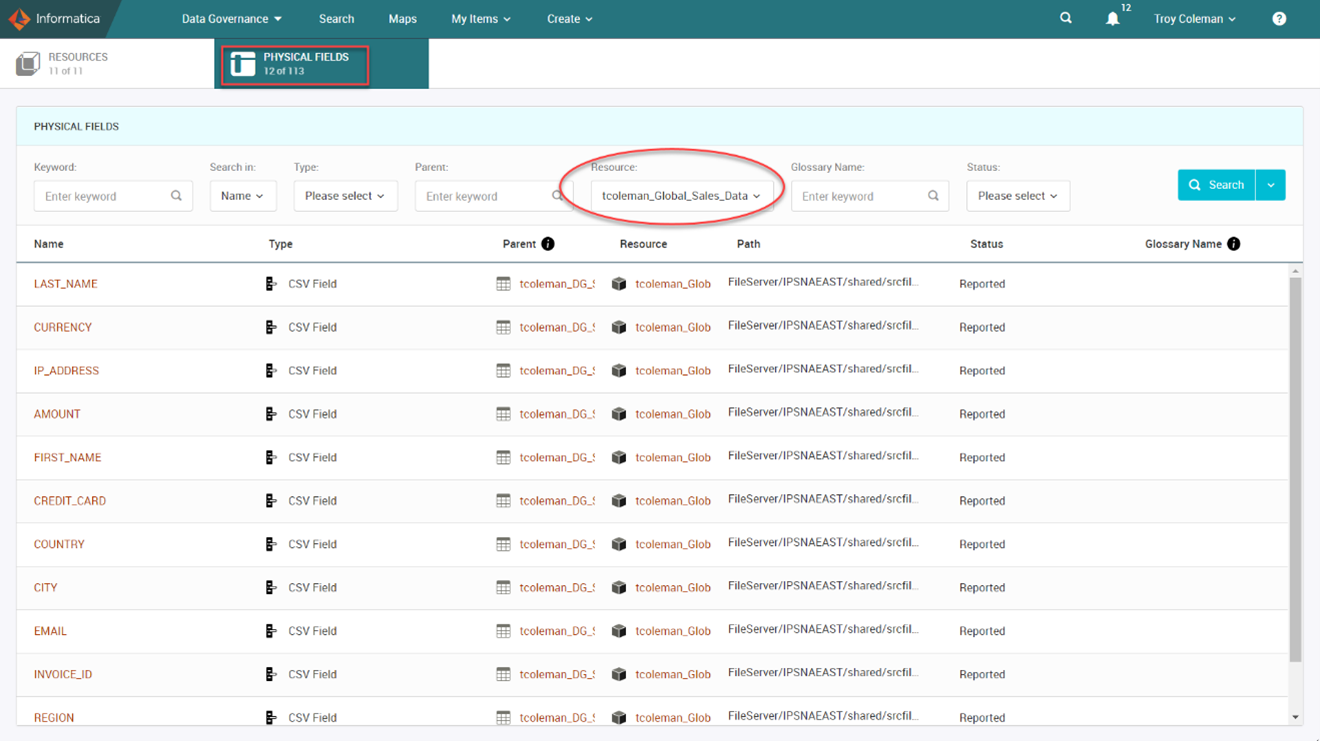
Figure 36. 12 Fields on Tab
9. Toggle back to the Unison Search page.
10. Search for Glossary – Last_Name
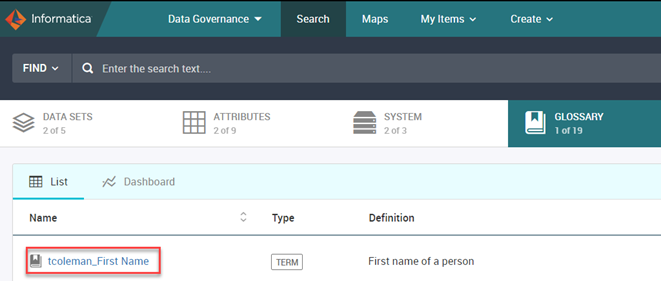
Figure 37. Search Last Name
11. Click on First Name in Glossary.
12. Click Edit.
13. Access Data tab.
14. Navigate to Data Discovery.
15. Click on the pencil icon associated with Data Domain Discovery Rules
16. Choose Data Domain – FirstName

Figure 38. Data Domain – FirstName
17. Click Select.

Figure 39. Save and Close
19. Click Save & Close.

Figure 40. Pop-up window
Wait for the pop-up window to close.
19. Click on the Data tab in First Name (GLOSSARY) and ensured that the Data Domain Discovery Rule association is complete.
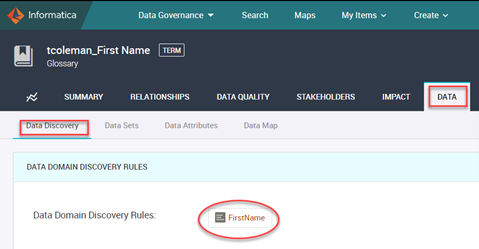
Figure 41. Data Tab
20. Switch to EDC to link Axon Glossary to Data Domains or object Business Title. Note in the image below that the Business Title Party Data will override the data domain LastName when LAST_NAME is imported into the Axon dataset attribute.
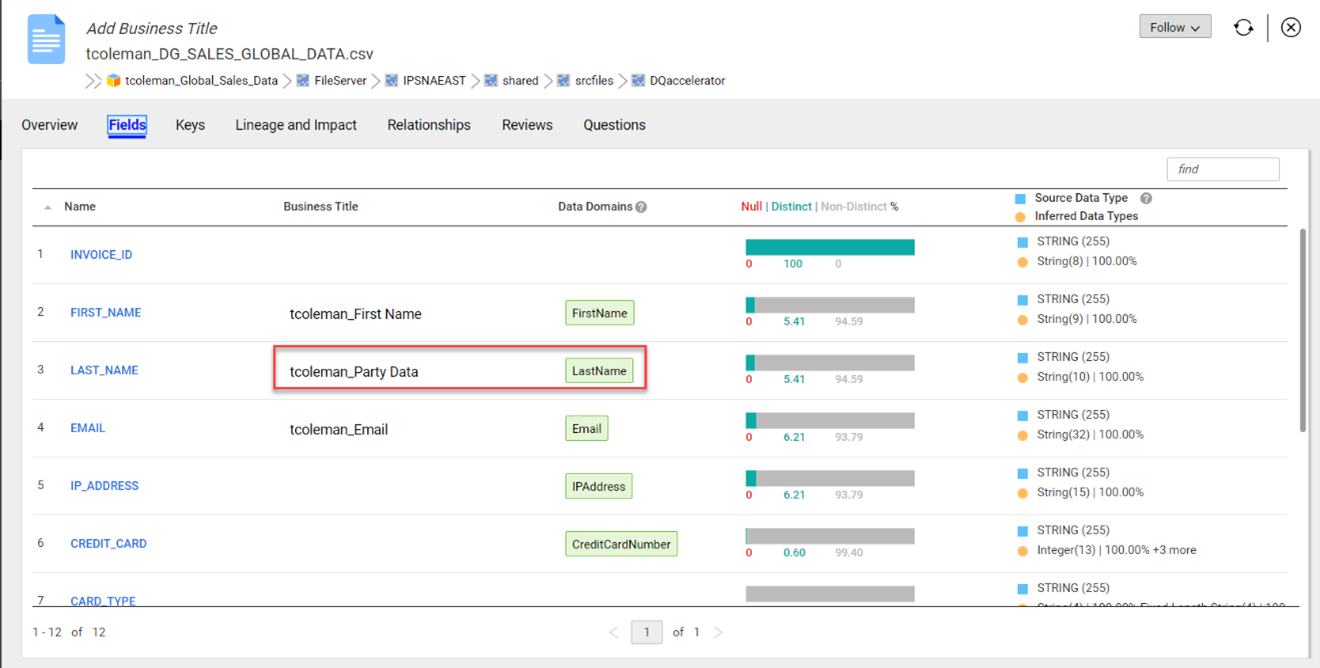
Figure 42. Link Axon Glossary to Data Domains
Axon Dataset Attribute:
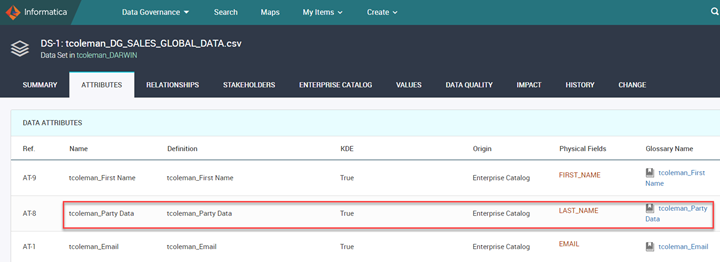
Figure 43. Axon Dataset
21. Ensure the data domain for LastName is a link through the Business Title Axon Glossary tcoleman_Last Name
Now when you run Axon auto onboarding, the name will be imported with the correct glossary name.
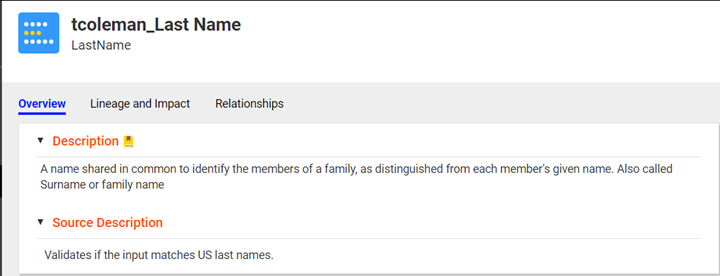
Figure 44. tcoleman_Last Name
The next step is to ONBOARD the objects that were linked earlier between EDC and Axon into Axon.
One of the applications of a maturing glossary is utilizing it within EDC to make associations to the physical assets discovered and thereby create the understanding of what those tables and fields support.
In this process, the fields/columns are onboarded. This is the launch pad for users to link the Axon and Informatica Data Quality objects to connect the rules.
Note that you can manually link the attributes in Axon with the fields in Enterprise Data Catalog.
We have selected the option to automatically onboard the objects from Enterprise Data Catalog to Axon. When you choose to onboard items, the data sets and attributes are automatically created and onboarded to Axon.
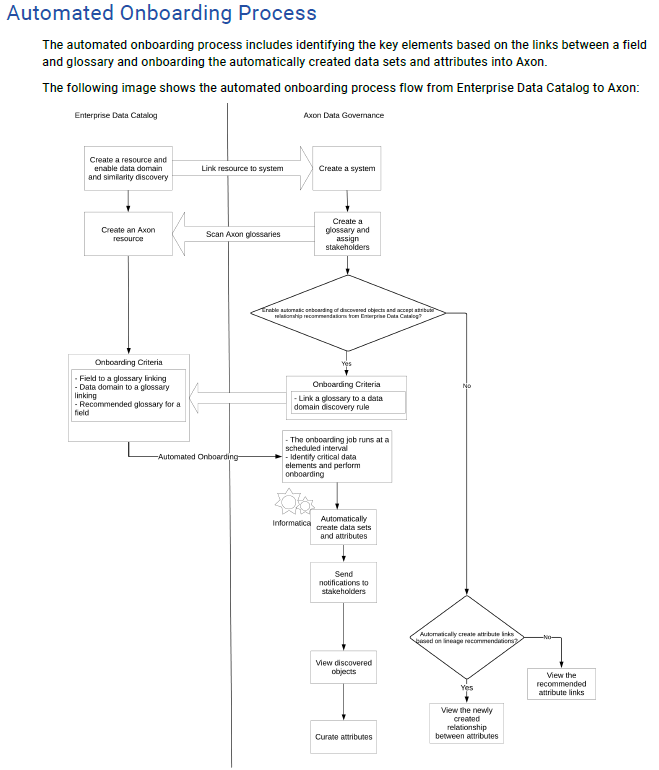
Figure 45. Automated Onboarding Process
Access the onboarding script, which is in the Axon server.
cd/home/nroot/Informatica/axon7.0.0/axonhome/axon_asset_onboarder/scripts/
The script file onbaoard_assets.sh is in this folder. The Axon server runs this script at 2:00 AM every day to onboard new data.
The steps are as follows:
1. Run the script file by running the following command.
sh onboard_assets.sh
The script execution will take at least 10 minutes.
2. Once the script is successfully executed, refresh Axon Search to see the number of Data Sets and Attributes onboarded.

Figure 46. Refresh Axon Search
Note: The record count in your instance may vary.
Follow the below steps:
1. Access Axon URL and log in as John Admin.
2. Click on the Bell icon at the top to view Notifications.
3. Select Bulk Upload.
4. You can see the chronology of actions performed as part of Onboarding listed here.
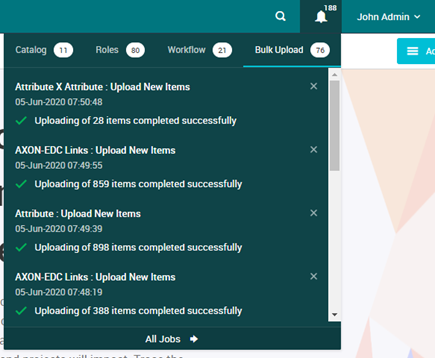
Figure 47. Onboarding Actions
5. Access Create à Manage Catalog Links tab.
6. Select the Physical Fields tab.
7. Search for Resource – tcoleman_Global_Sales_Data
8. Note that tcoleman_FIRST NAME and tcoleman_Last Name fields are now an Inferred Glossary.
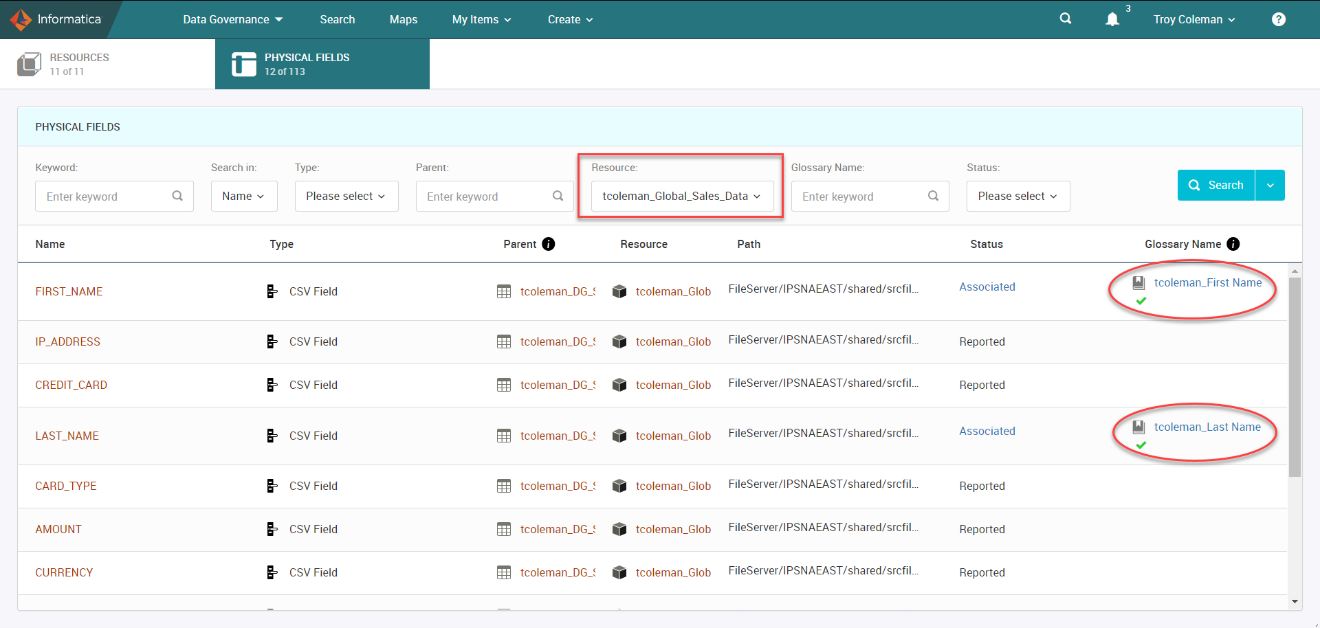
Figure 48. Inferred Glossary
Until now, the Attribute to Attribute link had to be manually created by the user, or the user could have used the lineage recommendation at the dataset.
Axon 7.0 allows the user to automatically create an Attribute to Attribute relationship in Axon based on the Field association and appropriate link existing in the Technical lineage in Enterprise Data Catalog.
Only one-hop linkages can be established (i.e., One column is directly linked to another column, and both are connected to two attributes, only then this linkage will appear in Axon).
This is additional information that will be brought in as part of the already existing on-boarding job that runs on a pre-scheduled basis.
This can be enabled/disabled in the Admin panel (System Settings). Appropriate user notifications in the UI will also be generated for the same.
Overview of Axon
Axon Data Governance provides visibility into the quality of your data in its business context so you can be confident that it's fit for purpose. Its integration with Informatica Data Quality ensures your team is working with trusted data.
Install Axon Agent
Run the AXON install option for Axon Agent if you want to connect Axon to Informatica Data Quality to run data quality rules on the Axon data assets. Informatica recommends that you install the Axon Agent on the system where you have installed Informatica Data Quality.
Configure Axon with IDQ
1. Launch Informatica Axon
https://<URL>:8443
2. Login with Administrator user credentials.
Email: admin@informatica.com
Password: <password>
3. Access Admin Panel from the User Menu dropdown.
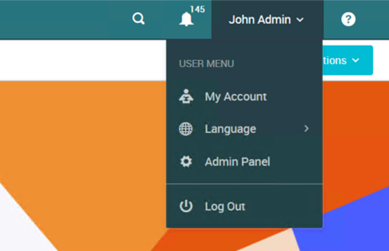
Figure 49. Admin Panel
4. Select Customize & Configure -> System Settings from the Admin Panel.
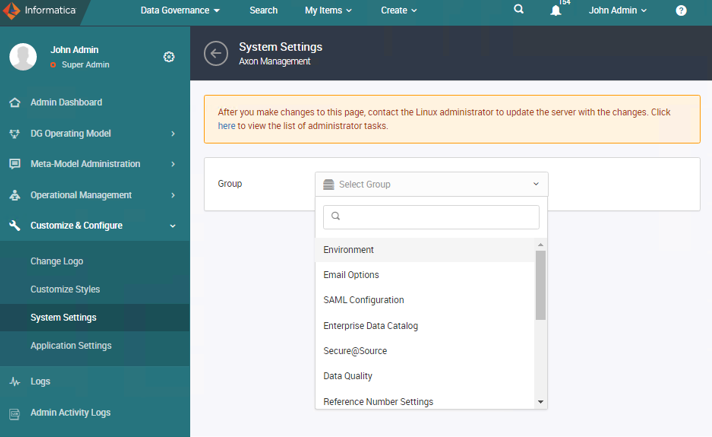
Figure 50. Customize and Configure
5. Choose Data Quality from the Select Group dropdown.
6. Enter the Data Quality Server Host and Port details. To do that, click on the Edit button.
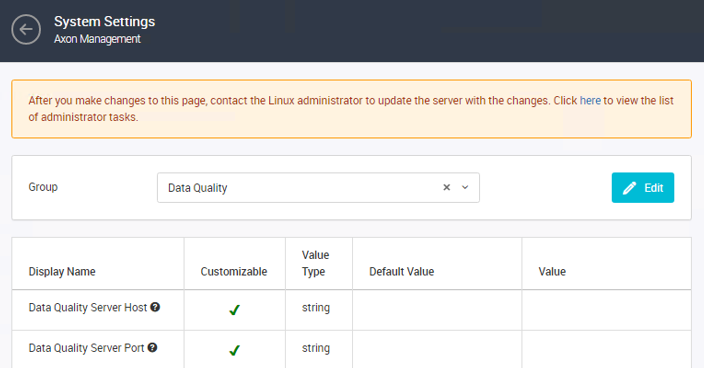
Figure 51. Data Quality Server Host
Data Quality Server Host – <hostname>
Data Quality Server Port – 10211 (Specify the port which you entered in the Agent Installation)
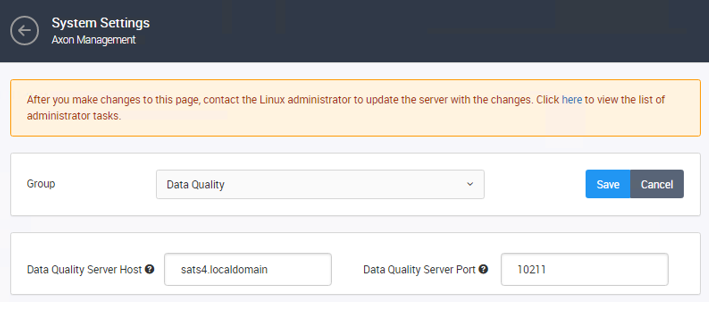
Figure 52. Enter Details in fields
7. Click Save to complete the step.
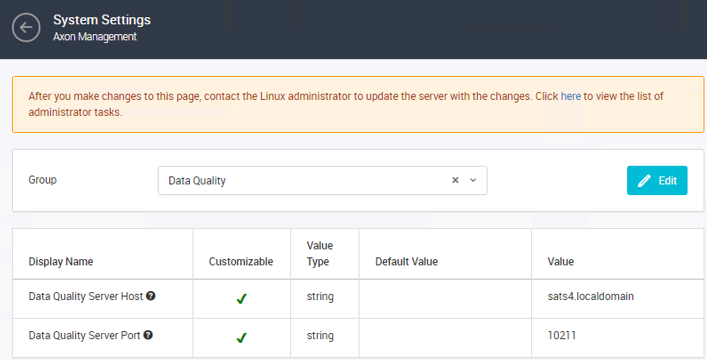
Figure 53. Complete the process
8. Access Application Settings under Customize and Configure.
9. Click Data Quality.
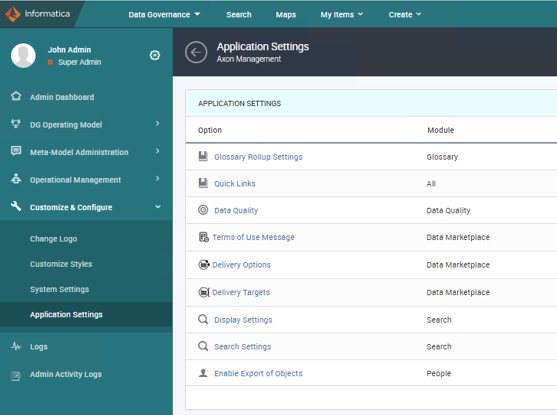
Figure 54. Application Settings – Data Quality
10. Ensure that the Auto-generate local rules for standard rules and Data Quality Rule Recommendations checkbox are checked.
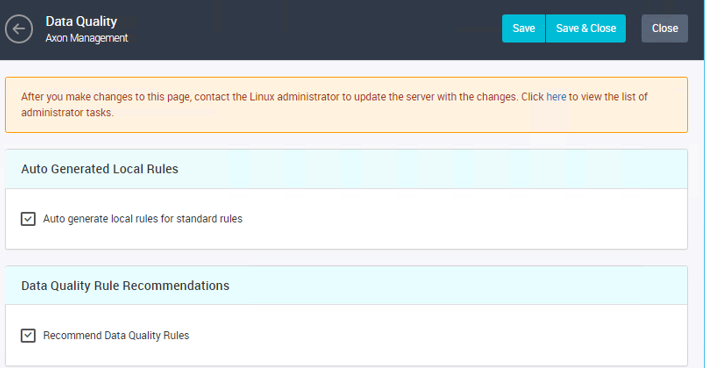
Figure 55. Check Data Quality Boxes
11. Click Save & Close.
The Data Marketplace is a new dimension to Axon. It provides a storefront experience that enables distributed data consumers in your company to search (or ''shop'') for governed data relevant to their needs and facilitates access where needed. It allows you to:
- Organize and publish governed data into browsable categories.
- Browse and search for data assets using relevant business context, powered by Unison.
- Have your data access requests follow a workflow that involves appropriate stakeholders.
The marketplace is a new way of serving your analytics community's diverse needs, helping users more easily locate curated data sets that may meet their needs from a reporting or interface perspective. The marketplace enables organizations to govern all their critical data, defining, assigning ownership, and ensuring and reporting on outcomes of data governance policies and rules. In our scenario, we will publish the Sales Global dataset in a reusable fashion so that other users know its topical focus and can then request access to it for their purposes.
Data Stewards and other users with appropriate access can publish data collections for business use and find data collections that other users in your organization have published. If you are the owner of a data set in Axon, you can make the data available for others on a self-service basis from the Data Marketplace interface. Similarly, if you want to use the data published by other organization members, you can request access to the data on a self-service basis.
Enable Data Marketplace and Assign Users
1. Launch the Informatica Axon URL.
2. Log in with Administrator (John Admin) user credentials.
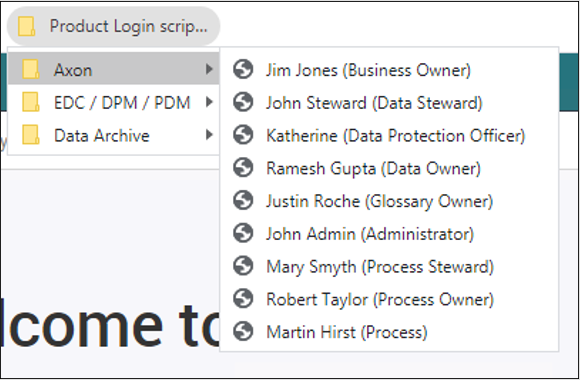
Figure 56. Log in with Administrator
3. Access Admin Panel from the User Menu dropdown.
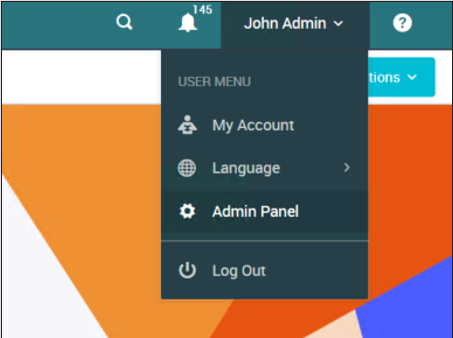
Figure 57. Access Admin Panel
4. Select Customize & Configure à System Settings from the Admin Panel.
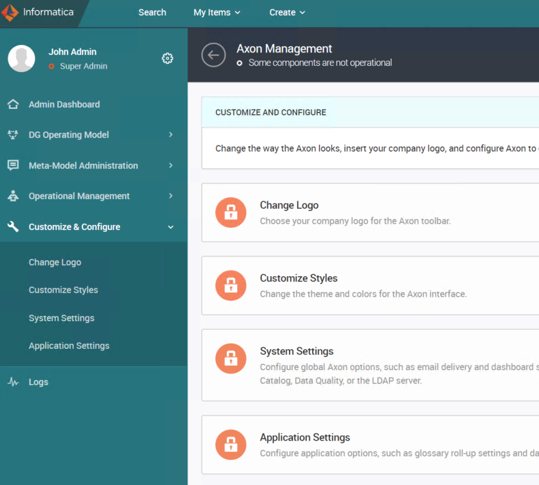
Figure 58. Select Customize and Configure
5. In the Group list, select Data Marketplace.
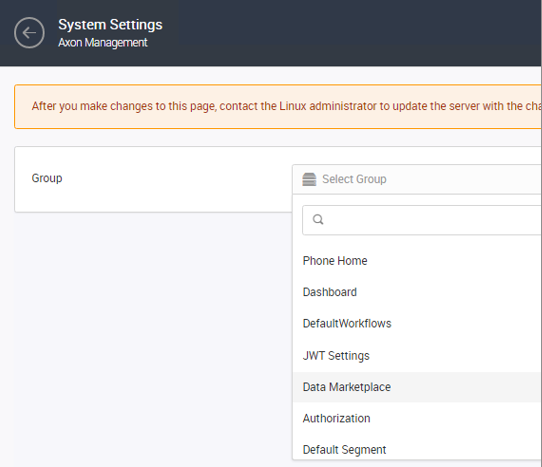
Figure 59. Data Marketplace
6. Click Edit, and configure the following properties:
Property |
Value |
Description |
Enable Data Marketplace |
Checked |
Select the checkbox to enable Data Marketplace. |
Data Marketplace Administrators |
John Admin |
Specify the administrators of the Data Marketplace. Administrators are the owners of all data collections and can approve access requests to data collections. |
Data Marketplace Technical Owners |
Ramesh Gupta |
Specify the default technical owners of the Data Marketplace. Technical owners provision data sets to users that have requested access to data collections. |
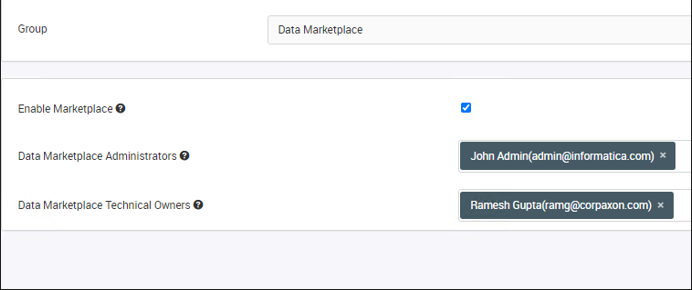
Figure 60. Edit and Configure Data Marketplace
7. Click Save to complete the step.
8. Log in to the server where Axon is installed.
9. Clear the Axon Cache and Restart Services. After you make system configuration changes, you must update the Axon cache with the new configuration values.
In this example, Axon was installed at: /informatica/Axon70
sh /informatica/Axon70/axonhome/third-party-app/scripts/paramsync
When you run the paramsync script, Axon restarts the HTTPD, Memcached, and email notification services.
10. Launch Informatica Axon URL and login with Administrator credentials and ensure that all the processes are running in the Admin Panel.
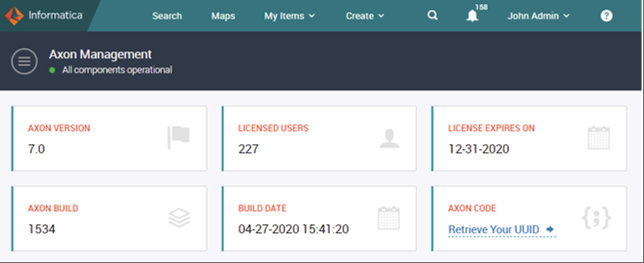
Figure 61. Informatica Axon URL
11. Login with Administrator (John Admin) user credentials.
12. Access Admin Panel from the User Menu dropdown.
13. On the navigation pane, click Customize & Configure à Application Settings.
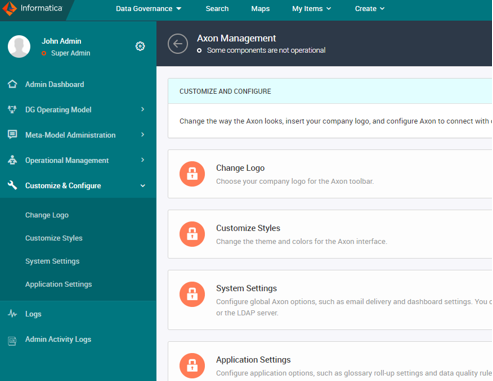
Figure 62. Customize and Configure – Application Settings
14. Click Delivery Options.
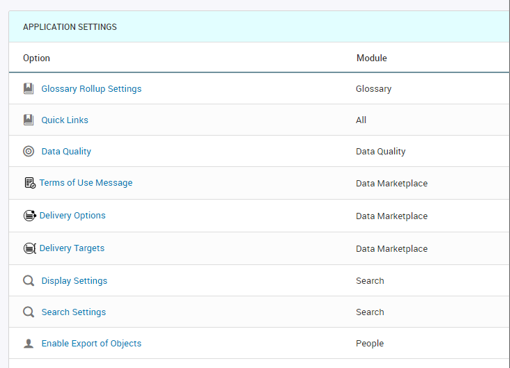
Figure 63. Delivery Options
The Delivery Options page displays the
- Delivery Methods
- Delivery Formats
- Data Presentations
15. Click Edit in the Delivery Methods section.
16. Click +, and configure the following properties in the Add Delivery Method window.
- Name: Email Delivery
- Description: The data collection will be sent over Email
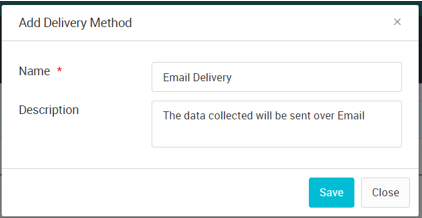
Figure 64. Add Delivery Method
17. Click Save to save the delivery option.
18. Click Edit in the Delivery Formats section, click, and configure the following properties in the Add Delivery Format window.
- Name: CSV
- Description: The data collection will be sent in CSV format
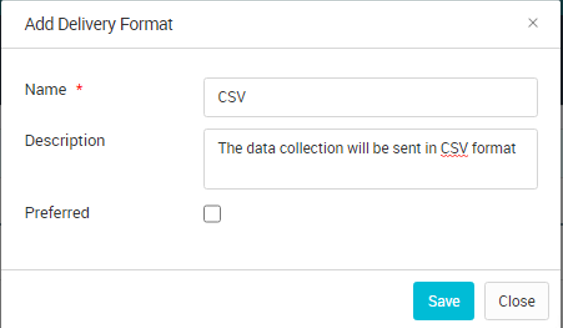
Figure 65. Edit Add Delivery Format
19. Click Save to save the delivery format.
20. Click Edit in the Data Presentation section, click, and configure the following properties in the Add Data Presentation window.
Method |
Format |
Status |
Email Delivery |
CSV |
ACTIVE |
Email Delivery |
XML |
ACTIVE |
Email Delivery |
JSON |
ACTIVE |

Figure 66. Add Presentation Window
21. Click Save to save the delivery format.
The steps are as follows:
1. On the Admin Panel, navigation pane, click Customize & Configure à Application Settings.
2. Click Delivery Targets. The Delivery Targets page displays the delivery targets that you have configured.
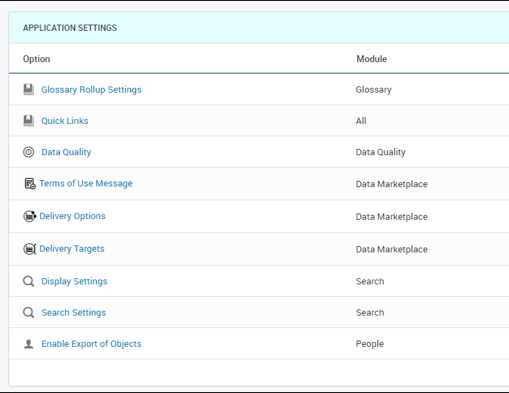
Figure 67. Delivery Targets Page
3. Click Create to configure a new delivery target for a system.
Option |
Value |
Description |
Name |
Mail Delivery Target |
Name of the delivery target. |
Description |
The target for all kind of mail delivery for CMD |
Description of the delivery target. |
Preferred Target |
TRUE |
Specify the delivery target as the default for the system. This target is the default delivery target that appears when data owners create data collections. |
System |
tcoleman_DARWIN |
Enter the Axon systems for which you want to specify the data presentations. |
Default Location |
NA |
The default location to deliver the data collection. Specify the location that is most suitable for the data format and method. |
Presentation |
CSV, Email Delivery XML, Email Delivery JSON, Email Delivery |
Data presentation for the Axon systems. |
Status |
ACTIVE |
Select Active to make the delivery target available for data owners. Select Deprecated to save the delivery target but make it unavailable for data owners for use. |
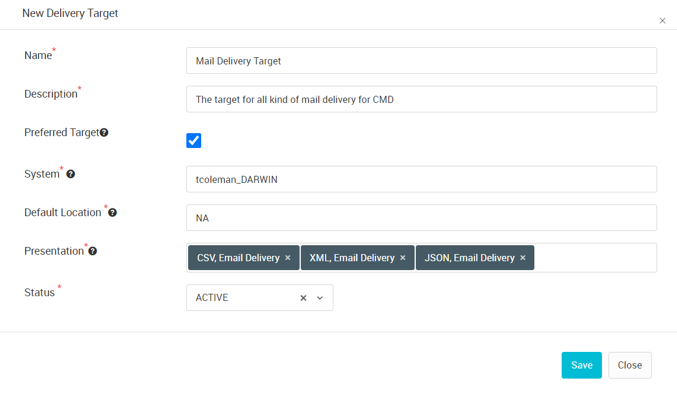
Figure 68. New Delivery Target
4. Click Save.
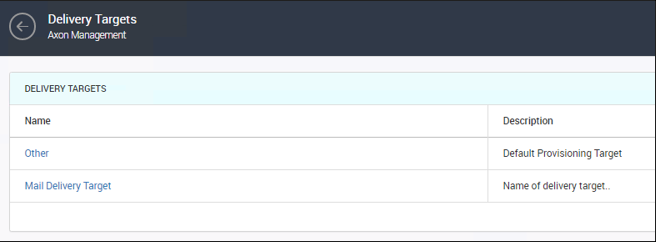
Figure 69. Save Delivery Targets
Enter the terms of use message that appears when Data Consumers request access to a data collection.
The terms of use provide usage requirements and guidelines that a data consumer must accept to use the data.
1. On the navigation pane, click Customize & Configure à Application Settings à Terms of Use Message.
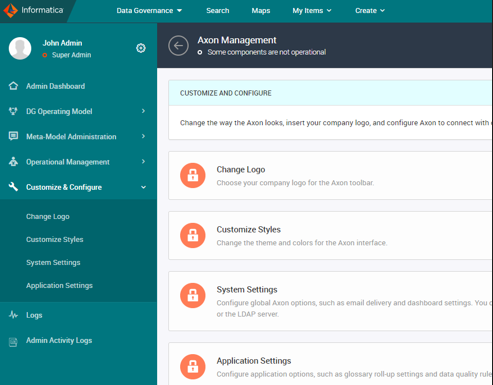
Figure 70. Terms of Use Message
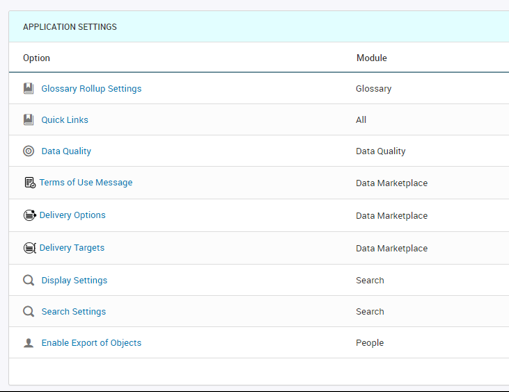
Figure 71. Application Settings
2. Click Show Editor.

Figure 72. Show Editor
3. Open Terms_Of_Use.rtf using WordPad.
Copy the sample content.
Note: You should have your legal department review this content before making it available in a production environment.
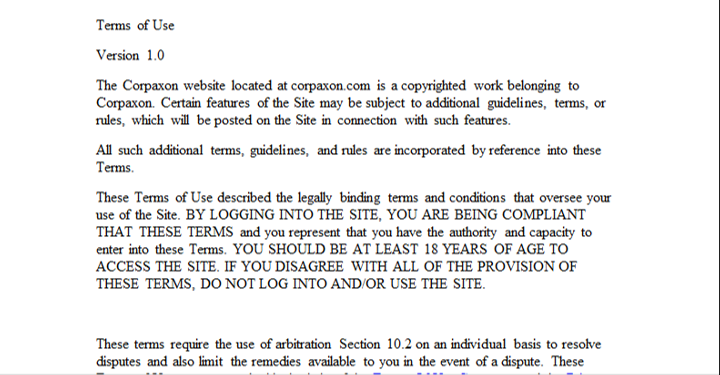
Figure 73. Terms of Use
4. Paste it over the blank field in Axon.
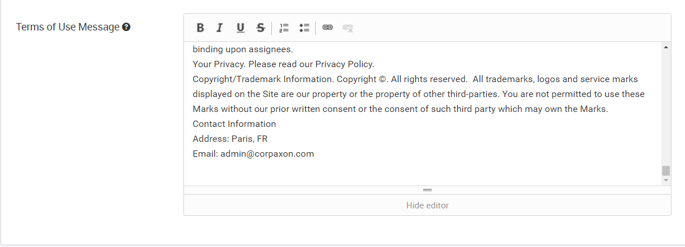
Figure 74. Terms of Use Message
5. Click Save & Close.
Following are the steps:
1. In the menu on the left, click Dropdown Configurations under Meta-Model Administration.
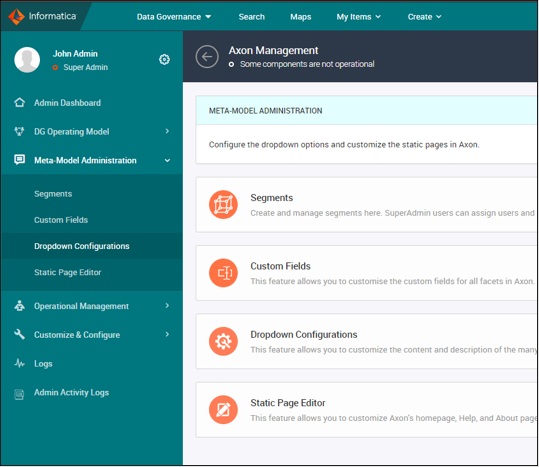
Figure 75. Dropdown Configurations
2. In the Dropdown Configurations page, type Policy in the Module field and select Policy Type from the Choice property list.
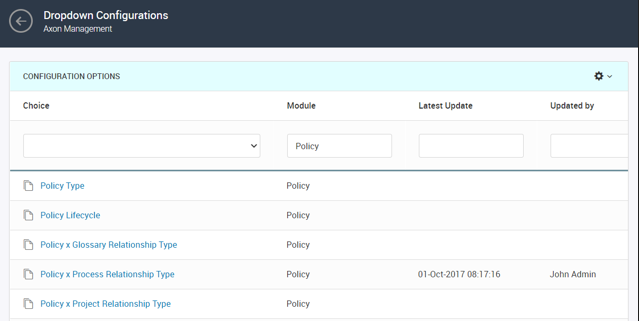
Figure 76. Policy and Policy Type
Axon filters the list of choices to display the options available in the facet that you selected.
Note: You must not update the values for the Axon Status module in the dropdown configuration list.
3. On the configuration page, click the + icon to add a new item to the dropdown menu.
4. Configure the following properties:
Primary Name |
Description |
EULA_Information |
End-User License Agreement Information |
EULA_Confirmation |
End-User License Agreement Confirmation |
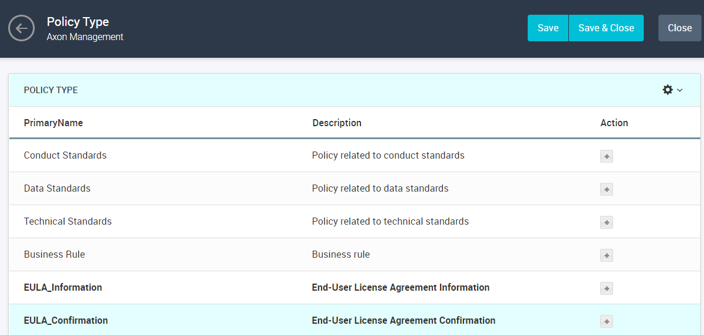
Figure 77. Policy Type
Specify a description that Axon will display in the dropdown menu.
5. Click Save and Close.
When data owners publish data assets to the Data Marketplace, they must add the data sets within a data category. Data categories help data owners publish the data to appropriate groups so that data consumers can search the data assets easily.
1. In the Axon toolbar, click Create à Upload from a file.
Axon displays the Upload from File page. Use the wizard to choose options related to Bulk uploading of data.
From the Upload Type list, select Object for the first drop-down and select Category under the DATA MARKETPLACE subcategory for the second drop-down.
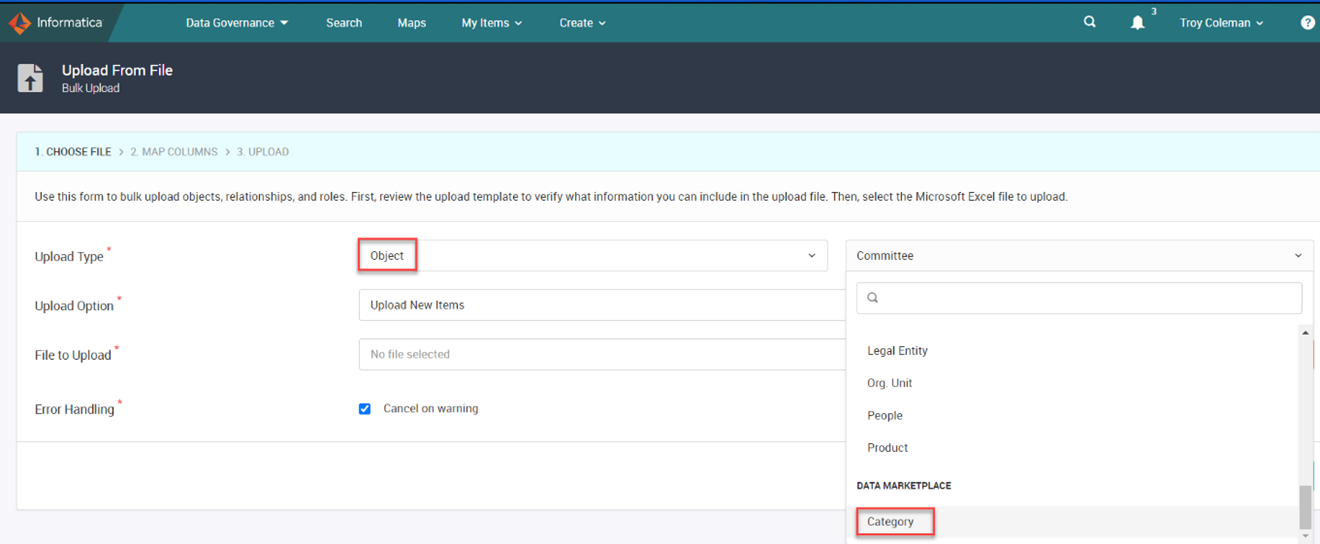
Figure 78. Upload from File
2. Choose Upload New Items as Upload Option.
Note: You can click Download Template.
A Microsoft Excel template is downloaded to the Downloads folder. In the Microsoft Excel template, add the data you want to add or update in Axon, and then save the file.
3. Click Choose File and select the template file from
C:\templates\Categories_DMP_BulkUpload_Template.xlsx
With this file's help, we will add "Sales" as a category in the marketplace.
4. To cancel the upload when Axon detects a conflict, select Cancel on warning.
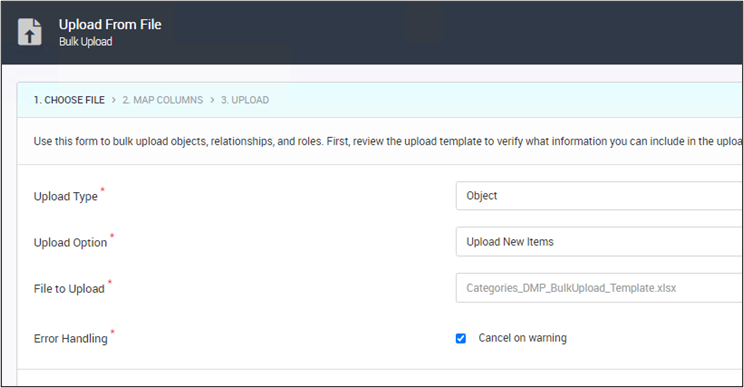
Figure 79. Cancel on Warning
5. Click Next Step — Map Columns.
After you upload the template, you need to map the template columns with the Axon properties to start the Bulk upload process.
We have used the sample data, which will be mapped automatically without any issue. Still, if you need to map manually, you can double-click a column in the Column in Uploaded File column and select the value that corresponds to the value in the Axon Field column.
6. Click Next Step — Start Upload.

Figure 80. Start Upload
In the Upload step of the wizard, review the progress of the upload task.

Figure 81. Upload
If the upload fails, you can download the error report to troubleshoot the upload.
For instance, let see the following Bulk Upload error report:

Figure 82. Bulk Upload Error Report
As you observe the message, The ID column requires a value. This means the "id" field is mandatory, and it must have a value for each Category. To resolve this, we need to provide unique values in the id field of all the categories present in the Bulk upload file and then again perform the Bulk upload operation.
Axon displays a progress bar and a message to indicate the progress of the upload task.
- To view the status of the bulk upload job, click Go to My Jobs. Axon displays the list of pending tasks in the My Jobs page of the Activity Stream tab. You can open the My Jobs page from the People object to viewing the upload task's progress in the Status column at any time.
- From the Action column on the My Jobs page, you can upload a fixed file again or download the original file you uploaded.
- Optionally, click the Notifications icon on the Axon toolbar and click the Bulk Upload tab to see the pending task's progress.
In CorpAxon, John Steward is the Data Steward for the sales team. John Steward has maintained his team's sales data in Axon and tagged the data with up-to-date Axon values. The sales team decides to make the data for demand trends available to other groups in the organization. John Steward identifies the data sets in Axon that might be useful for other teams.
He will be using the tcoleman_DG_SALES_GLOBAL_DATA.csv dataset. Before he publishes a data set from Axon Data Governance to the Axon Data Marketplace, he must prepare the data set by adding helpful details and connecting the relevant policies.
Follow the steps:
1. Log in to Axon. Go to the Unison Search page by clicking on the Search button.
2. Enter tcoleman_DG_SALES_GLOBAL_DATA.csv in the search field for datasets facet and click Search.

Figure 83. Unison Search Page
3. Press and hold CTRL (Command key in Mac) and Click the first Dataset Name tcoleman_DG_SALES_GLOBAL_DATA.csv
A new tab will open. Navigate to the newly opened account in Chrome.
4. Go to the DATA QUALITY section to check if this data set passes the data quality rules or not.
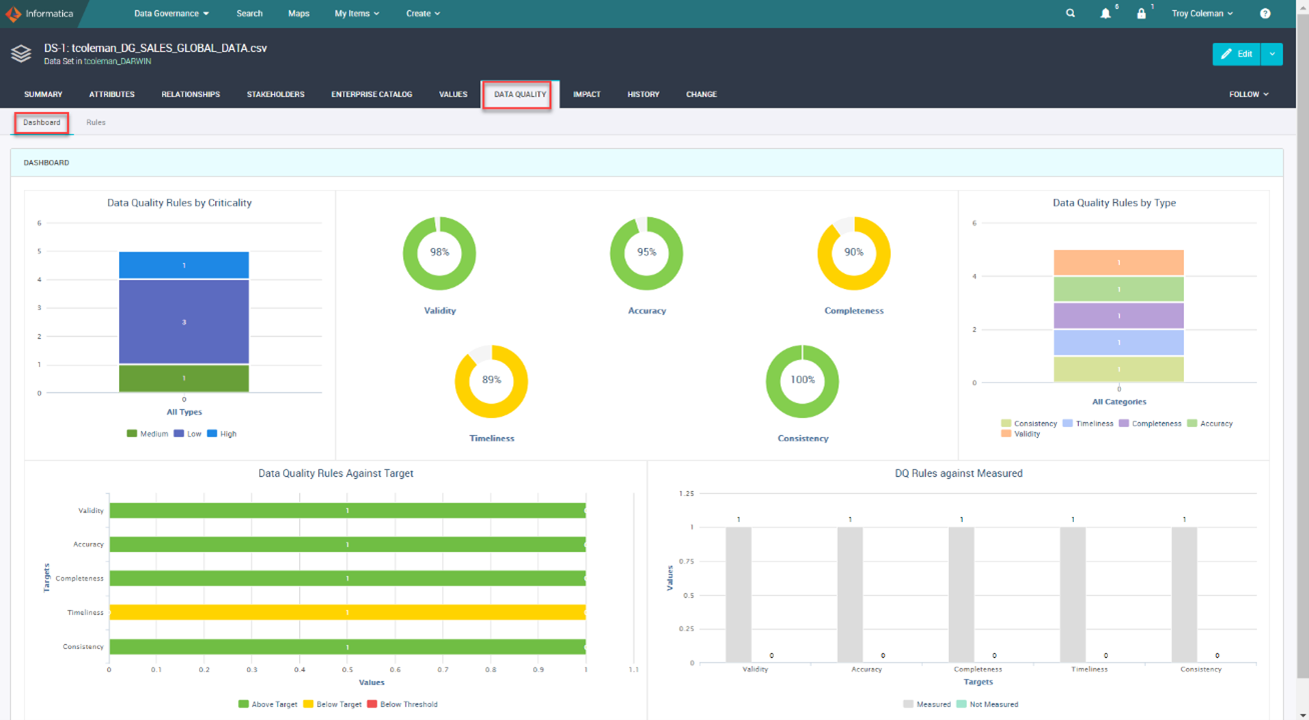
Figure 84. Data Quality
It seems like this data set is in good shape.
Now he should also link some policies to this data set. He cannot link a Policy object directly to a Data Set object. Instead, he can link a Data Set object to a Glossary or System object and attach the System or Glossary object to the Policy object.
5. Go to the Summary tab to know about the linked Glossary and System.

Figure 85. Summary Tab
John decides to link a Policy object to the tcoleman_DARWIN System. To do that, he needs to create a policy object first.
6. Click Create > + Business & Change > Policy.
7. Enter the following values for the respective properties while creating the new policy.
Name: End-User License Agreement
Description: End-User License Agreement for the consumption of Data
Type: EULA Information
Internal: True
Axon Status: Active
Lifecycle: Enforced
Axon
Viewing: Public
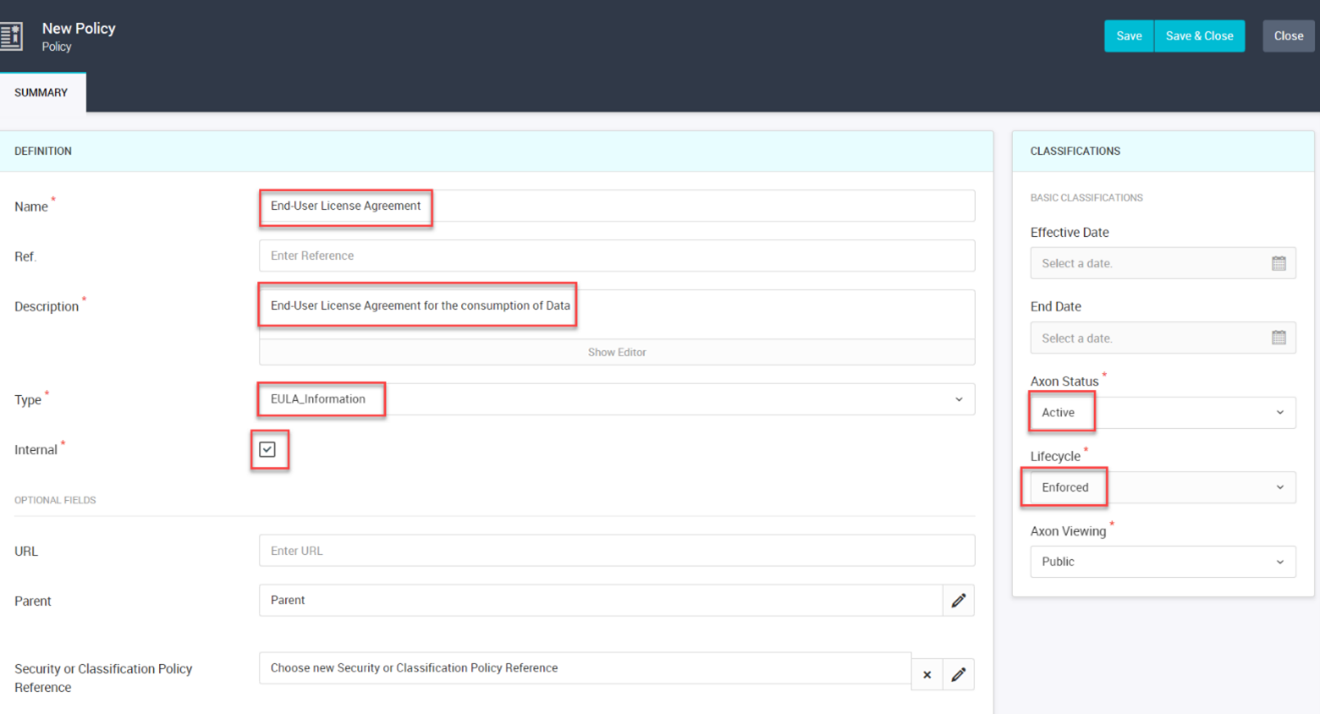
Figure 86. New Policy
8. Click Save.
9. Go to the Impact tab and select the System sub-tab.
10. Now, under the System grid, click in System Name and choose tcoleman_DARWIN
Relationship Type: Policy is regulating System
System Name: tcoleman_DARWIN
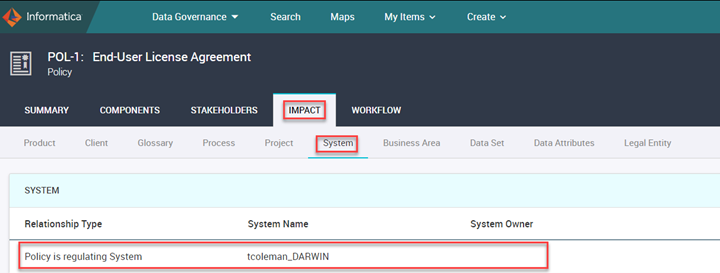
Figure 87. End-User License Agreement
11. Click Save & Close. The data is now ready for use by other business teams in the organization.
John Steward has done his job by preparing the Data Set. Now, he requests the Marketplace Administrator to publish the data set tcoleman_DG_SALES_GLOBAL_DATA.csv linked to the tcoleman_DARWIN System to the data marketplace under the SALES category.
John Admin is the Marketplace Administrator, so the next action item is on John Admin.
Follow the below steps:
1. Log in as John Admin using the available login script.
2. Go to the Unison Search page by clicking on the Search button.
3. John Admin can use the advanced search feature of unison search to find the data set name tcoleman_DG_SALES_GLOBAL_DATA.csv, which is linked to a system named tcoleman_DARWIN.
4. Enter tcoleman_DG_SALES_GLOBAL_DATA.csv in the search field, select Data Set as facet from the dropdown next to it. And click Search.
5. Click Find to open the operator dropdown and Select AND operator. Enter tcoleman_DARWIN in the search field, select System as facet from the dropdown next to it. And click Add to Search.
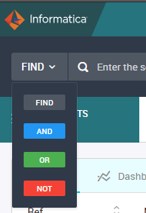
Figure 88. Click Find

Figure 89. Search Field
6. Now, go to the DATA SET tab to get the tcoleman_DG_SALES_GLOBAL_DATA.csv data set linked with the tcoleman_DARWIN System.

Figure 90. Data Set Tab
7. Select the row and click Bulk Publish.

Figure 91. Bulk Publish
1. When we publish data to the marketplace, we must give the Category and Numbering Prefix as required input.
As John Steward mentioned, his data set is about Sales data, so it should go to the sales category.
2. Click on the pencil icon on the category field to select a category.
3. Select SALES.
4. Enter SALES as a numbering prefix.
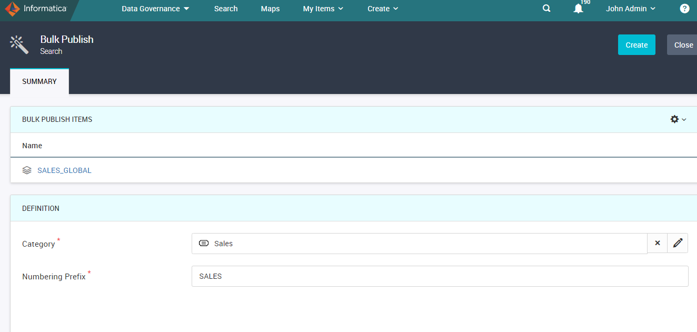
Figure 92. Bulk Publish Summary
12. Click Create to publish the data set.
John Admin is not done yet; he should make John Steward as Data Owner and Ramesh Gupta as Technical Owner of this data set. A data owner (John Steward) should also select the delivery options for a data collection after their data set is published for the end-user to consume. This task can also be performed by Marketplace Administrator (John Admin).
13. Launch Data Marketplace and go to the home tab.
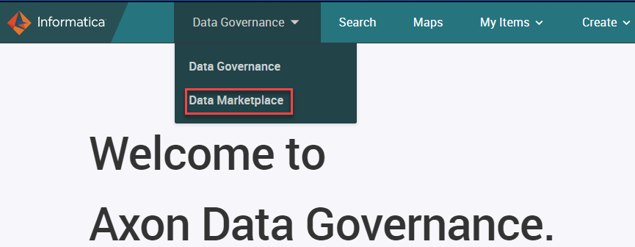
Figure 93. Data Governance – Home Tab

Figure 94. Data Marketplace
14. In the search box, enter “SALES_GLOBAL” and click Search.
15. Select the SALES_GLOBAL data collection to view it.

Figure 95. Data Collections
16. Click on Edit.
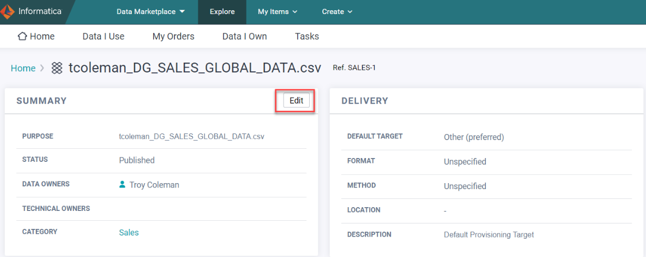
Figure 96. Explore – Edit
17. Click and add John Steward as Data Owner and Ramesh Gupta as Technical Owner. Then click on Save.
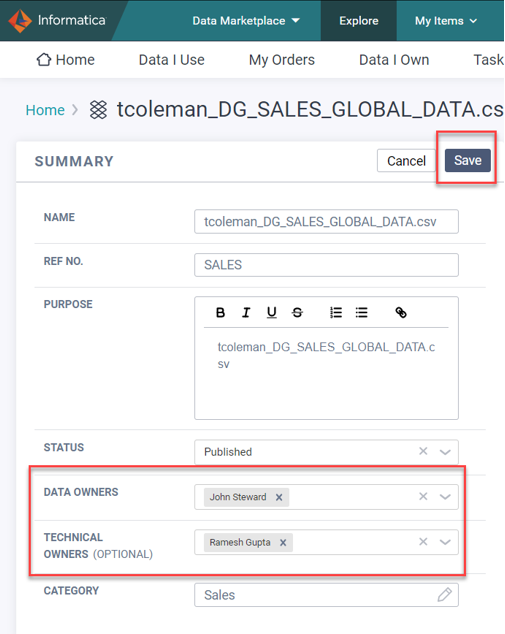
Figure 97. Select Data & Technical Owners
18. Now scroll down and click on the Delivery tab to set delivery options for this data collection.
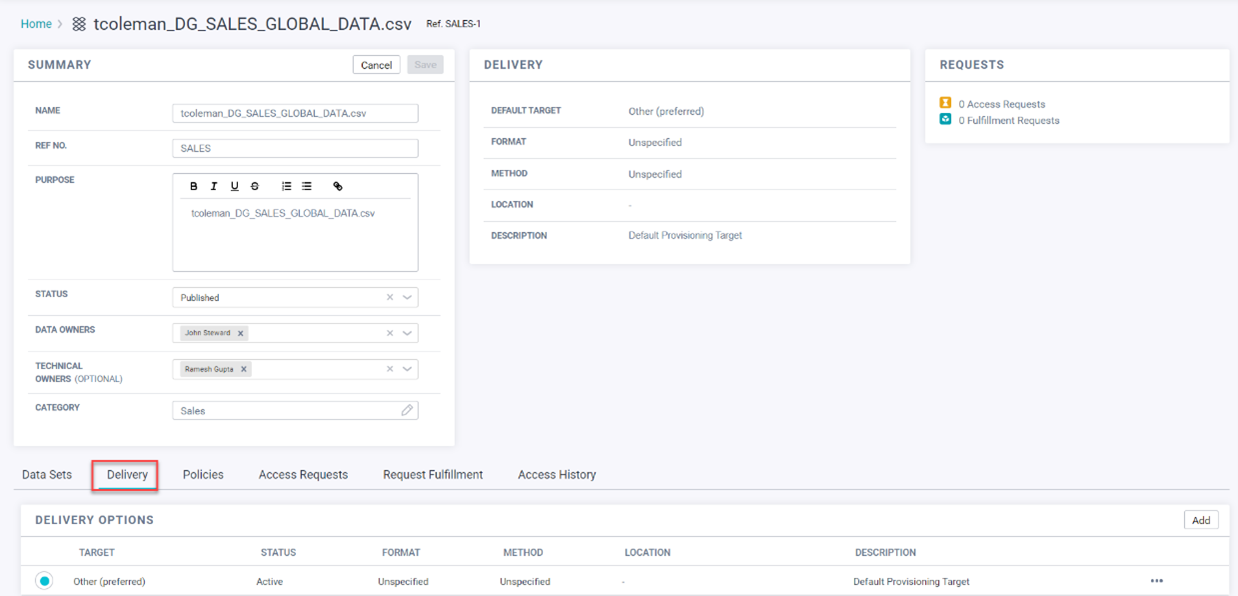
Figure 98. Delivery Tab
19. Click Add.

Figure 99. Click Add
20. Add the following delivery options for this data collection.
Option 1
Target: Mail Delivery Target
Status: Active
Format: CSV
Method: Email Delivery
Option 2
Target: Mail Delivery Target
Status: Active
Format: JSON
Method: Email Delivery
21. Make the CSV format mail delivery a default delivery option by selecting the list item.

Figure 100. Delivery Option
Martin Hirst needs to search for the data which is related corresponding to Sales. Search for data collections in the Data Marketplace to find data assets that he can use to feed in the AI&ML model.
1. Log in as Martin Hirst.
2. Launch Data Marketplace and go to the Home tab.

Figure 101. Data Governance

Figure 102. Data Marketplace
The page displays the data collection categories that the Axon Super Admin or Data Marketplace Admin has created.
3. Expand the All Categories menu to see the data collection subcategories and select Sales categories.
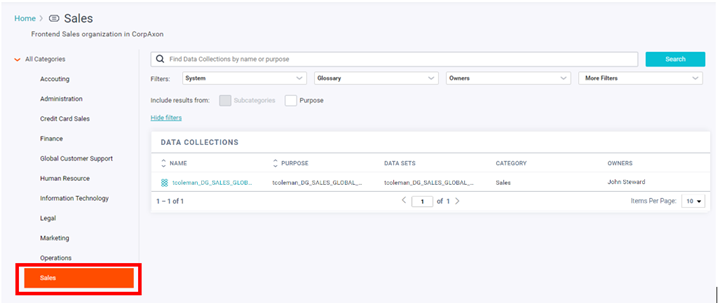
Figure 103. Sales Categories
You can click the column headings to sort the list. In the left menu, you can browse for data collections by their categories and subcategories.
4. In the search box, enter a search term for the data you want to find, and click Search.
5. To filter the search results, click Show filters.
Note: Use filters to see data sets associated with specific facet objects in Axon.
6. Select the tcoleman_SALES_GLOBAL data collection to view it.
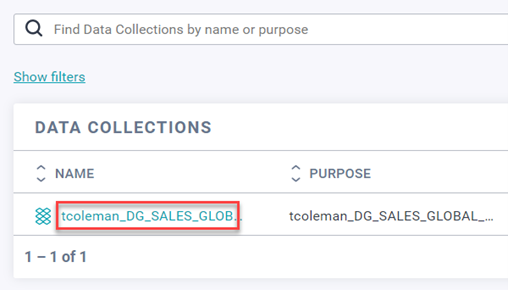
Figure 104. View Data Collections
7. View the Summary section of the page to see the properties of the data collection.
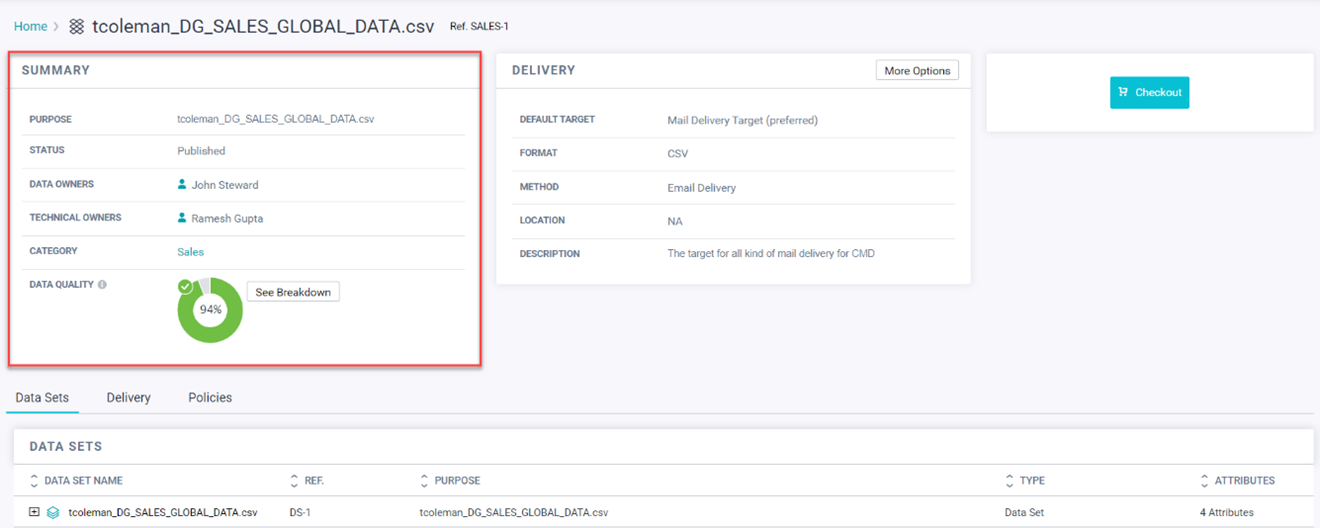
Figure 105. View Summary
8. Click on See Breakdown to see the data quality score parameters of the Data Collection.
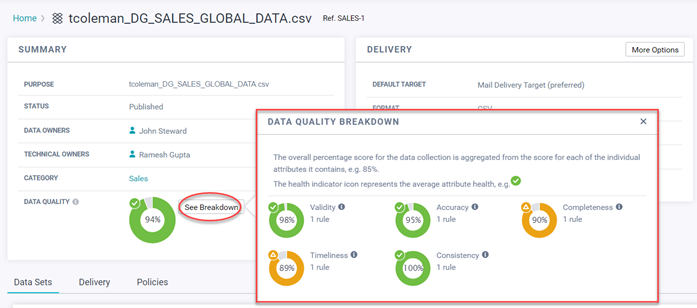
Figure 106. See Breakdown
9. View the Delivery section of the page to see the delivery properties of the data collection.
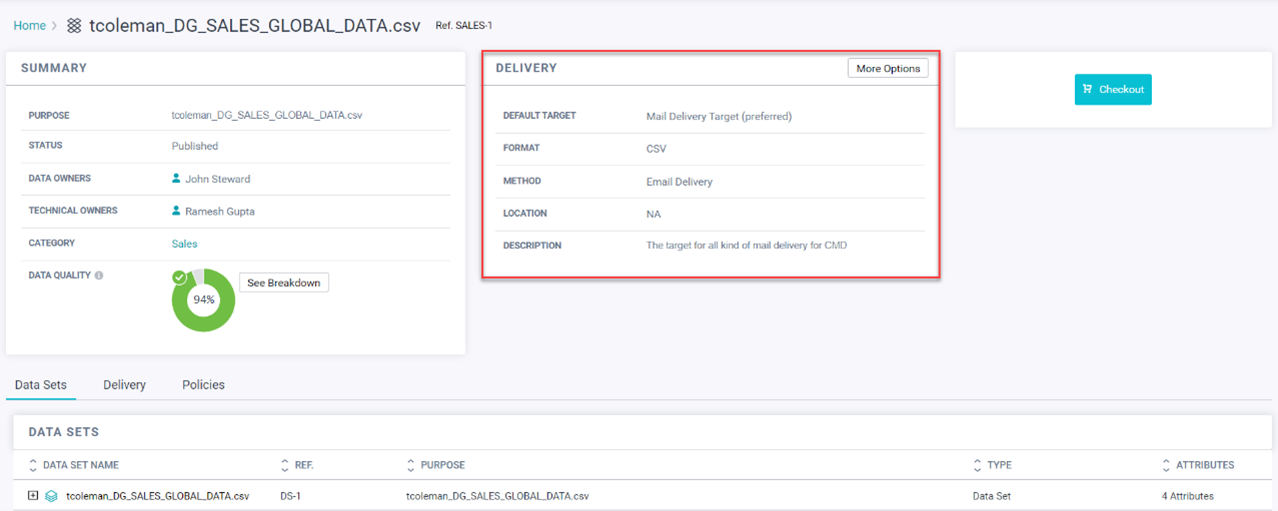
Figure 107. View Delivery Section
10. Click on the sign at the left of the Data Set Name to see the attributes available inside the dataset.
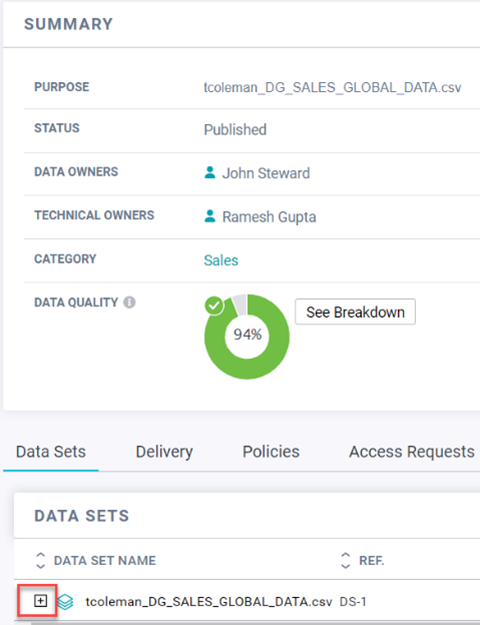
Figure 108. Dataset Summary
 Figure 109. Dataset Attributes
Finally, seeing the data collection statistics, Martin realized this is the data asset that he needs; he must request the data owner (John Steward) for access to the data.
1. Click Checkout.

Figure 110. Checkout Page
The Checkout page for the data collection appears.
2. In the Request Details step of the checkout process, enter the following properties:
- Business Justification: Input to the AI&ML model for better prediction.
- Delivery Target: Default
- Delivery Request: Deliver the request to the following email ID: Martin.Hirst@corpaxon.com
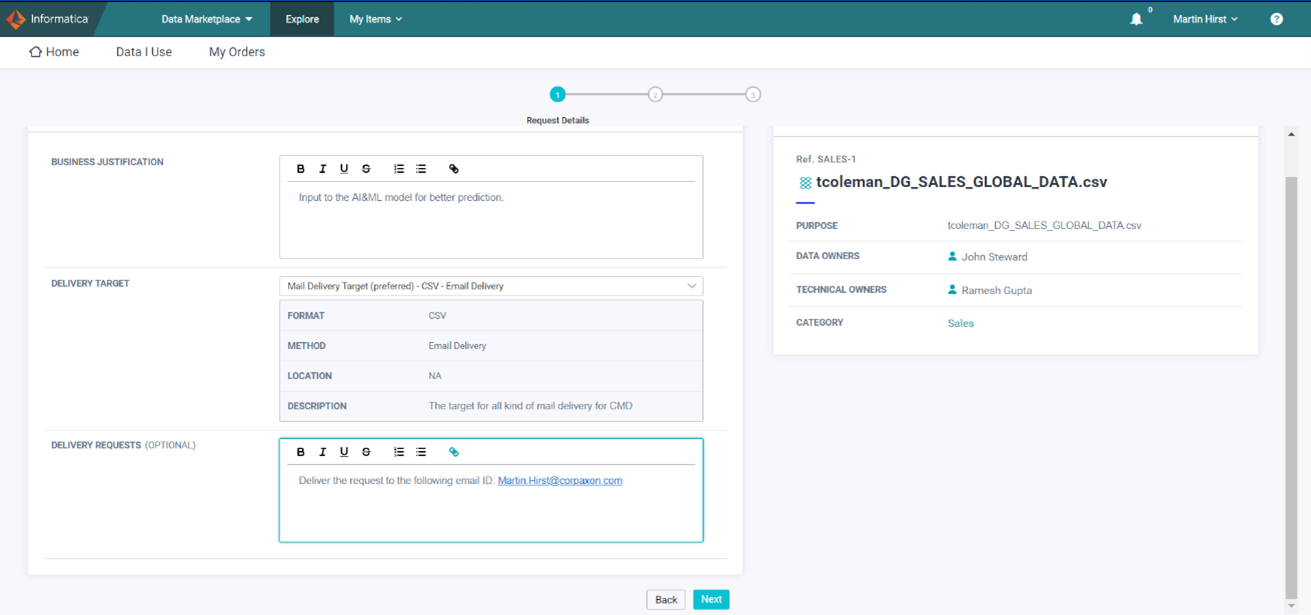
Figure 111. Request Details
3. Click Next.
The Usage Guide step of the data collection appears.
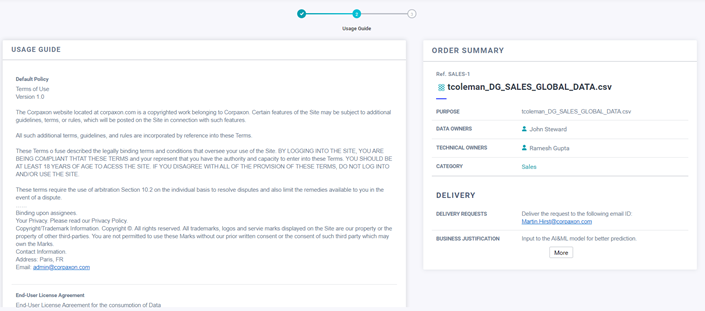
Figure 112. Usage Guide
4. In the Usage Guide step of the checkout process, read and accept the policy for using the data collection.
5. Scroll down the page and click Submit Order.
You have placed an access request for the data collection.
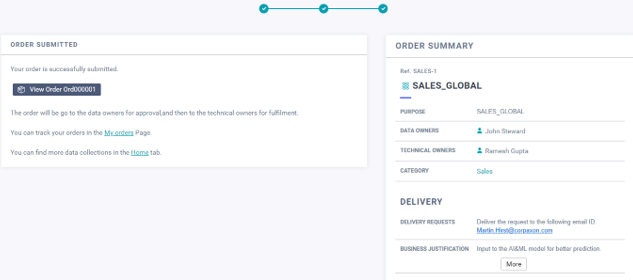
Figure 113. Order Submitted
6. In the Order Submitted step of the checkout process, review your order. Click View Order to view the details of the order.
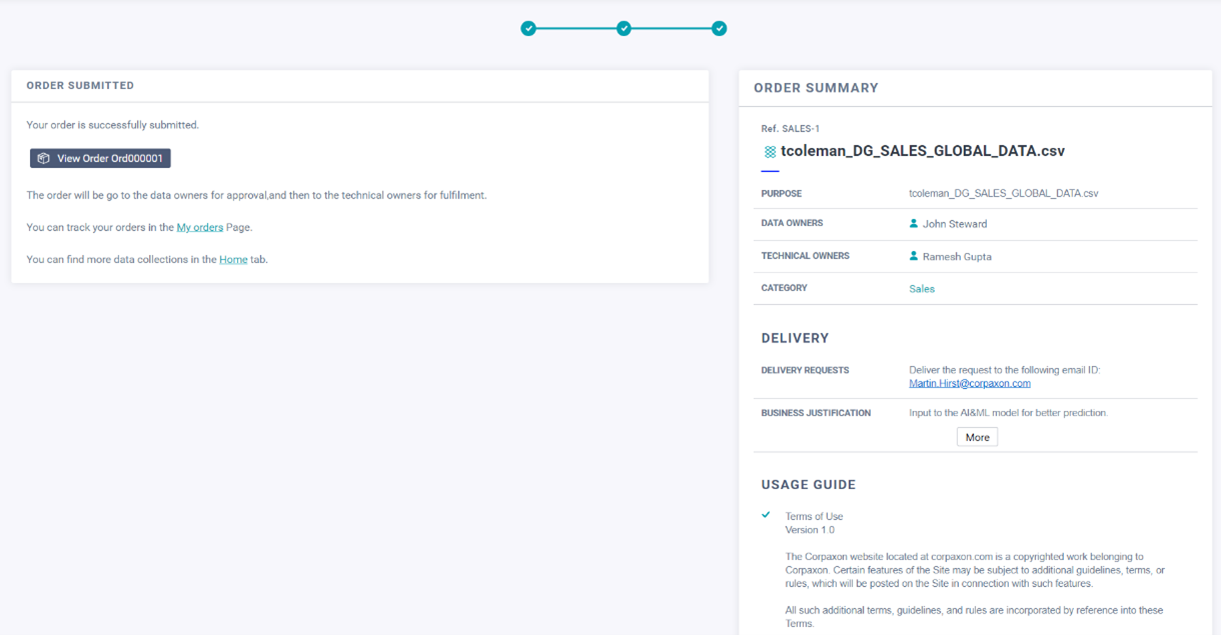
Figure 114. View Order
Your request to access the data collection is complete.
The Data Owner or Data Marketplace administrator can see your request in the Data Marketplace and decide whether to approve or decline the offer.
Martin uses the checkout process in the Data Marketplace to request access to the data. John Steward can see in the Data Marketplace that Martin wants access to the data. John approves Martin's request.
1. Log in as John Steward using login scripts
2. Launch Data Marketplace and go to the Tasks tab.
3. Go to the Requests sub-tab to see the data collections that are waiting for your approval.

Figure 115. Requests Sub-tab
4. In the list of access requests, click on the Order number to open the access request.
Figure 116. Requests – Order Number
The page displays the timeline, summary, and delivery details of the order.
5. In the Timeline section of the order details page, you can see the history of the access request's interactions.
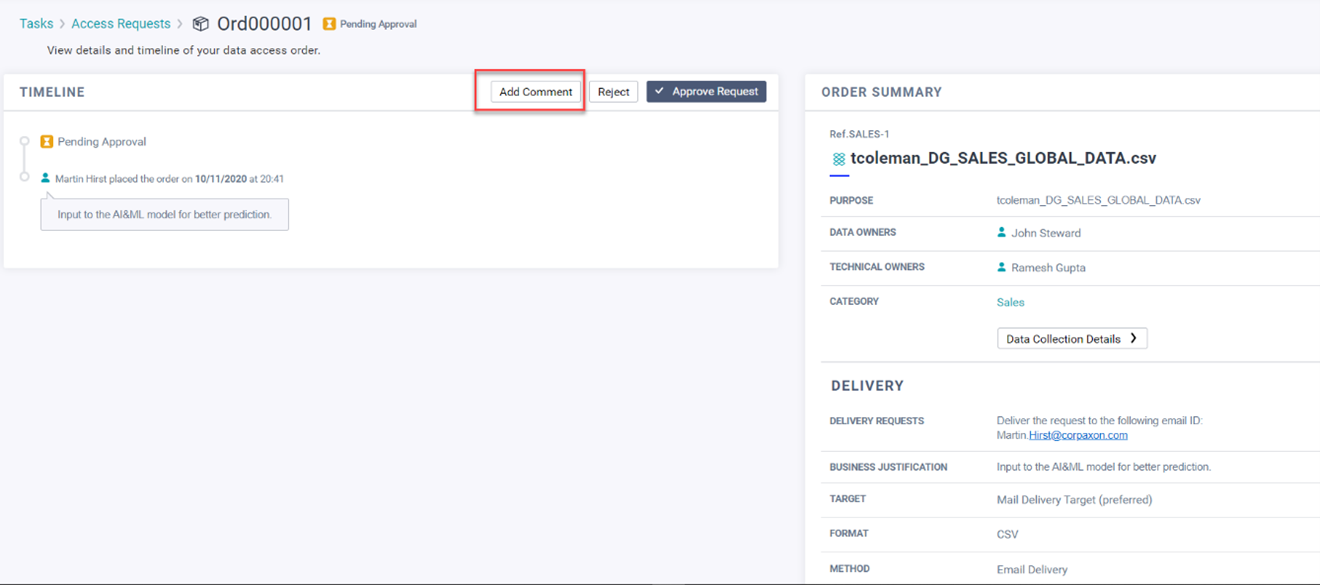
Figure 117. Timeline Section
6. Click Add Comment to add a comment to the access request.
7. Enter the comment "Request Approved" in the Add Comment section.
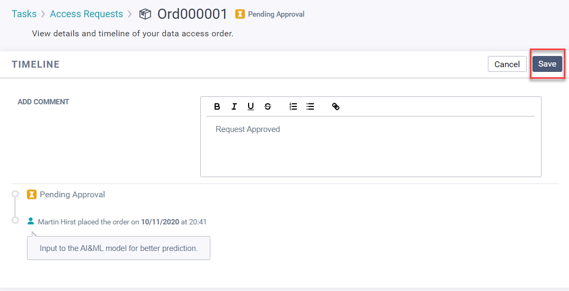
Figure 118. Request Approved
8. Click Save
9. Click Approve Request.
If you log in as Martin, under the My Orders section, you can see that the order is now approved and in Fulfillment Stage.

Figure 119. My Orders
Ramesh Gupta is the designated Technical Owner for the data in Axon.
Ramesh can see in the Data Marketplace that John has approved Martin's request for the sales data.
Ramesh grants Martin access to the data.
This data source is a Microsoft CSV file. Ramesh will share the CSV file through a shared drive link in an email.
Other delivery options would be to use EDC provisioning.
After delivering the data to Martin, Ramesh marks the order as fulfilled in the Data Marketplace.
1. Log in as Ramesh Gupta
2. Launch Data Marketplace and go to the Tasks tab.
3. Go to the Fulfillment sub-tab to see the data collections that are waiting for your delivery.

Figure 120. Fulfillment Sub-tab
4. In the list of fulfillment requests, click on the Order number to open the access request. On this page, Ramesh can find the email address for the data delivery request.
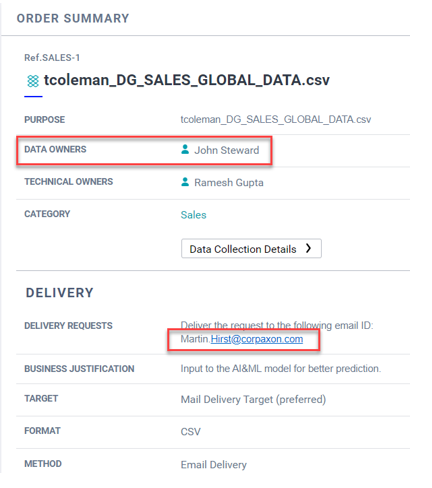
Figure 121. Order Summary
5. Deliver the data to the Data Consumer. Ramesh is supposed to do this step outside the Axon Data Governance environment. (Send the file to the email address.)
6. Click Fulfill to enter the details of the request fulfillment.
7. Select the delivery target, which has been used to deliver the data.
8. Enter "Request Fulfilled. Please check your email for the data delivery." in the add comment section.
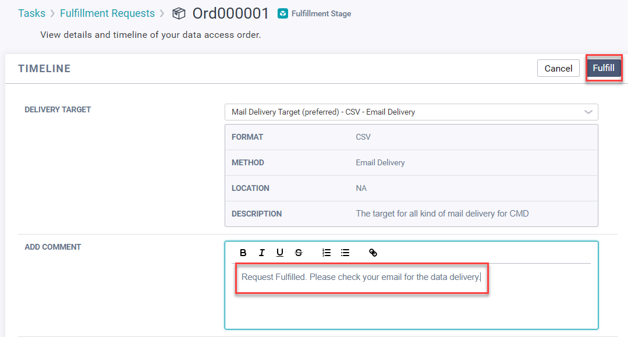
Figure 122. Add Comment Section
9. Click Fulfill to mark the data access request as fulfilled. If you log in as Martin, you can see that the order is now fulfilled under the My Orders section.

Figure 123. Order Fulfilled
You have completed configuring and shopping for Data on Informatica Axon Data Marketplace.
